
English
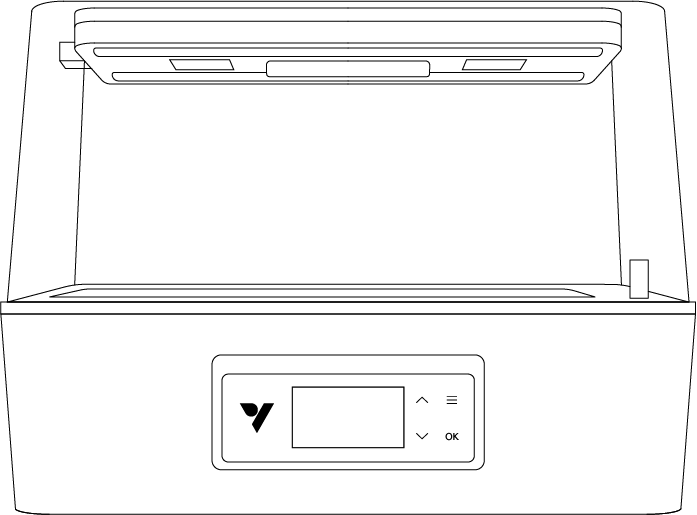
VSeed Smart Seedling Box Manual
Model Name
-
VSS-VSS40
-
VSS-VSS40-EU
-
VSS-VSS40-UK
-
VSS-VSS40-AU
Safety Information
|
General Handling & Inspection
Inspect Before Use: Visually inspect the VSeed and its power cord for any loose parts or damage before every use. Do not operate if any damage is found.
Indoor Use Only: This device is designed exclusively for indoor use. Do not expose it to severe weather conditions or extreme outdoor environments.
Avoid Physical Damage: Handle with care. Protect the unit from drops, heavy impact,or rough handling.
Keep Away from Children and Pets: This device contains electrical components and heating elements. It is not a toy. Do not allow children or pets to lean on or play with the unit or cables.
Electrical Safety
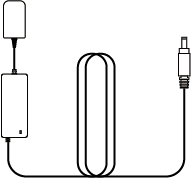
Use Original Adapter: Use only the original power adapter provided with the VSeed. Ensure your local wall outlet voltage matches the product’s specifications.
Cord Placement: Ensure all cables are routed carefully away from walkways to avoid tripping hazards. Do not allow cords to hang over the edge of a table or counter.
Damaged Cords: Do not operate the unit if the power cord or plug is damaged, frayed, or securely compromised.
Wet Hands Warning: Never plug in, unplug,or handle the power adapter or electrical components with wet hands.
Unplug When Not in Use: Always unplug the device from the outlet when it is not in use for extended periods, before moving it, or before adding/removing water.
Placement &Operation
Stable Placement: Place the VSeed on a flat,stable, und water-resistant surface. Do not place it on carpets, rugs, or delicate wood furniture to prevent potential water damage from accidental spills.
Ventilation Clearance: Keep at least 10cm (4 inches)of clearance around all vents. Never block the intake or exhaust fans,as this may lead to overheating and fire hazards.
Environment: Keep the device away from external heat sources (e.g., radiators,space heaters), AC output vents, and direct, scorching sunlight.
Water & Moisture Precautions
Keep Electronics Dry: While the internal seed trays are designed to hold water, the main device base, electrical housing,and hood are not waterproof.
Do Not Submerge: Never submerge the electrical parts in water or spray water directly onto the fan vents or light panels. Protect the device exterior from excess moisture and dripping water.
Spill Emergency: If water accidentally spills into the fan vents or over the electrical connections, immediately unplug the device from the wall before attempting to wipe it.
Cleaning
To safely clean your device:
Turn off and unplug the power cord first. This prevents electric shock or damage during cleaning. Using a clean, soft, lightly damp, lint-free cloth,gently wipe down the external surfaces. Carefully avoid getting moisture into any openings, vents, or electrical output ports.
Do not use water immersion, harsh cleaning solutions,aerosol sprays,or chemical detergents, which could enter and permanently damage internal components.
Allow your device to air dry completely before reconnecting the power cord and turning it back on.
Repairs & Servicing
If you experience an issue with your device, please contact VIVOSUN Customer Support before attempting any repairs.
Opening the device housing to inspect or repair internal components is only allowed with VIVOSUN’s explicit permission.
Disassembling the device or installing third-party add-ons without permission could damage your device in ways not covered by the warranty. Unauthorized modifications or repairs are made entirely at the user’s own risk.
Key Features
-
All-in-one Propagation System
Seamlessly combines the essential lighting, ventilation, ebb & flow irrigation and water circulation heating for optimal seed starting and cloning.
-
Full-Spectrum Grow Light
Offers a tailored, dimmable light spectrum perfectly tuned for early root development and healthy seedling growth.
-
Dual-Fan Ventilation System
Active intake and exhaust fans regulate internal airflow, effectively preventing excessive moisture, mold, and damping-off.
-
ThermoFlow Propagation System
Integrates automated ebb-and-flow irrigation with continuous circular heating to ensure optimal water delivery and consistent root-zone temperatures.
-
Clear Dome & Easy Maintenance
The high-clarity dome offers a seamless interior view, while the built-in 4L tank ensures up to 2 weeks of continuous, hands-free hydration.
-
Intelligent Smart Control
The VIVOSUN app enables automated lighting & irrigation cycles, remote monitoring, and environmental guidance via your smartphone.
Product Contents
| Image | Quantity |
|---|---|
|
1pcs |
|
1pcs |
|
40pcs |
|
6pcs |
|
1pcs |
|
1pcs |
|
1pcs |
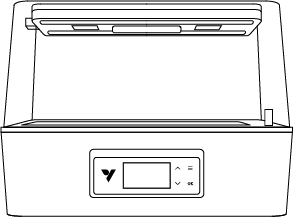




Dimensions
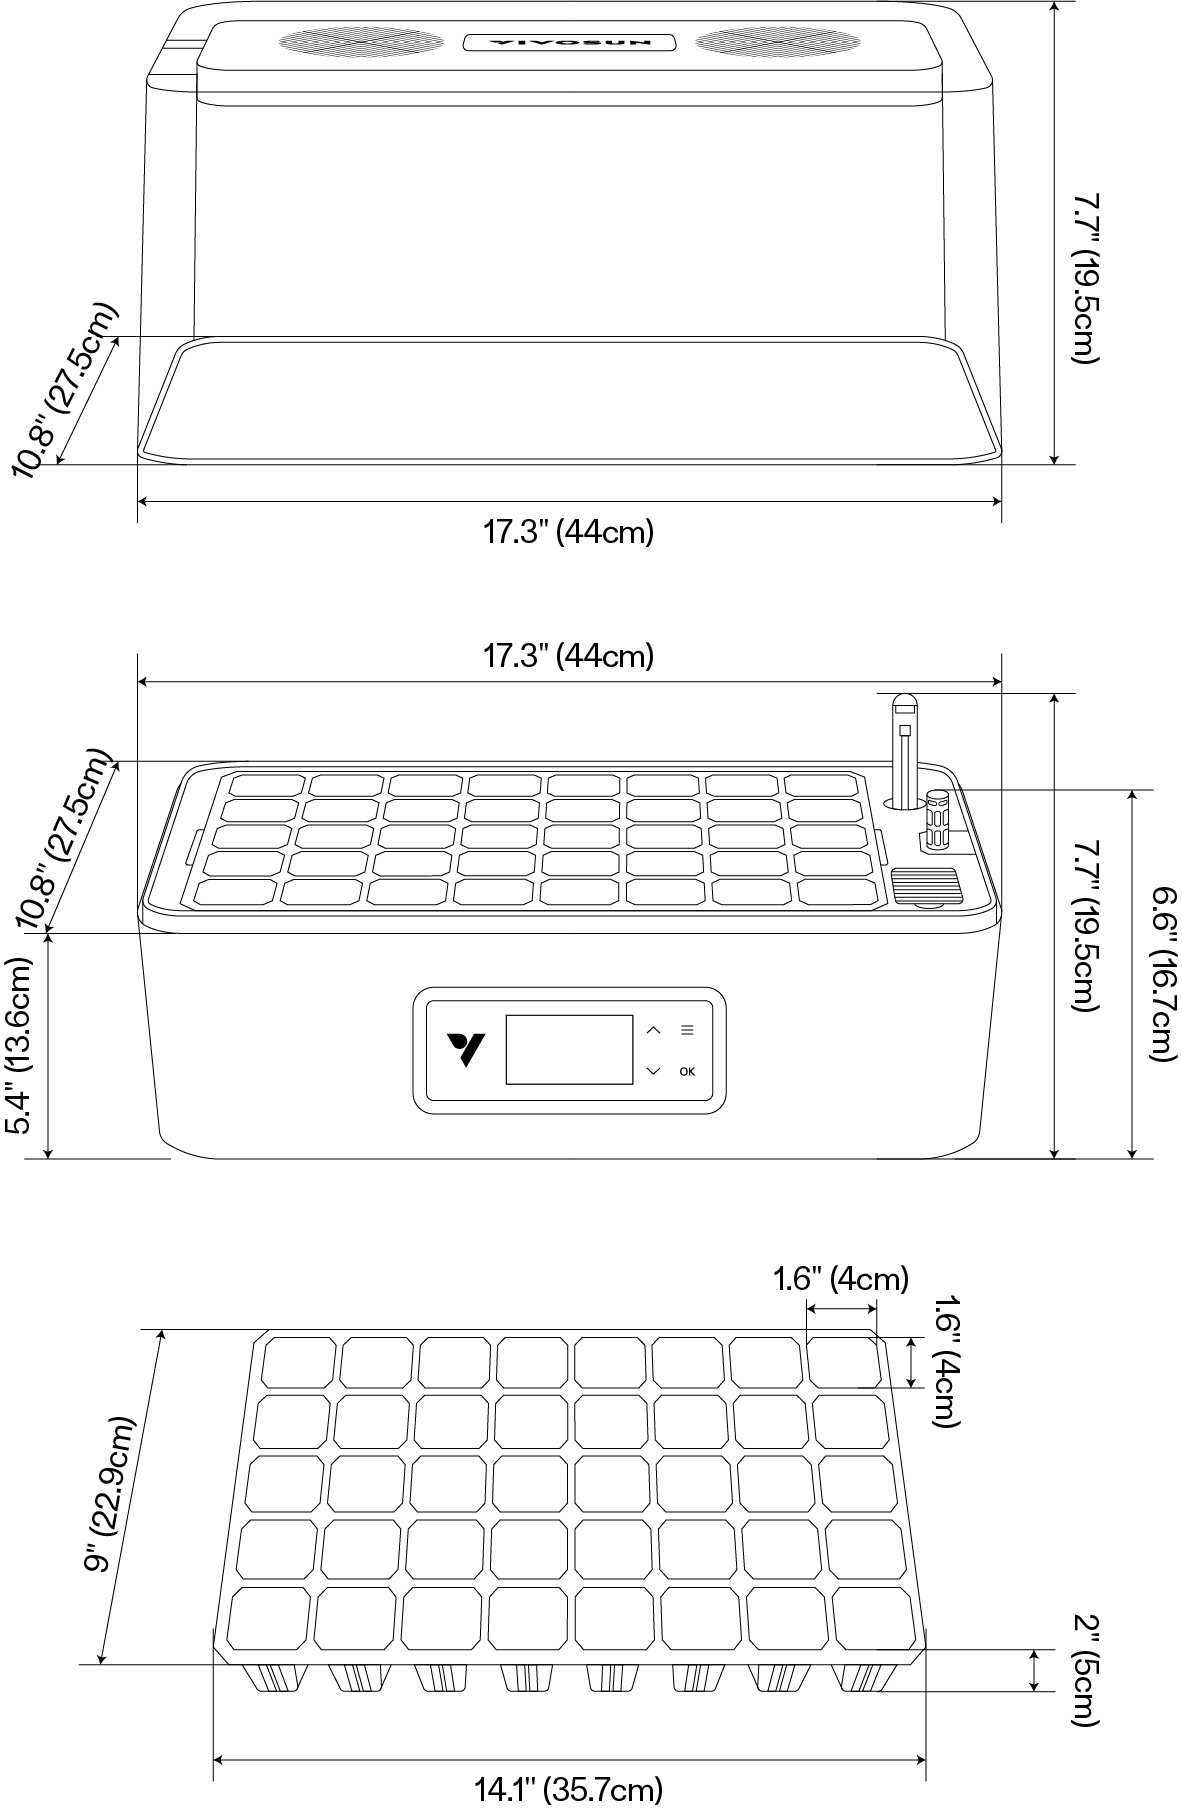
Specifications
Demensions |
17.3*10.8*12.8 inch (44*27.5*32.6 cm) |
Grow Height |
6.7 inch (17 cm) |
Tank Capacity |
1.1 Gal (4L) |
Seed Starter Tray |
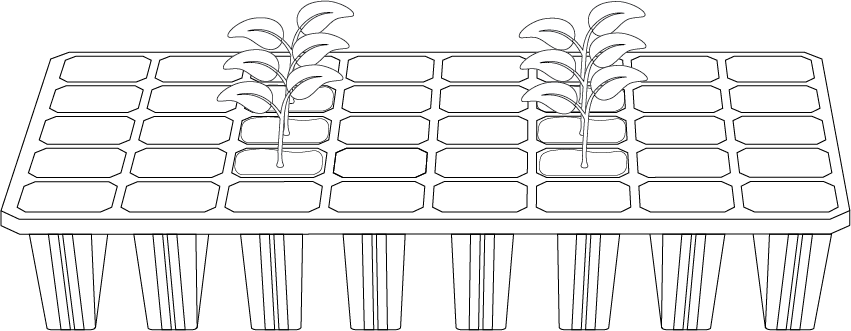
40-tray for versatile plants |
Ventilation |
Active dual-fan airflow (Input Fan: 0.72W & Output Fan: 0.72W) |
Light System |
30W Adjustable Full-spectrum LED Grow Light |
Irriagtion |
Automated ebb-and-flow |
Pump |
DC 5V, 2W, 20 Gal/h |
Heating |
40W |
Max Heating Capacity |
Increases root temperature by 10°C (18°F) at 15°C (59°F) ambient. |
Sensor |
Dome Temperature & Humidity, Root Temperature |
Programming Root Temperature |
68-90°F (20-32°C) |
Temperature Range |
32°F-257°F(0-125°C) |
Humidity Range |
0 to 99% RH |
Operating Temperature |
32° to 140°F (0-60°C) |
Operating Humidity |
35% to 85% RH |
Power Supply |
12V 6A |
Max Power |
70W |
Display Type |
LCD |
Connectivity |
Wi-Fi 2.4G |
App Control |
Vivosun App |
Installation
① |
② |
③ |
|
④ |
|
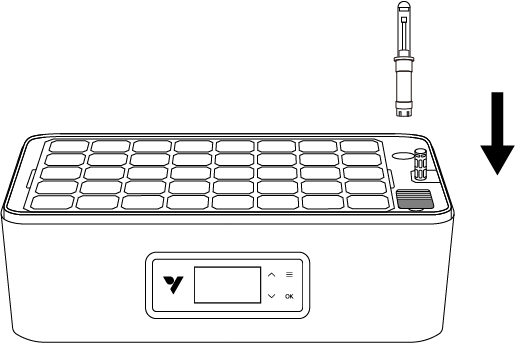
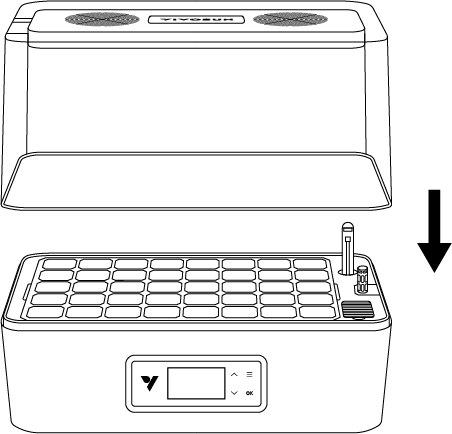
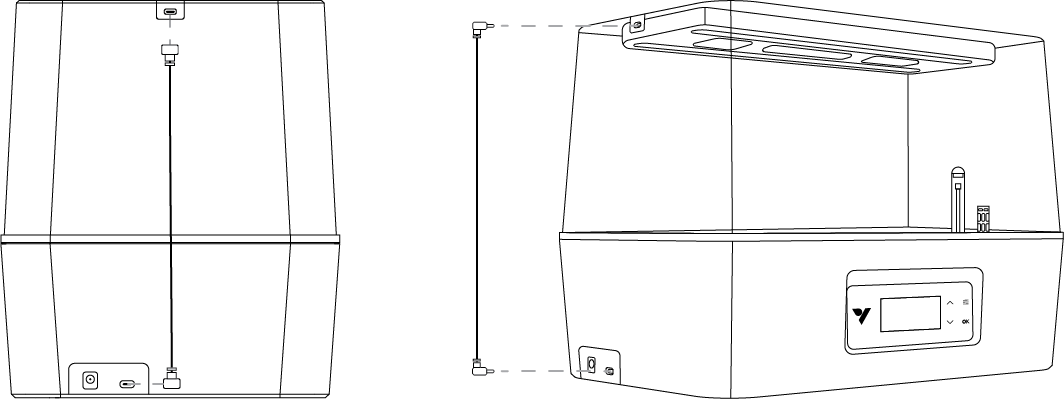
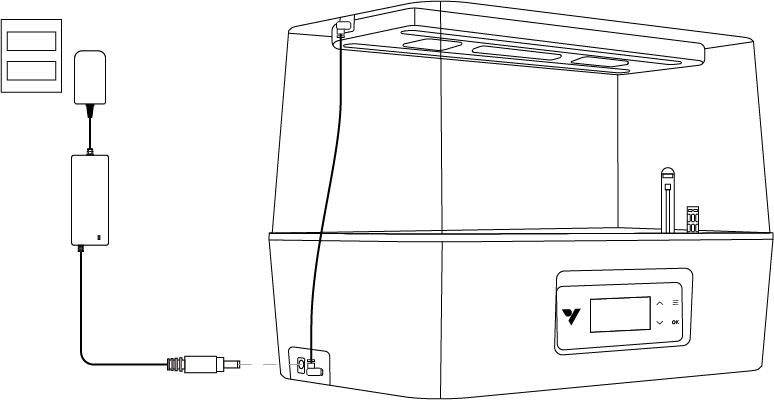
Step 1: Install the water level indicator:
Insert the indicator into the designated hole on the base.
Step 2: Place the lid:
Put the clear dome lid onto the base.
Step 3: Connect the Type-C cable:
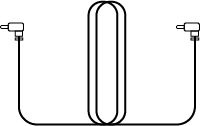
Use the Type-C to Type-C cable to connect the base and the lid.
Step 4: Connect to power:
Plug in the power adapter to turn the device on.
① |
② |
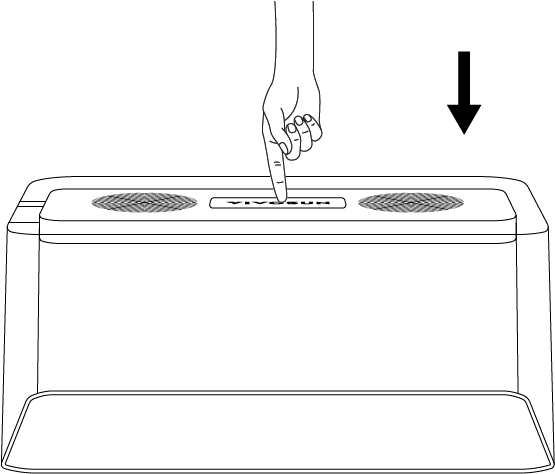
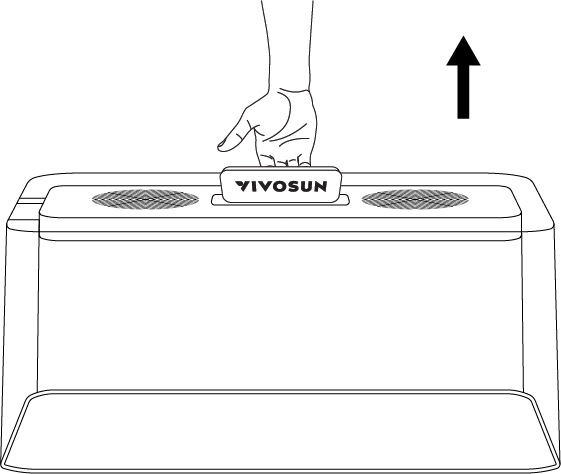
Handle Instruction
Press down on the handle to pop it up.
Connection
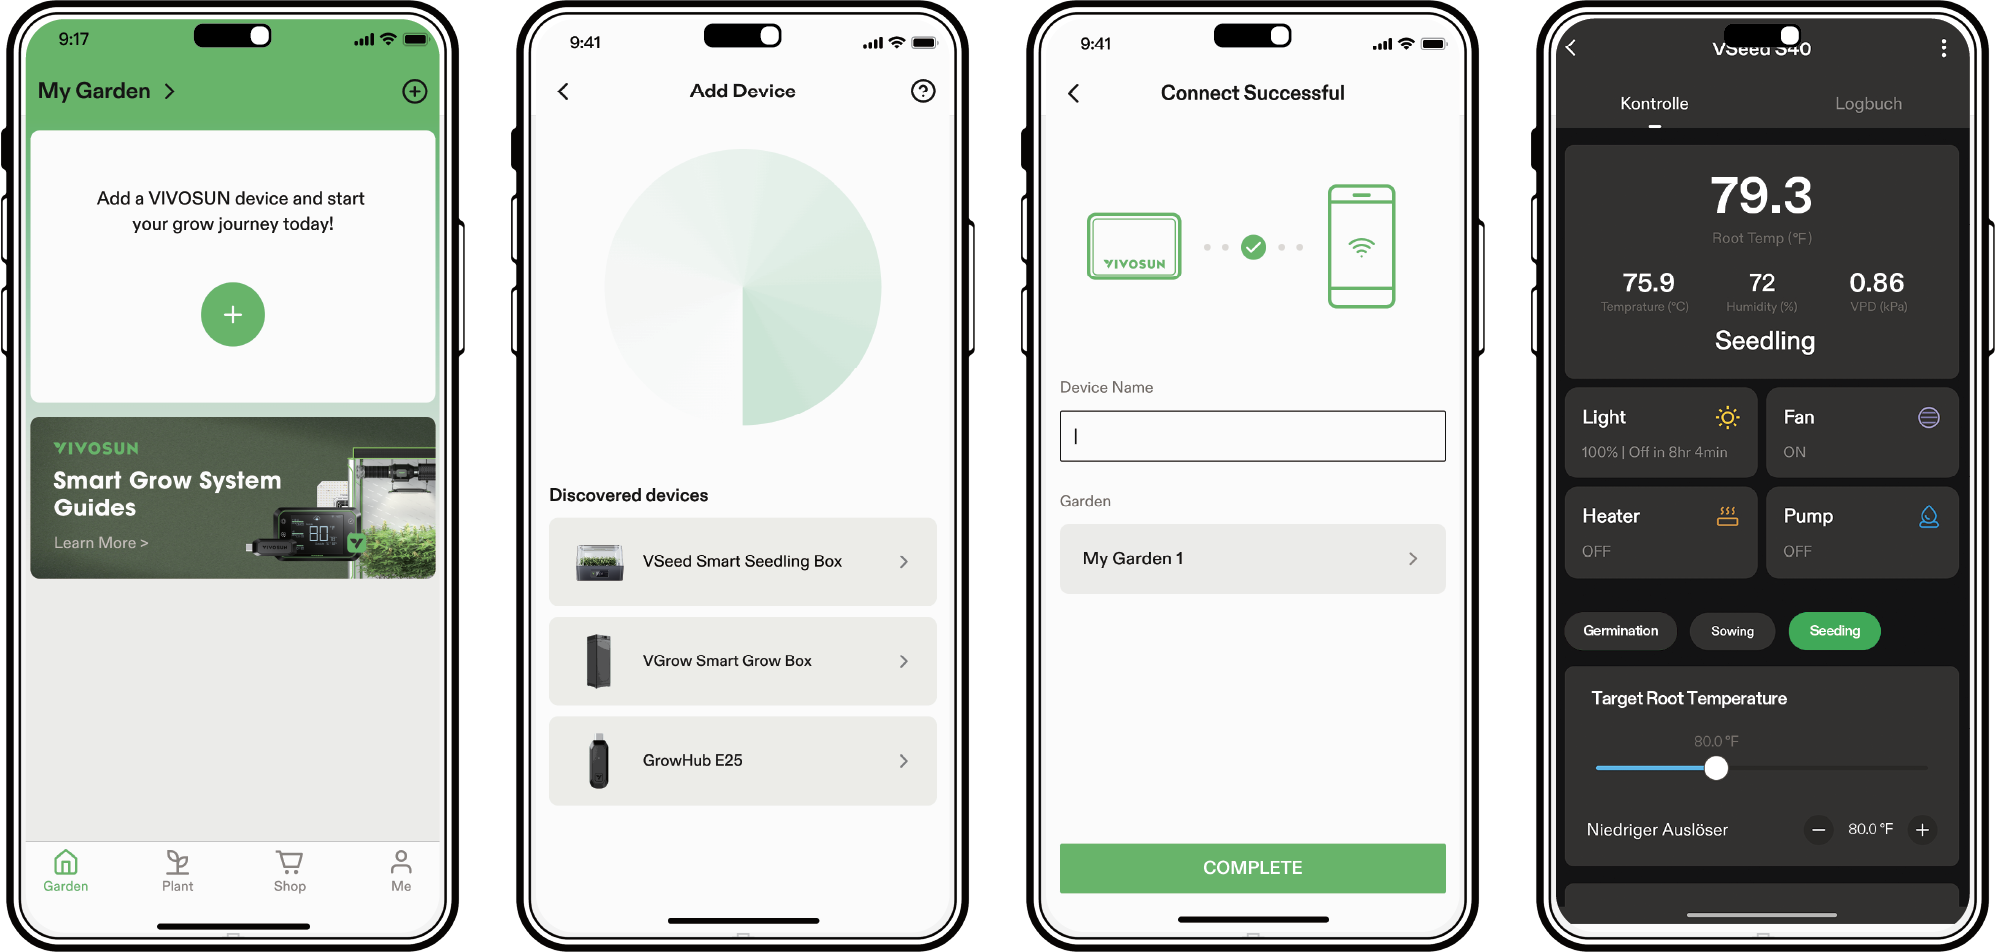
Step 1:
Download VIVOSUN APP
Search ''VIVOSUN'' in the Apple App Store or in the Google Play Store to download the VIVOSUN App.
Step 2:
Add VSeed
Tap ''+'' or  to add VSeed. When connecting to VIVOSUN APP,
  will flash on the LCD screen.
Step 3:
Name Device
After connecting successfully, you can rename your device and start growing.
Note: Make sure you have a 2.4G Wi-Fi connection and that Bluetooth is enabled on your phone.
Maintenance
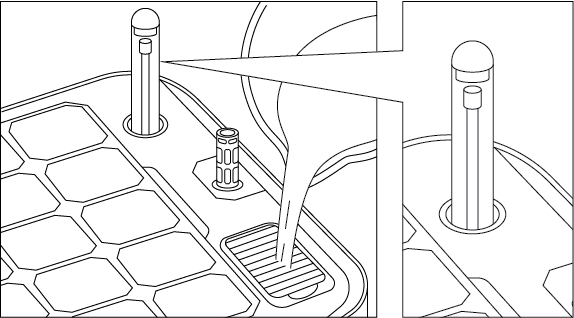
1. Watering &Capacity:
Add water through the water fill cover and monitor the water level using the water level indicator. The maximum tank capacity is 1.1gal (4 L)—do not overfill. A full 1.1 gal (4 L)tank can sustain your plants for approximately 2 weeks.
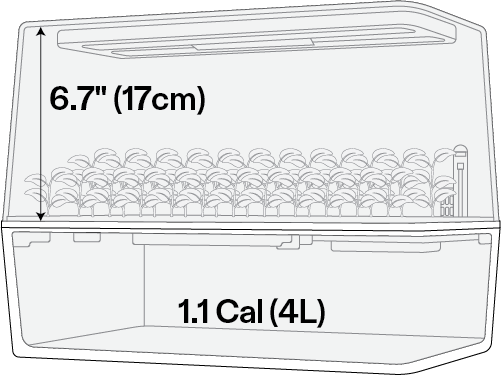
2. Optimal Growth Space:
The device provides up to 6.7 inches (17 cm) of vertical growth height, making it suitable for both seed starting and cloning processes.
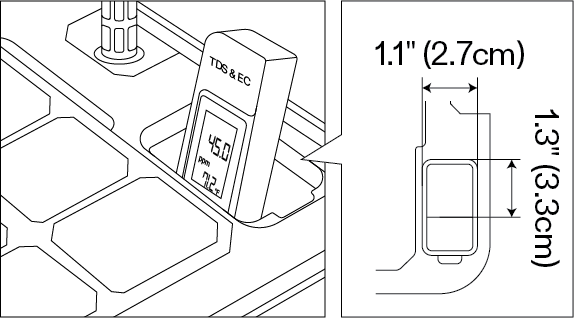
3. Nutrient Monitoring:
The water fill cover on the inlet can be easily removed, allowing convenient access to measure water pH and EC levels using a meter. The monitoring port measures 1.1×1.3inches (2.7×3.3cm)and accommodates most standard testing meters.
4. Cleaning & Reusability:
The seedling trays are fully reusable. We recommend thoroughly cleaning the trays and wiping down the reservoir after each cycle.
WARNING -CLEANING SAFETY: The main electrical unit is not waterproof. Do not submerge the device in water during cleaning, as this may cause a short circuit.
Control Interface
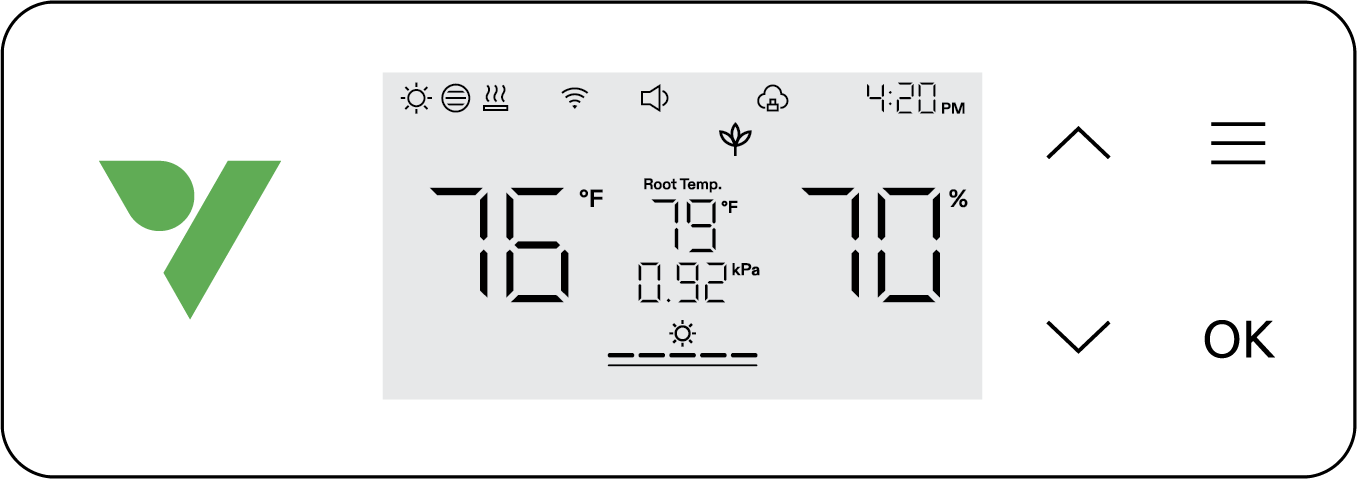
| Buttons | Press | Long Press | |
|---|---|---|---|
|
Increase a setting’s value when configuring parameters. |
Switch Temp Between °C and °F Display |
Press and hold both buttons simultaneously to Reset the device. |
|
Decrease a setting’s value when configuring parameters. |
Quick Irrigation: Starts a 10-min ebb & flow cycle. Long press again to stop. |
|
|
Enter Germination, Rooting and Seedling stage selection mode. |
Modify target parameters for the current stage: Root Temp., Humidity, Light Intensity, and Light Cycle. |
Press and hold both buttons simultaneously to enter Standby Mode. Grow light, fan, water pump, and heating mat) components are turned off. Light, fan, water pump, and heat mat turn OFF. The 3 stage icons cycle sequentially. |
|
Confirm settings |
System settings for time (local display), mute and screen brightness |
|


| No. | Name | Description |
|---|---|---|
1 |
LIGHT STATUS |
Indicates light is on. |
2 |
VENTILATION FAN STATUS |
Indicates ventilation fan is on. |
3 |
HEATING STATUS |
Indicates the heating is activated. |
4 |
WATER PUMP STATUS |
Indicates the water pump is currently running. |
5 |
WI-FI ICON |
Indicates Wi-Fi connection and signal strength. Displays if device is offline. |
6 |
MUTE OR NOT |
Indicates the key tone is turned on or mute. |
7 |
WATER SHORTAGE ALERT |
Alerts when the water level is extremely low. |
8 |
APP CLOUD |
Indicates device is being controlled by the VIVOSUN APP. |
9 |
TIME |
Displays current time (automatically sets when the device connects to Wi-Fi) or light on time when setting stage on local display. |
10 |
DOME TEMPERATURE |
Displays the current temperature inside the dome. |
11 |
GROWTH STAGES |
Indicates the current selected growth stage: Germination, Rooting, or Seedling. |
12 |
ROOT TEMPERATURE |
Displays the current root temperature. |
13 |
VPD VALUE |
Displays the current VPD inside the dome. |
14 |
UP AND DOWN ARROWS |
Indicates temperature, humidity, root temperature and VPD values are too high or too low. |
15 |
DOME HUMIDITY |
Displays the current humidity inside the dome. |
16 |
LIGHT INTENSITY |
Displays the current brightness level of the grow light, ranging from OFF to level 5. |
17 |
LIGHT ON TIME |
Displays the light cycle time for the grow light to turn on automatically. |
18 |
LIGHT DURATION |
Displays the total working hours set for the light cycle. |
19 |
SETTING & SCREEN BRIGHTNESS |
Indicates the device is entering System Settings or Screen Brightness adjustment. |
Operation
VSeed is pre-programmed with optimized settings for three growth stages.
| Germination | Rooting | Seedling | ||
|---|---|---|---|---|
Grow Light |
Intensity |
0% |
70% |
90% |
ON/OFF Cycle |
OFF |
18H/6H |
18H/6H |
|
Ventilation Fan |
High Dome Humidity Trigger |
99% |
80% |
70% |
High Dome Temperature Trigger |
86 °F (30 °C) |
86 °F (30 °C) |
86 °F (30 °C) |
|
Heating |
Root Temperature |
77 °F (25 °C) |
77 °F (25 °C) |
74 °F (23 °C) |
When environmental parameters exceed the safety thresholds below, the system will show alert by up and down arrows.
| Germination | Rooting | Seedling | |
|---|---|---|---|
High Temp. |
90 °F (32 °C) |
90 °F (32 °C) |
90 °F (32 °C) |
Low Temp. |
68 °F (20 °C) |
68 °F (20 °C) |
68 °F (20 °C) |
High Humidity |
/ |
90% |
90% |
Low Humidity |
45% |
45% |
45% |
High VPD |
2.5 kPa |
2.5 kPa |
2.5 kPa |
Low VPD |
0.25 kPa |
0.25 kPa |
0.25 kPa |
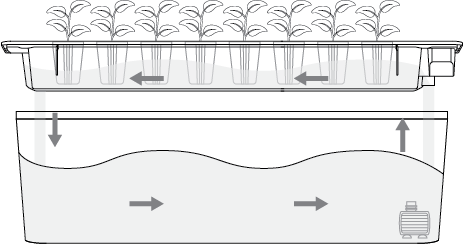
Automatic Ebb & Flow Irrigation
Based on the light cycle setting, a 10-minute automated ebb and flow irrigation cycle starts 30 minutes after the grow light turns on.
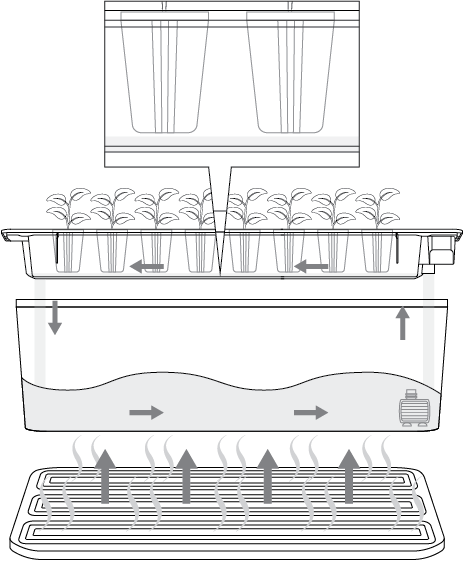
ThermoFlow Propagation System
-
Heating Logic: When the root temperature falls below the target, the heating mat activates to warm the water in the basin. Concurrently, the water pump will run in rapid, intermittent cycles to swiftly circulate the water, ensuring even and stable heating for the root zone.
-
Insulation Design: The water channel design prevents substrate absorption during heating; the water functions only as a thermal insulation layer.
-
Plant Safety Algorithm: To protect roots from heat stress, the system separates heating and irrigation. If auto-irrigation is scheduled during heating, the system prioritizes cooling to maintain safe water temperature.
 IMPORTANT NOTE ON"QUICK IRRIGATION"
The safety algorithm mentioned above applies strictly to automated irrigation. Manual"Quick Irrigation"operates instantly without assessing water temperature. Since pressing the button overrides the system,you should always check that the water temperature is safe before using Quick Irrigation to avoid scalding your plants' roots.
1. Setting the Time
Upon first power-on, the device will default to a 12-hour format. Use the Up and Down buttons to adjust the hour and minute settings directly, then press OK to confirm.
To adjust the time later or switch between time formats, press and hold the OK button for 3 seconds to enter System Settings. Use the Up and Down buttons to choose between a 12-hour (12H) or 24-hour (24H) format, adjust the time accordingly, and press OK to confirm.
Note: Time will automatically update when connected to Wi-Fi.

2. Select the Stage
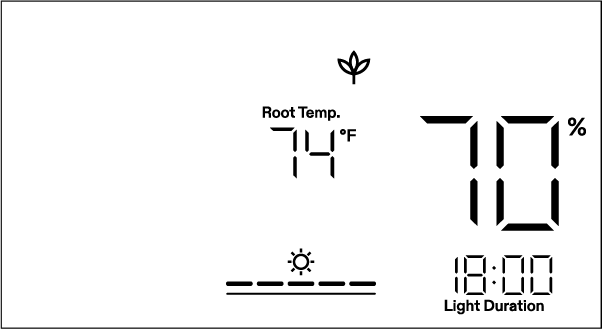
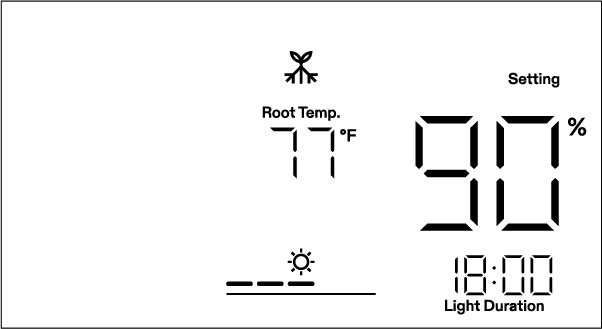
After setting the time, the display enters Stage Selection mode and cycles through Germination, Rooting, and Seedling. The numbers at the bottom show the default targets: root temperature, humidity, light intensity, and light duration.
Use the Up and Down buttons to switch between Germination, Rooting, and Seedling stages. Press OK to confirm and start.
During operation, press Menu to enter Stage Selection.
3. Changing Stage Parameters
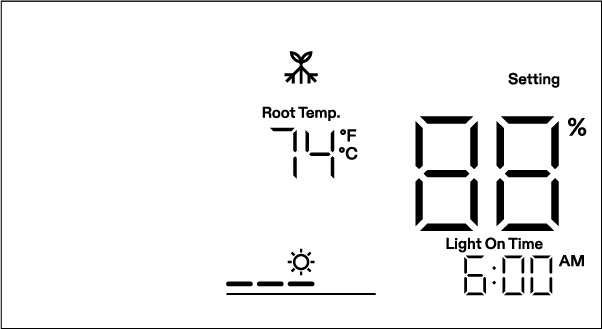
While a stage is running, press and hold the Menu button to customize its default settings. Use the Up and Down buttons to modify the target root temperature, dome humidity, light intensity and light duration, pressing OK to confirm each value. After adjusting these parameters, you will finally set the daily "Light On Time" using the same up and down buttons, then press OK to complete and save your setup.
4. Switching Between Temperature Units (°F/°C)
Press and hold the Up button for 3 seconds to switch between °F and °C.
5. Setting the Key Tone
Press and hold the OK button for 3 seconds to enter system settings. Use the OK button to navigate the menu and select "keytone". Use the Up, Down, and Confirm buttons to toggle the keytone on or off. If the keytone is off, a "  " will be displayed.

6. Adjusting Screen Brightness
Press and hold the OK button for 3 seconds to enter system settings. Use the OK button to navigate the menu and select Screen Brightness. Adjust the screen brightness by pressing the Up, Down, and Confirm buttons.

Grow Guide
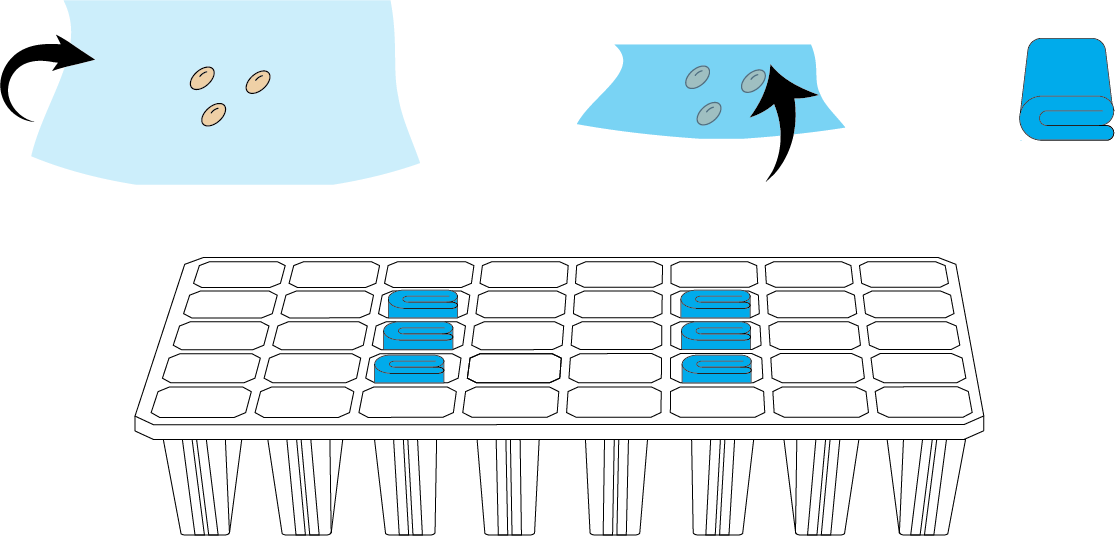
1. Germination: Wrap the seeds in a moist paper towel, place them in the seed starter tray, and cover with both the germination cover and the main dome. Add nutrient solution (pH 5.5-6.0; EC 0.6-0.8 ms/cm or 300-400ppm) to the tank. Set the machine to Germination Stage. Seeds will typically sprout in 1-2 days.
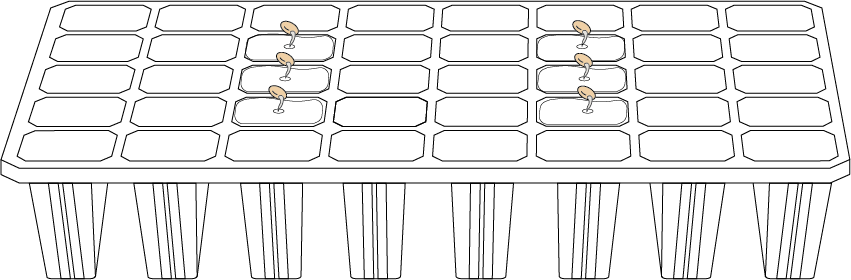
2. Rooting: Place the seed rooters into the tray, then press and hold the Down button for Quick Irrigation to fully soak them. Carefully plant the sprouted seeds into the wet seed rooters with the roots facing down, and put the dome on. Set the machine to Rooting Stage.
3. Seedling: Once the two cotyledons (seed leaves) fully unfold and true leaves begin to emerge, set to Seedling Stage. If the water level alarm triggers, promptly refill the tank with nutrient solution (pH 5.5-6.0; EC 0.6-0.8 ms/cm or 300-400ppm).
Replacement
Replacing the Light & Fan Module
Note: Please ensure the device is unplugged before starting.
Step 1: Remove the silicone plugs:
Pull out the translucent silicone plugs on the top to expose the Phillips screws underneath.
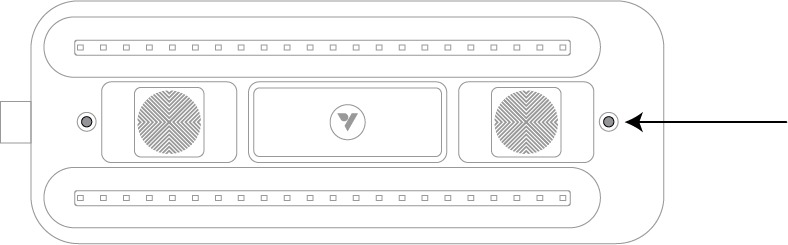
Step 2: Detach the module:
Use a Phillips screwdriver to take out the screws on both sides, then carefully remove the old light & fan module.
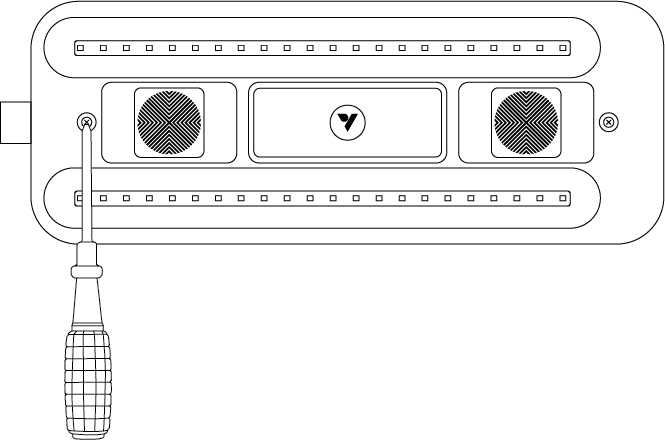
Step 3: Install the new module:
Place the new module in position, secure it by tightening the screws, and push the silicone plugs back in to complete the replacement.

Replacing the Water Pump / Temperature & Humidity Sensor
Step 1: Remove the ebb&flow tray:
Take out the water fill cover first, which makes it easier to lift out the entire ebb&flow tray.
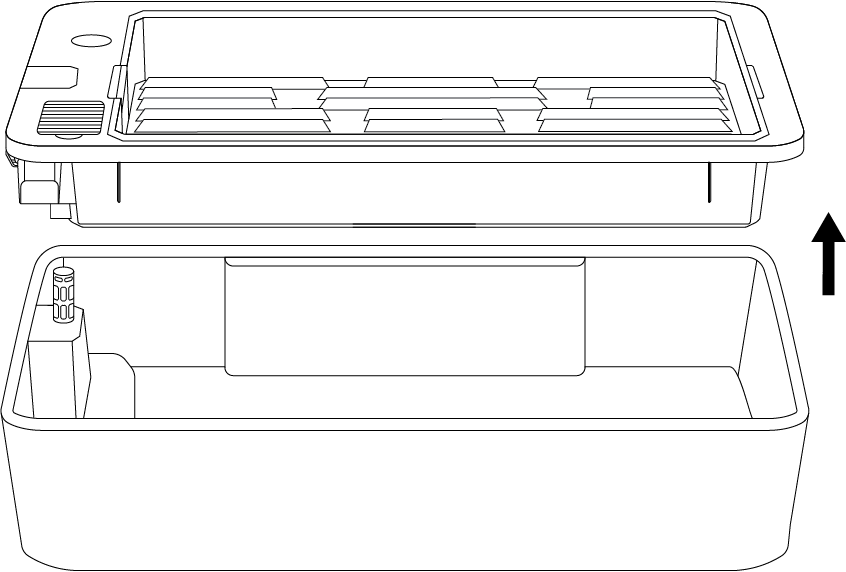
Step 2: Detach the pump housing:
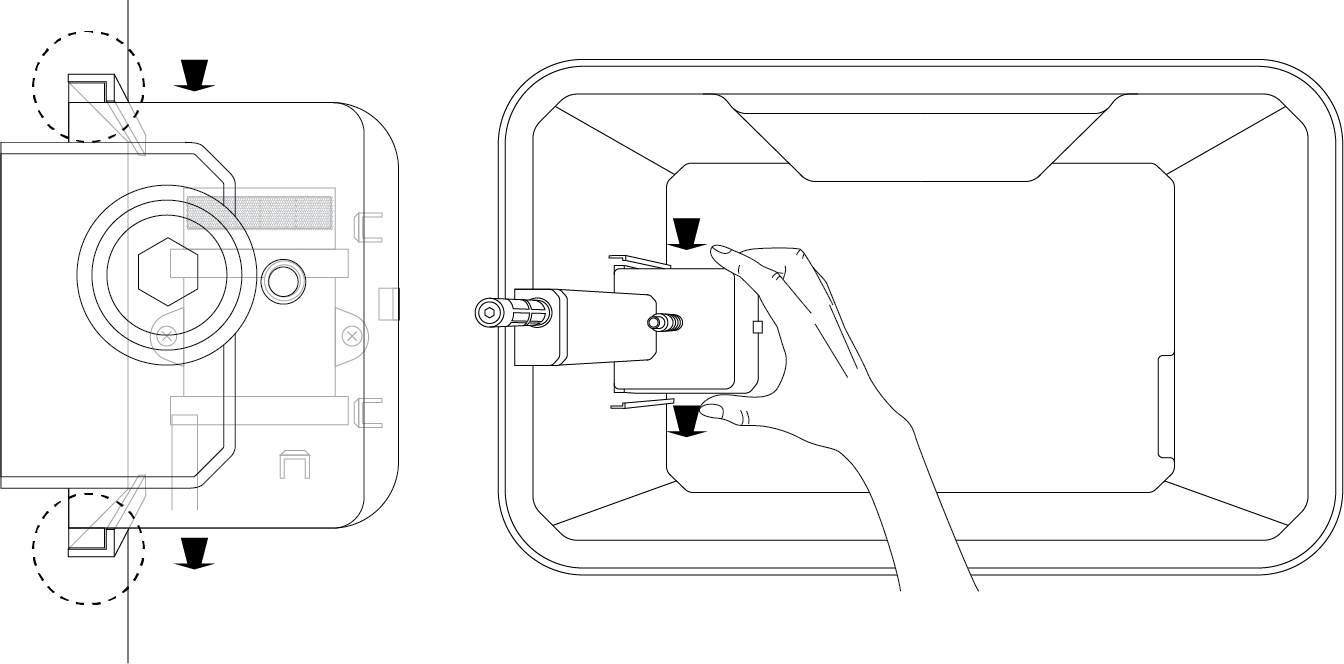
While pressing down on the water reservoir with one hand, gently pull the pump housing upwards with your other hand to detach it.
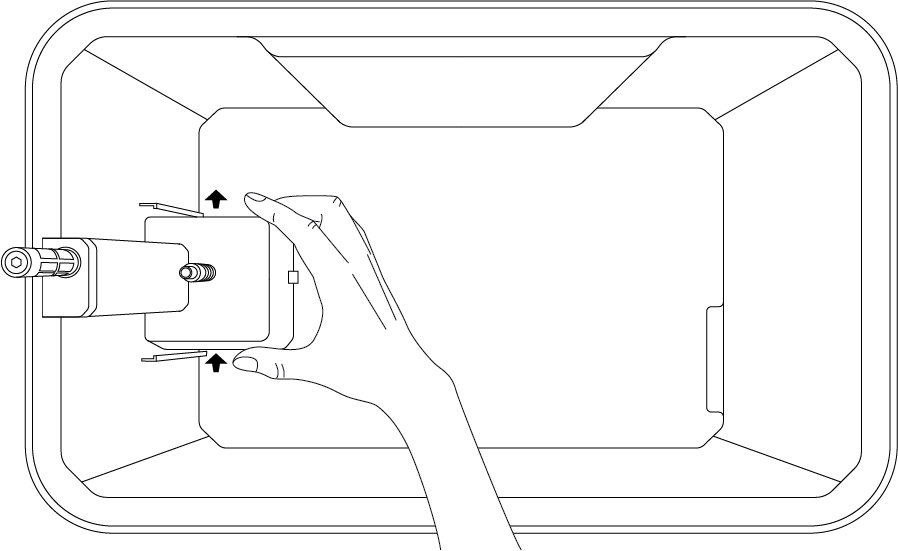
Step 3: Locate the connectors:
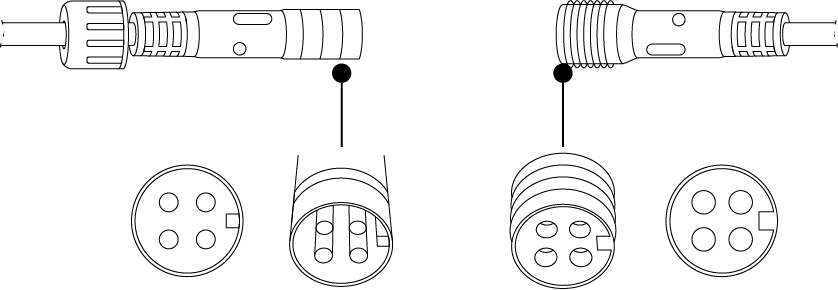
Once the housing is detached, you will see two waterproof cable connectors. The lower one is for the Water Pump, and the upper one is for the Temperature & Humidity Sensor. Unscrew and unplug the corresponding connector based on which part you need to replace.
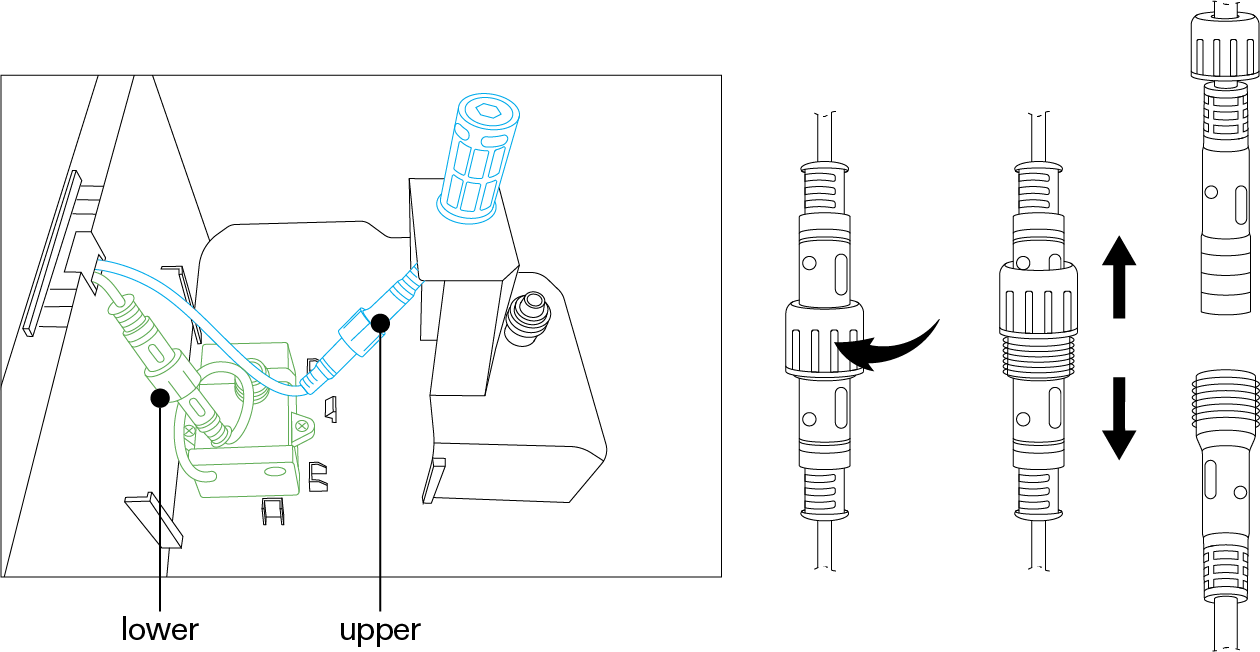
Step 4: Replace the component (Choose A or B):
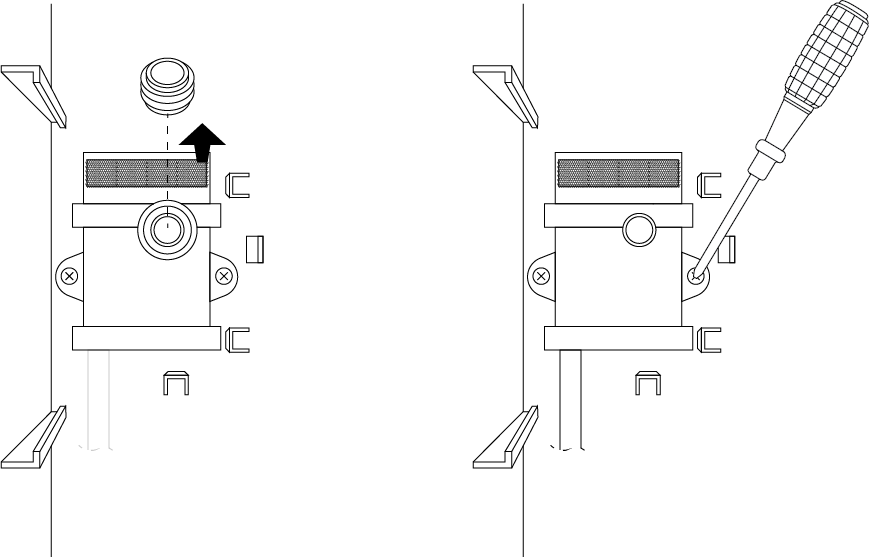
A: Water Pump: Disconnect the cable and remove the silicone cap from the top of the pump
(  Crucial: Keep this cap safe, do not discard it). Use a Phillips screwdriver to take out the mounting screws and remove the old pump. Install the new pump, secure the screws, put the silicone cap back on, and reconnect the cable. Be sure to screw the connector completely tight to prevent water damage.
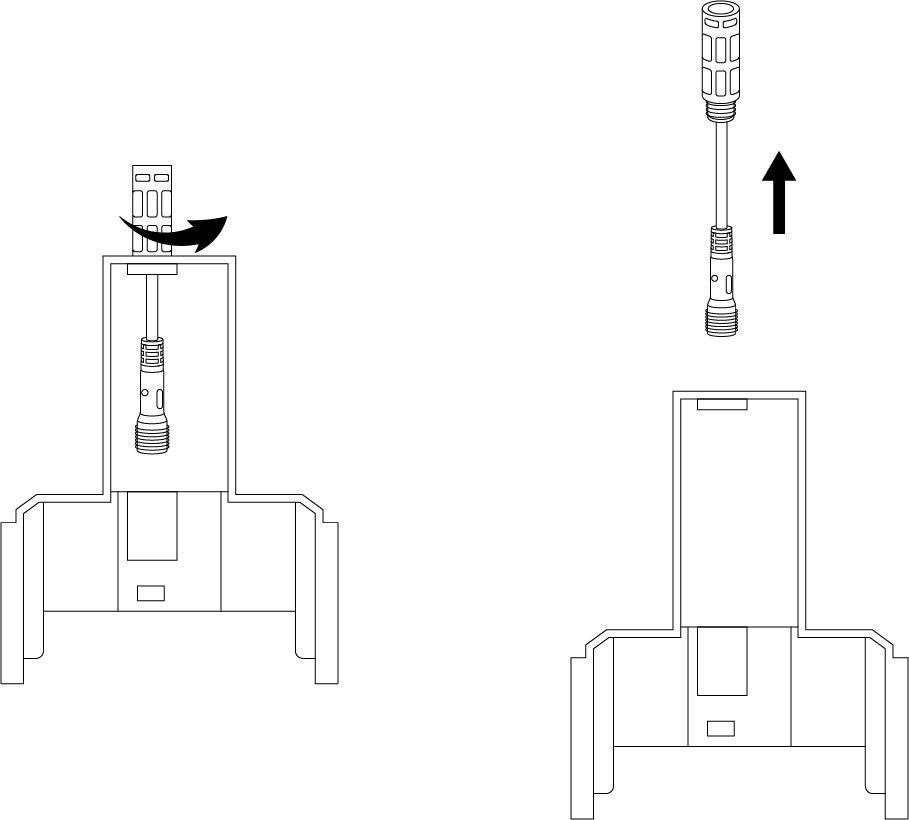
B. Temperature & Humidity Sensor: Disconnect the cable, roughly unscrew the old sensor module, install the new one, and reconnect the cable.
Step 5: Reinstall the pump housing:
Carefully tuck all cables and connectors inside the pump housing to ensure nothing is pinched.
Align the housing with the snaps/clips on the base, and press down firmly to lock it into place.
IMPORTANT NOTE
Keep it dry: Please ensure the entire water reservoir is completely empty and thoroughly dry before replacing any components. This prevents water from getting into the open electrical connectors.
Align the pins: When reconnecting the waterproof terminals, please ensure the internal alignment notches match up correctly before pushing them together. Do not force them.
Warranty
VIVOSUN offers a 2-year limited warranty on this product purchased directly from us or our authorized dealers, beginning on the original date of purchase.
This warranty is provided in addition to, and does not affect, your statutory rights under applicable consumer protection laws in the country where the product was purchased.
For the full Warranty Policy, please visit: https://www.vivosun.com/help/warranty-policy
Alternatively, you may contact customer service at support@vivosun.com / +1888-505-8486.
Contents

We help you grow your best green.

We provide the highest quality.

We relentlessly pursue the future.

We make growing more enjoyable.

We support every grower.
Sign up and get 8% off your first order
©2026 Vivosun All Rights Reserved