










English
GrowHub X42 Manual
MODEL NAME
-
VSE-GHX42
SAFETY INFORMATION
 Please read these instructions carefully before using the device. Failure to follow the safety guidelines may cause serious injury, void your warranty, and release Vivosun from all liability.
-
Ensure your AC power source meets the electrical requirements of this device.
-
Check and comply with local laws and safety regulations for installation and operation.
-
Follow the instructions for each smart device and connect only compatible devices to the designated ports on the Hub using the appropriate cables.
-
DO NOT connect incompatible devices.
-
DO NOT use this control panel, the Hub, or any connected grow devices outdoors or in hazardous environments, including areas with flammable/explosive materials, corrosive chemicals, or excessive moisture. These devices are designed for indoor use in grow tents only. Avoid splashing water onto the touchscreen surface.
-
Turning off devices via the control panel does not fully disconnect power. Always unplug the main power from the Hub and power down all devices before installation, maintenance, or relocation.
-
Carefully read and follow the instructions for each device and its connection to the controller. Failure to do so may result in damage and void the warranty.
-
If any device, Hub port, or power cord is damaged, stop use immediately and contact Vivosun. Do not disassemble or modify devices without Vivosun’s authorization—doing so may cause damage and void your warranty.
-
DO NOT press the touchscreen with sharp objects or subject it to heavy impacts. Clean the screen surface only with a dry, soft microfiber cloth.
Save these instructions for future reference.
PRODUCT CONTENTS
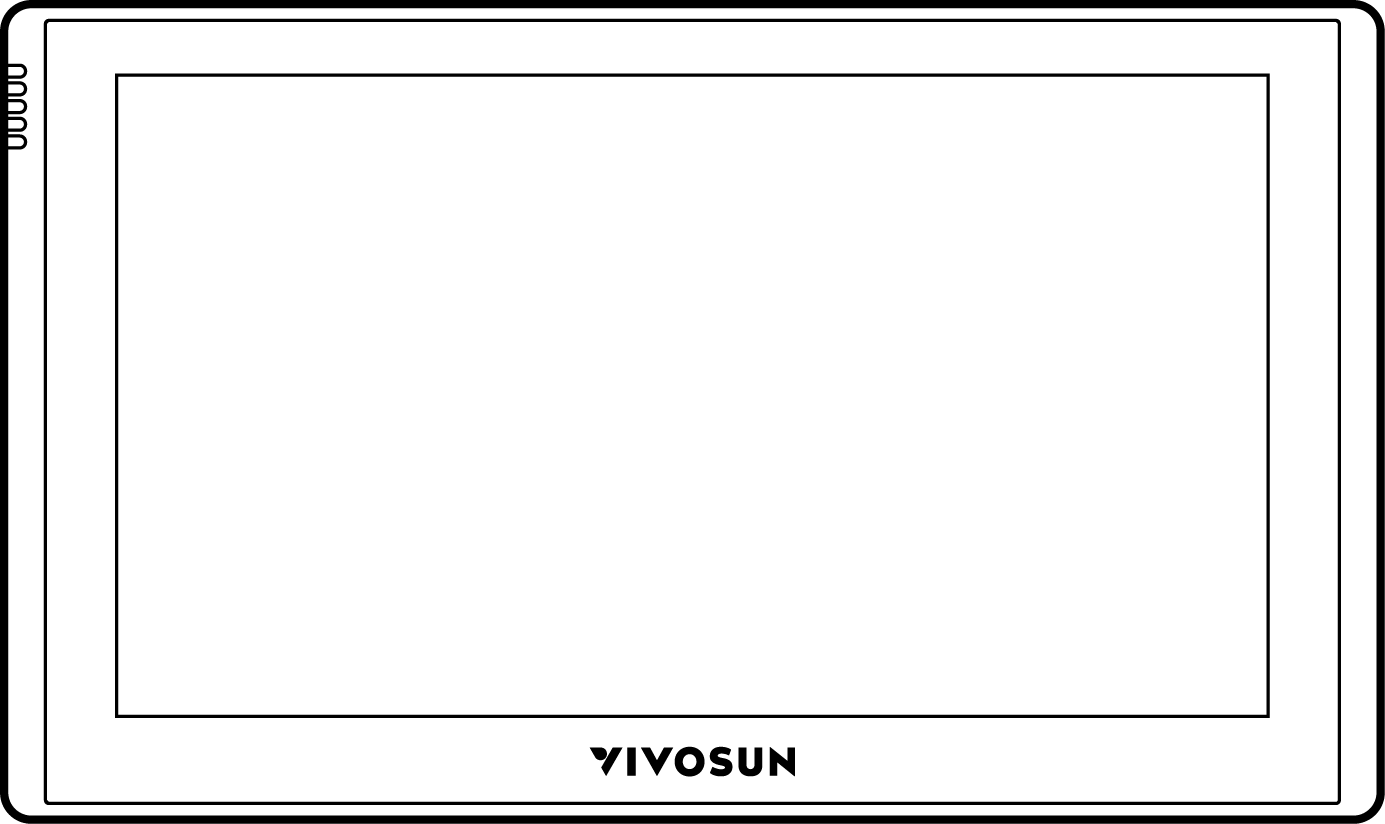
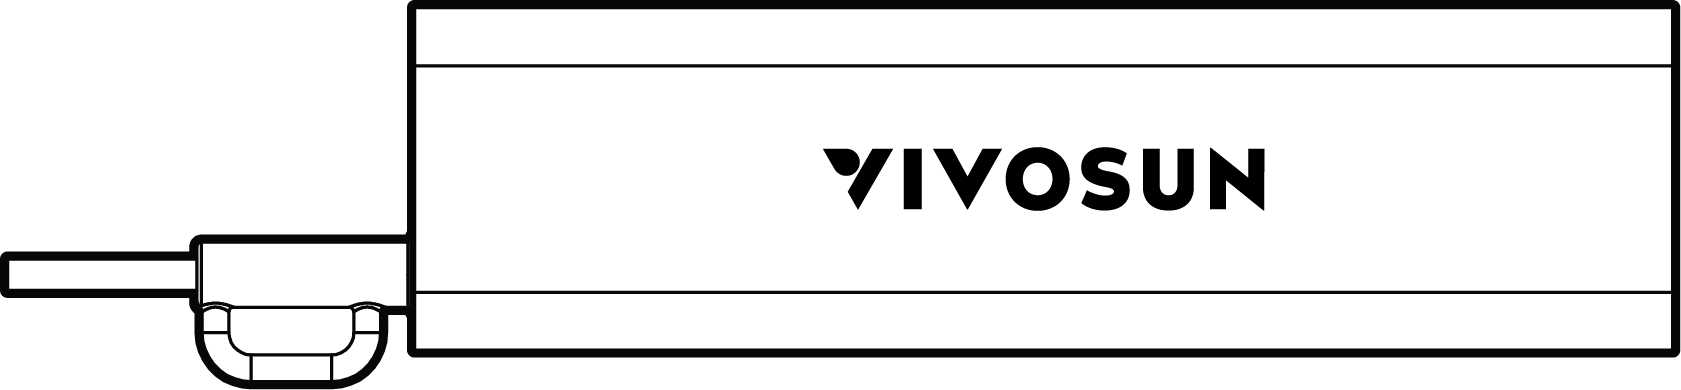
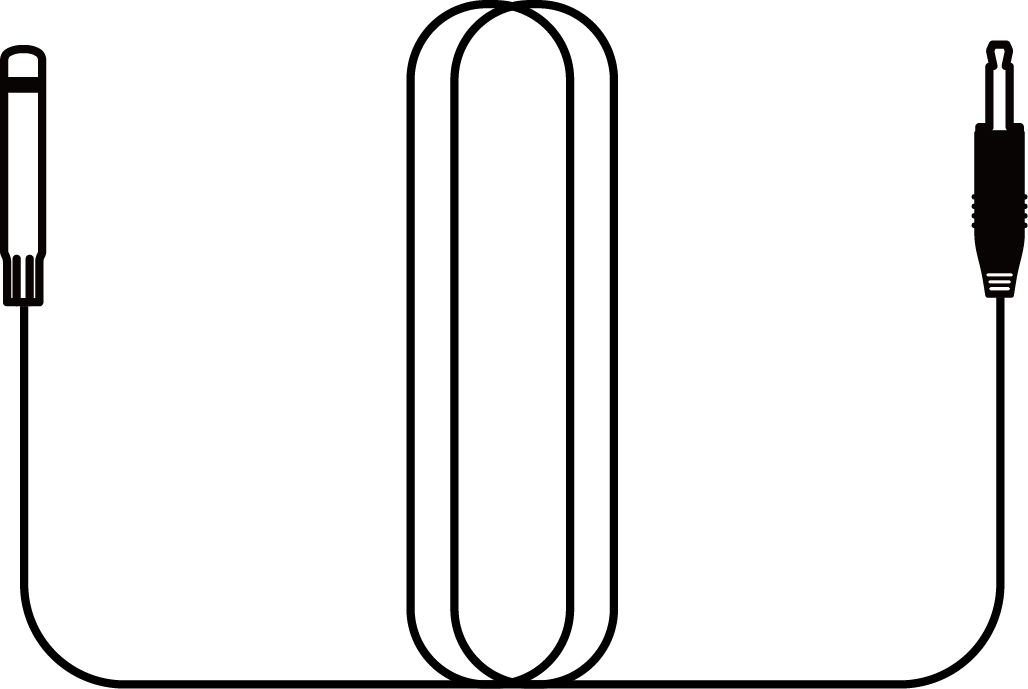
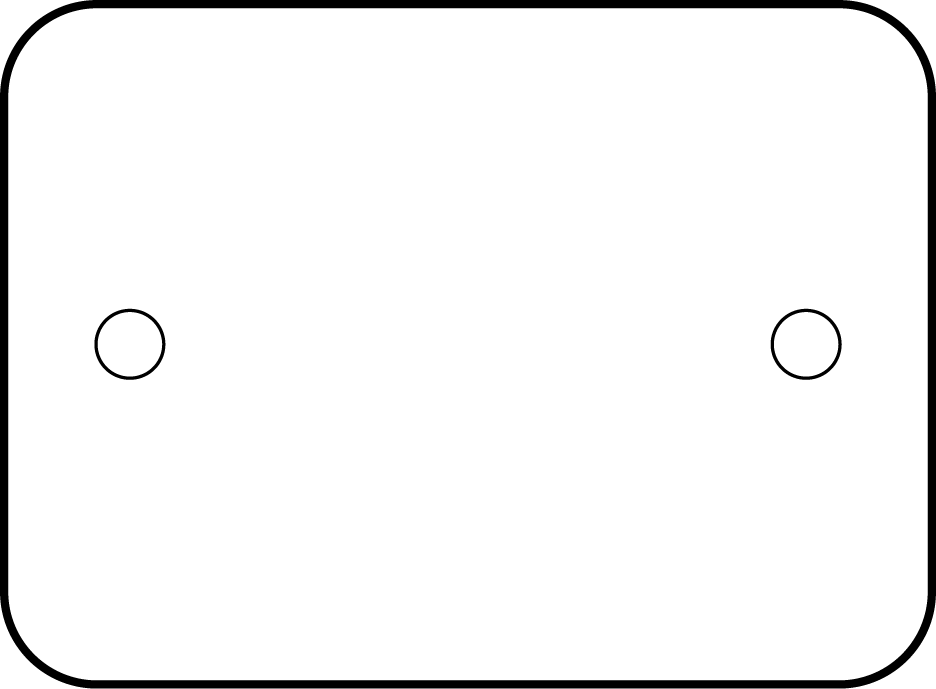
| Number | Image | Quantity |
|---|---|---|
|
|
1pcs |
|
|
1pcs |
|
|
1pcs |
|
|
1pcs |
|
|
1pcs |
|
|
1pcs |
|
|
1pcs |
|
|
1pcs |
|
|
1pcs |
KEY FEATURES
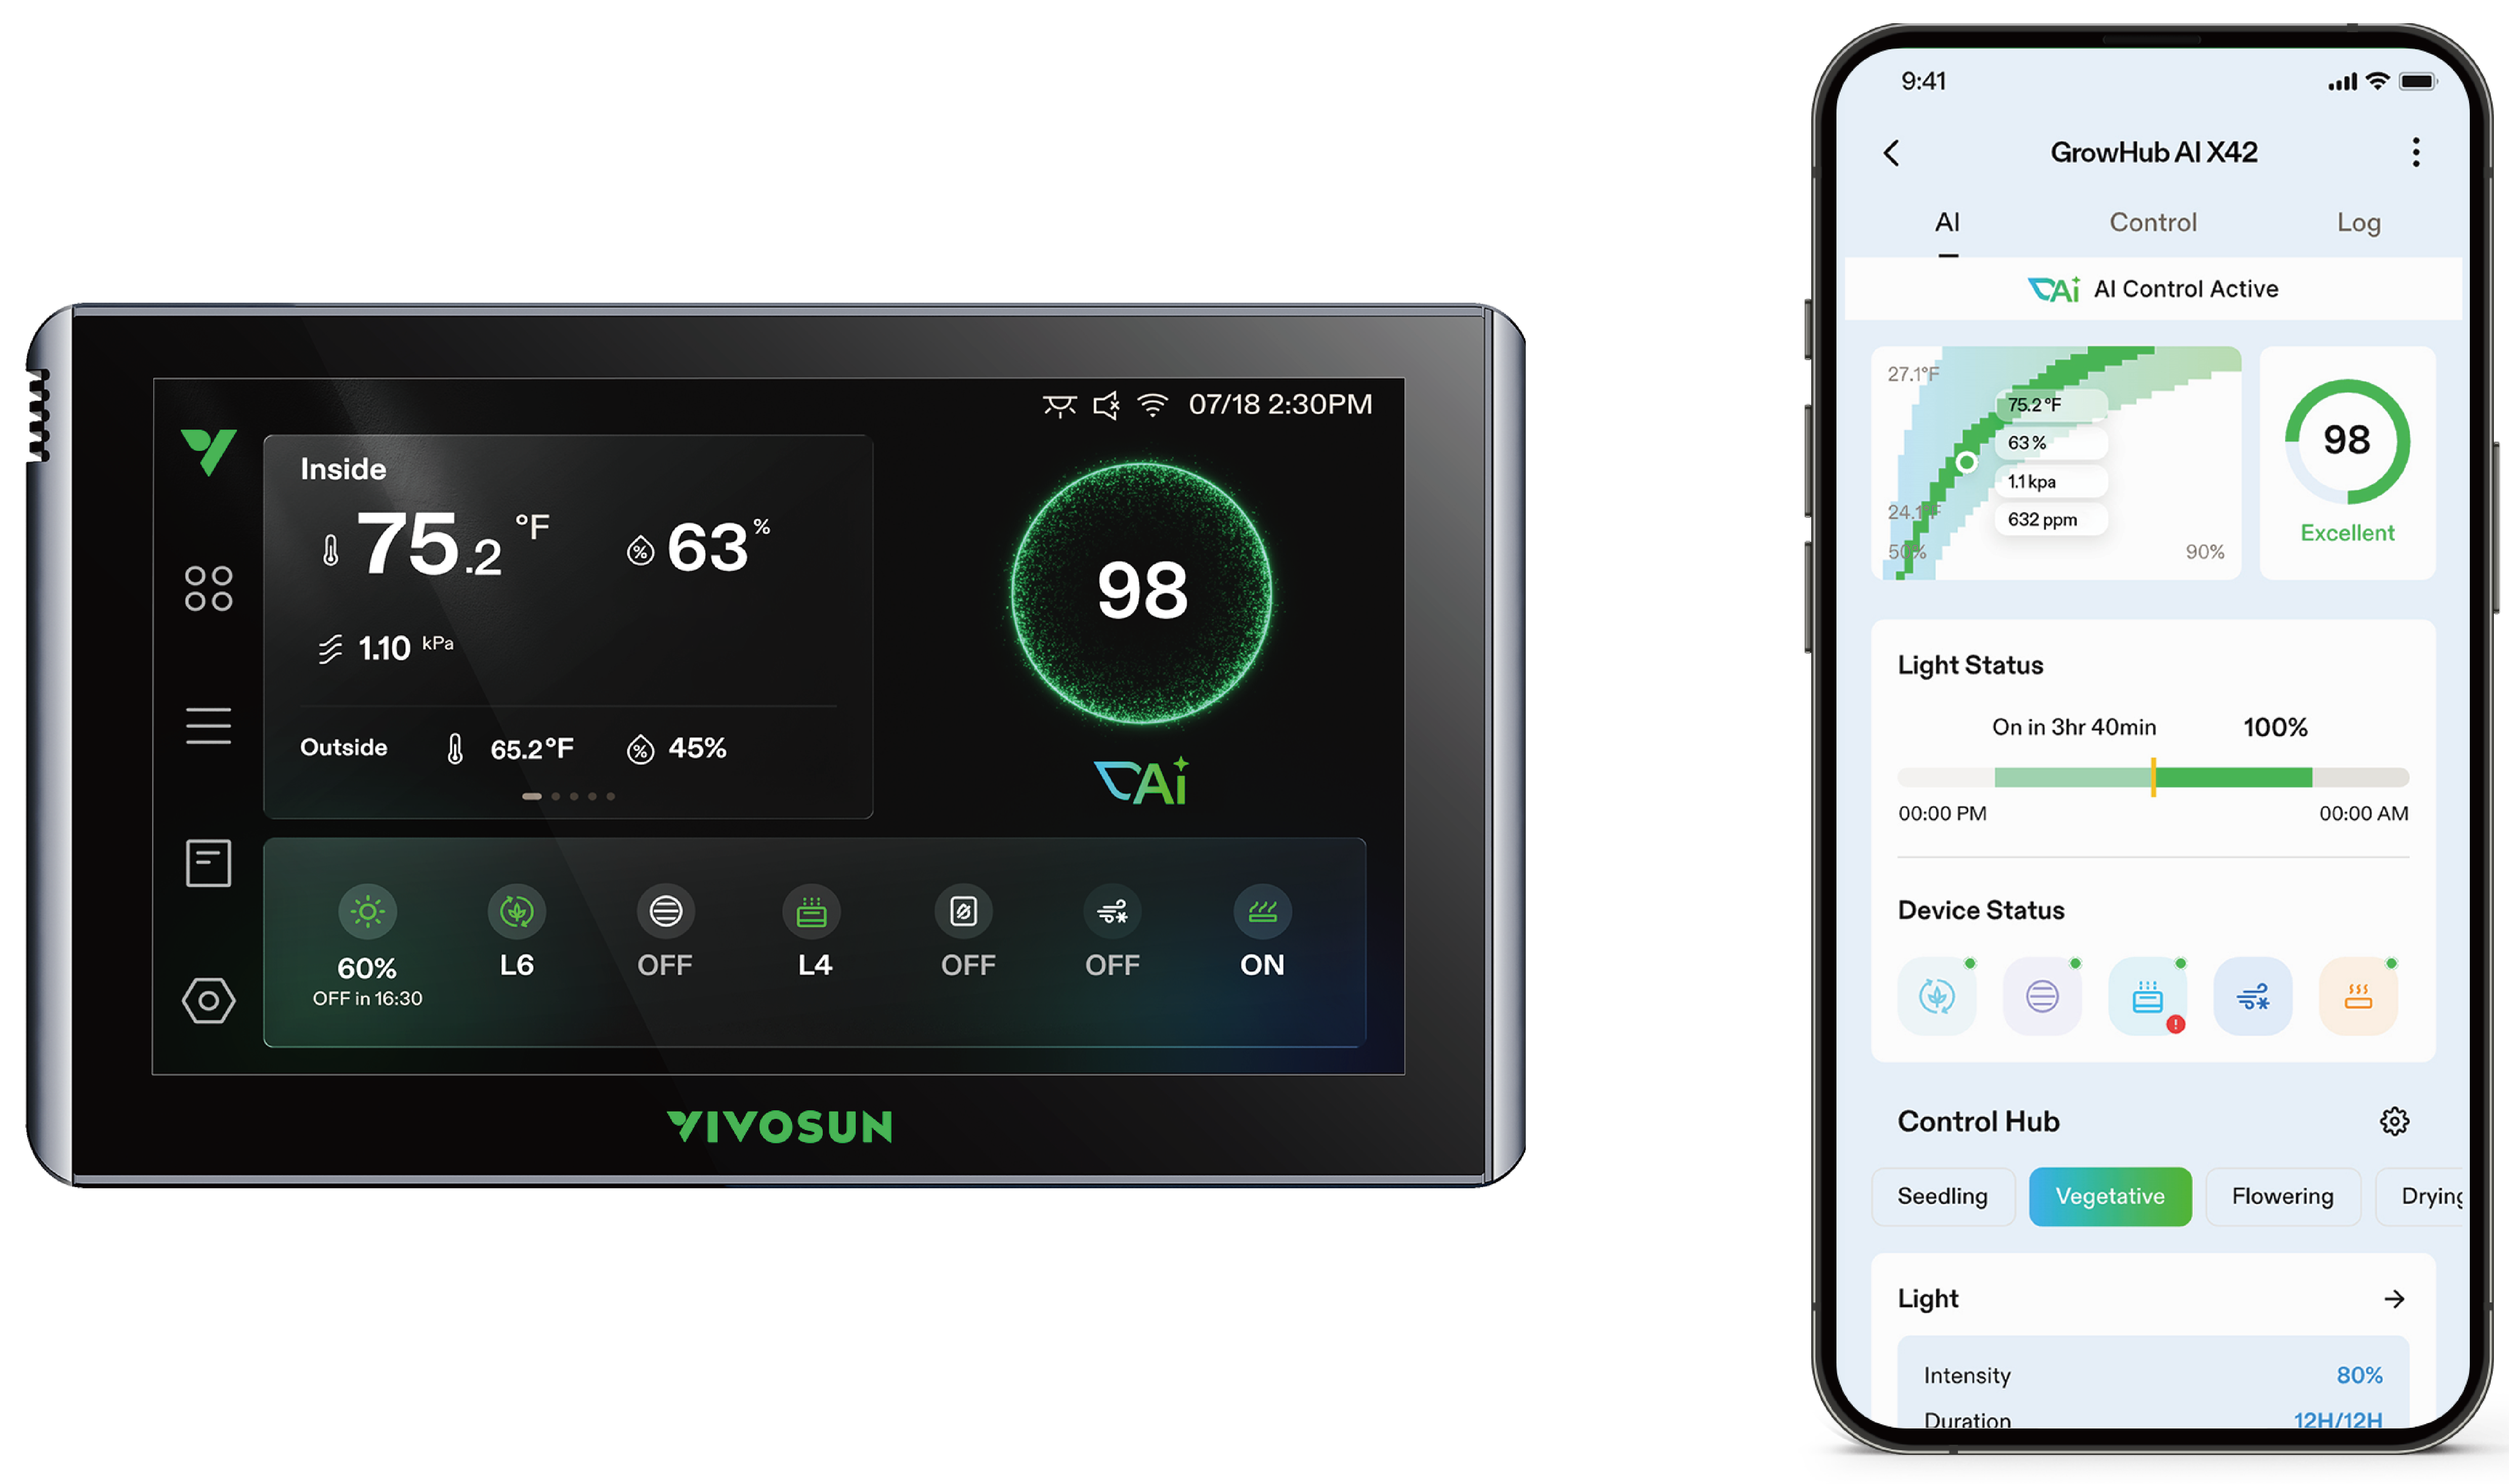
UNIFIED CENTRAL CONTROL: Centrally monitor and manage your grow lights, ventilation, circulation, and all environmental equipment. Seamlessly control all devices based on data from a single, unified sensor probe.
AI CLIMATE CONTROL: Advanced AI technology analyzes real-time data and predicts future environmental changes, automatically adjusting connected devices to maintain the most stable microclimate for your plants.
7" TOUCHSCREEN & APP CONTROL: Features an upgraded 7-inch color touchscreen for quick, intuitive local setup. Wi-Fi enabled for remote monitoring and full control via the VIVOSUN App from anywhere, at any time.
3 AI GROW STRATEGIES: Designed to fit your specific goals. Choose between ECO Mode (energy saving), Standard Mode (consistent targets), or Performance Mode (ultra-fast response) to perfectly balance power consumption and peak growth results.
VISUAL GROW INSIGHTS: View dynamic environmental scores and detailed logs directly on the screen. The controller tracks AI events and provides actionable suggestions to continuously optimize your grow space.
CLEAN & WIRELESS SETUP: Enjoy a simplified, clutter-free grow tent. Full wireless connectivity between the controller and compatible devices ensures a clean, effortless installation with no cable management headaches.
SPECIFICATIONS
Dimension |
7.3*4.3*0.7 inch / 18.6*10.9*1.9 cm |
Display Size |
7” Color Touchscreen |
Sensor Probe Length |
9.84 ft / 3 m |
Sensor Supported |
Temperature & Humidity Sensor, 4-in-1 Sensor |
Operating Voltage |
12V DC |
Rated Power |
7 W |
Operating Temperature |
32-140 °F(0-60 °C) |
Operating Humidity |
35% to 85% RH |
Detection Temperature |
-40-257 °F(-40-125 °C) |
Detection Humidity |
0% to 100% RH |
WiFi Connection |
2.4 GHz & 5 GHz |
INSTALLATION & CONNECTION
Step 1:
Remove the tape cover from the iron plate and paste the plate on the INSIDE surface of your tent where you want the controller located. Then you can place the Smart Controller on the OUTSIDE surface of your tent where it will attach to the iron plate via a built-in magnet on its back.
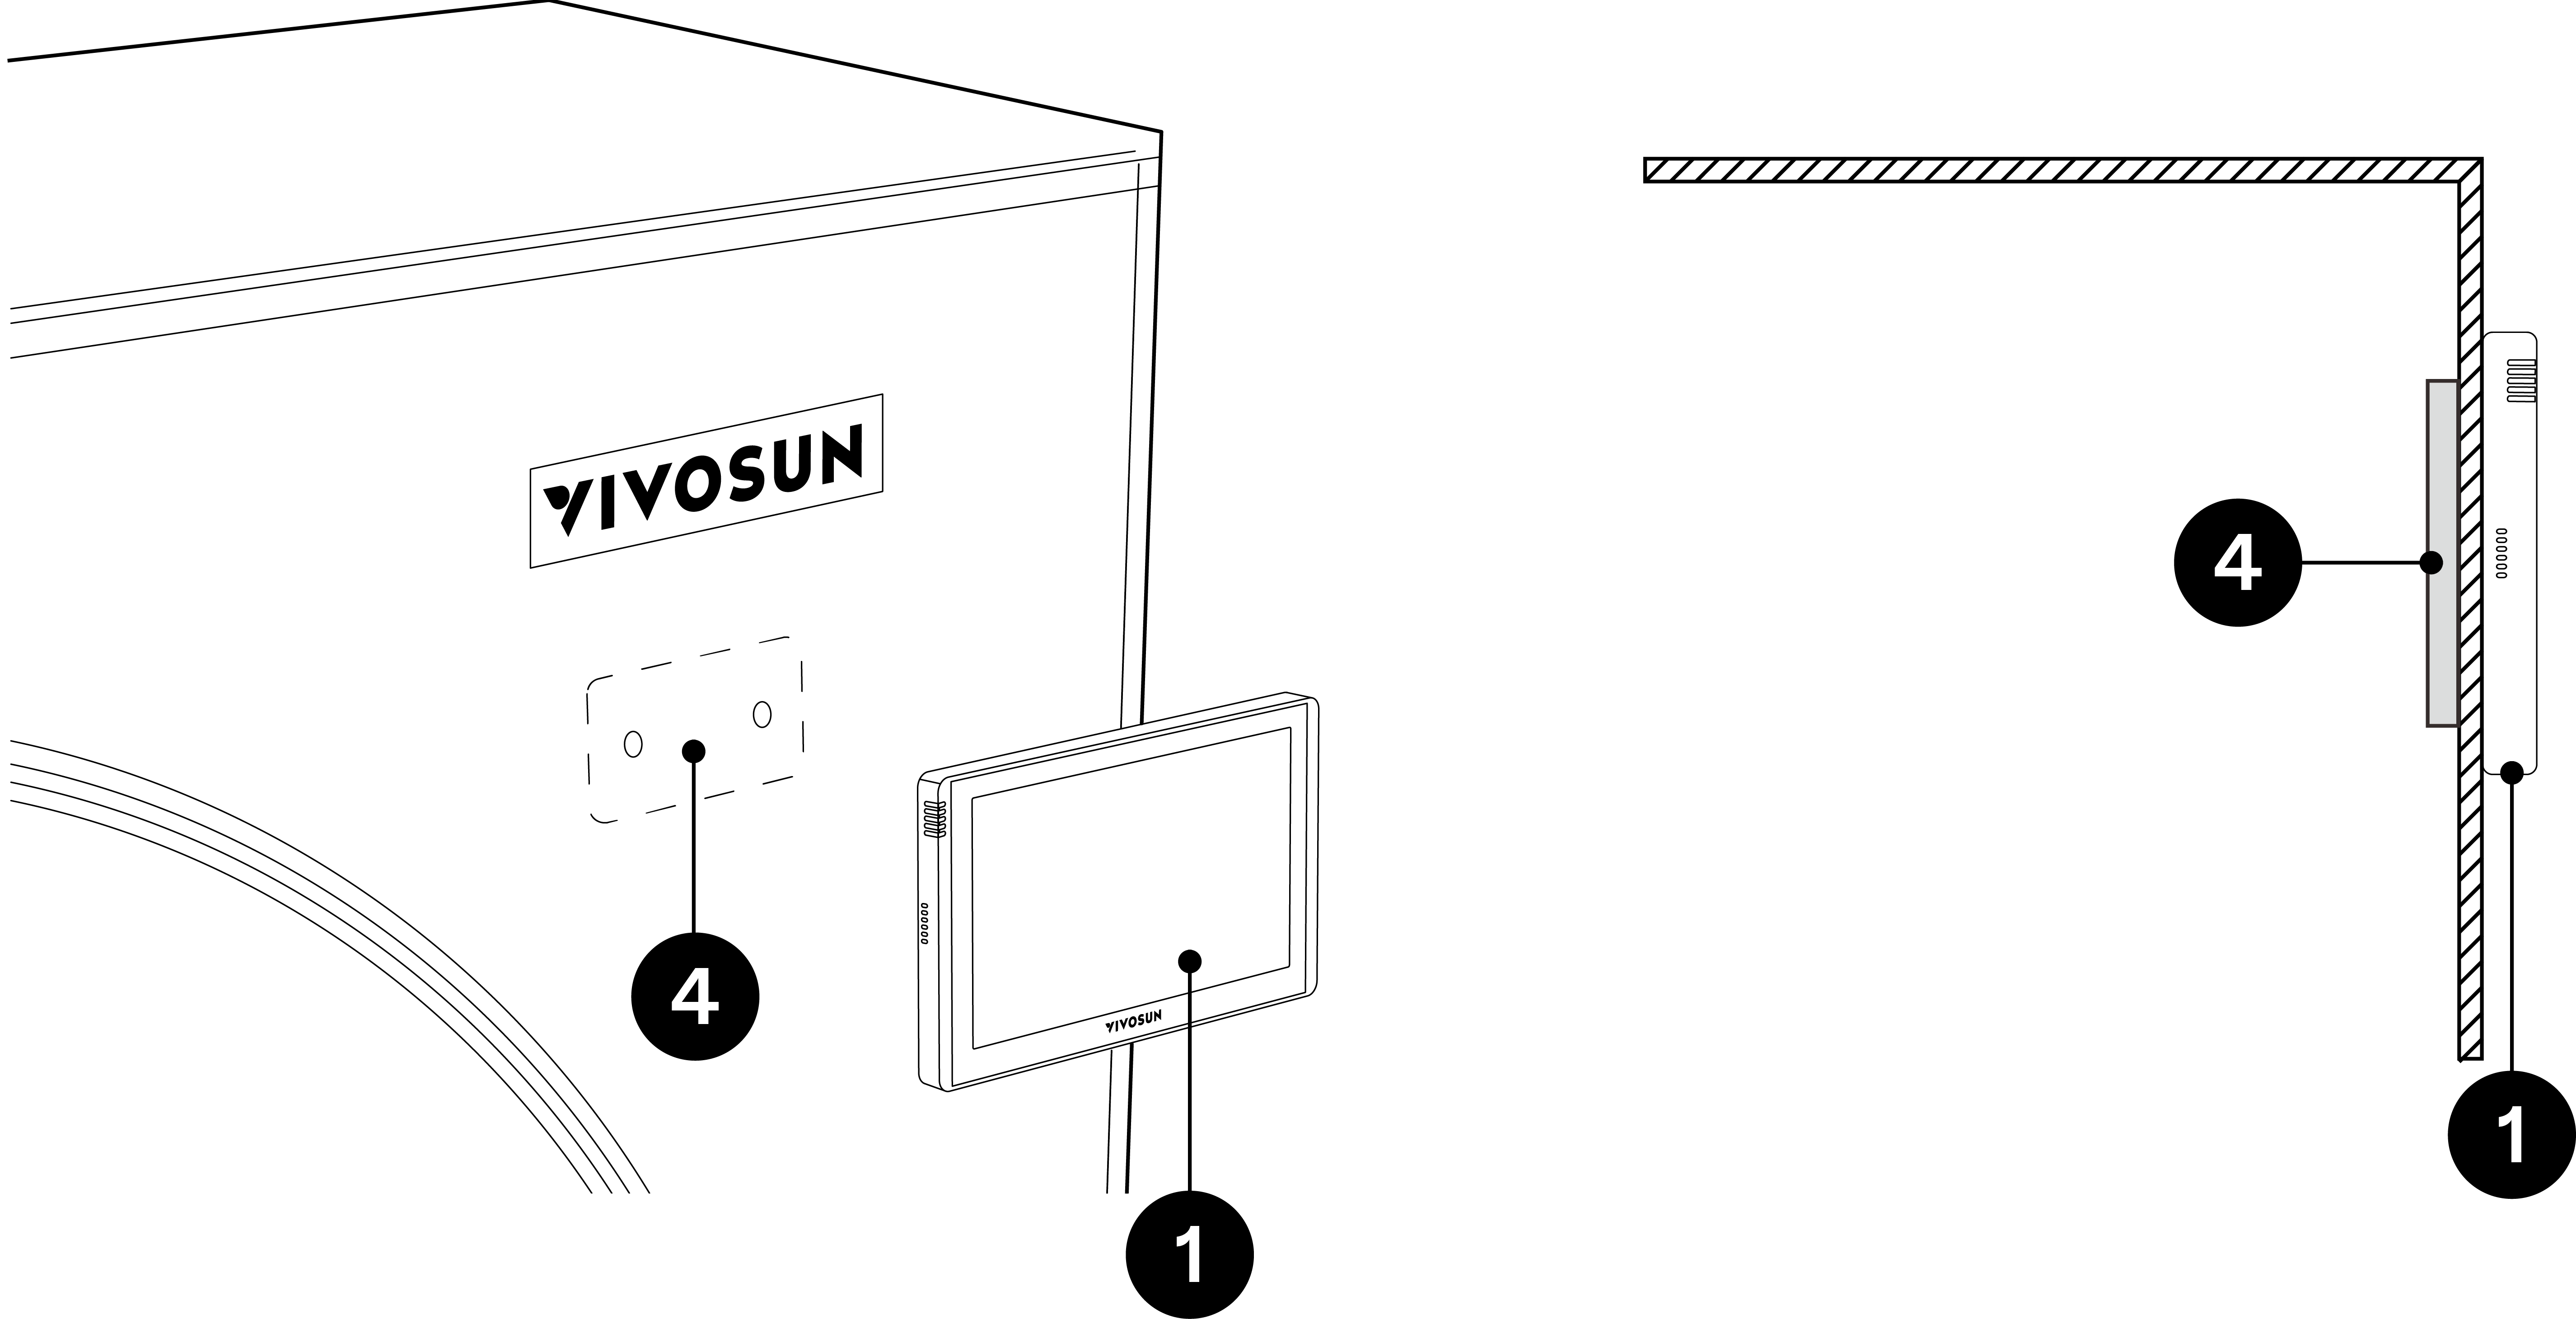
① |
Smart Controller (with Magnet) |
④ |
Iron Plate |
A |
Tent |
Step 2:
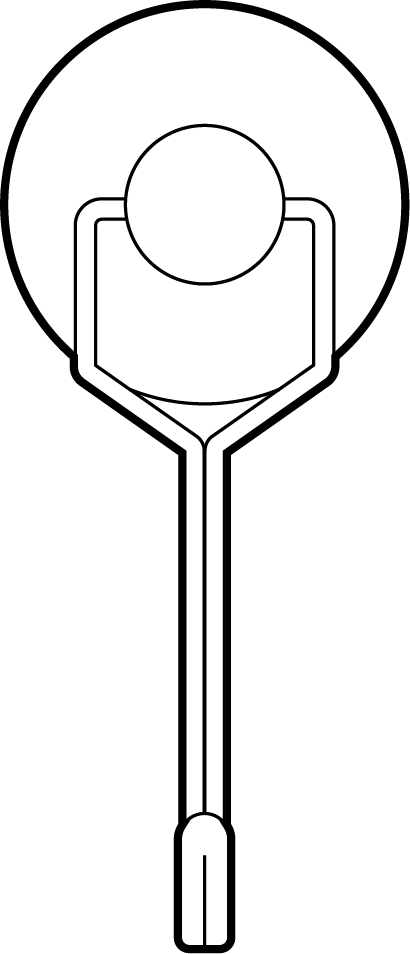
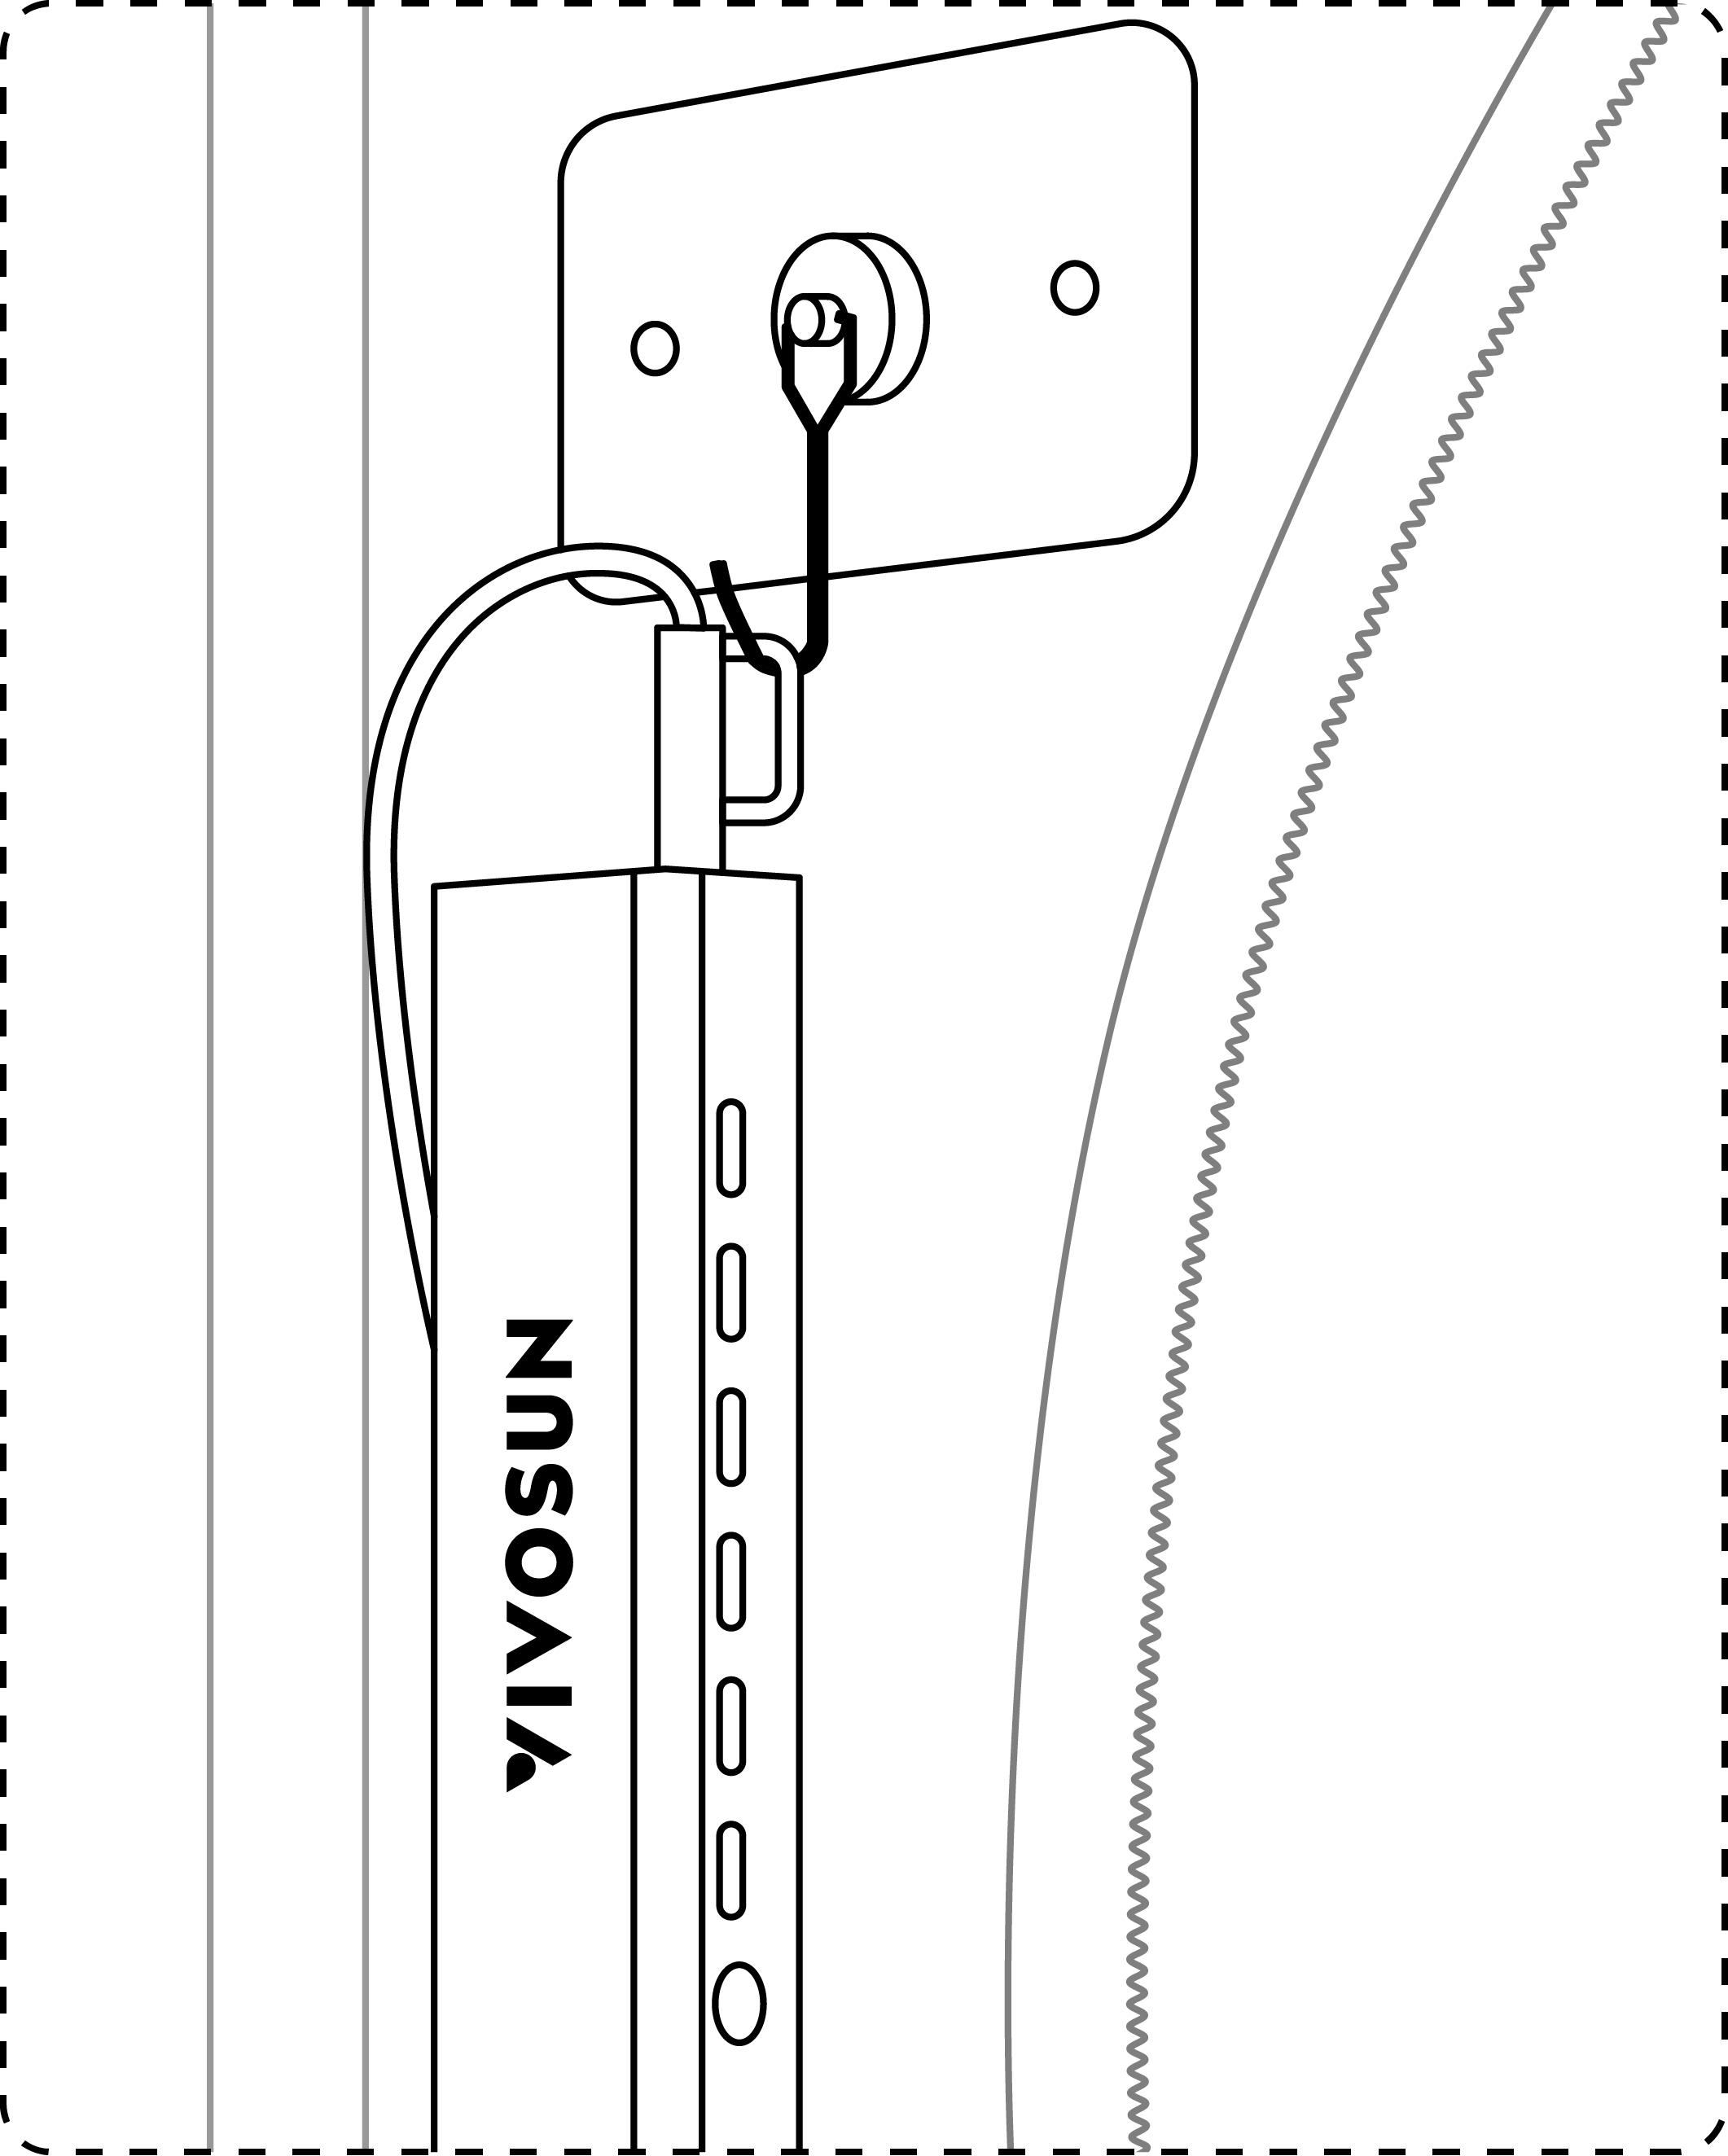
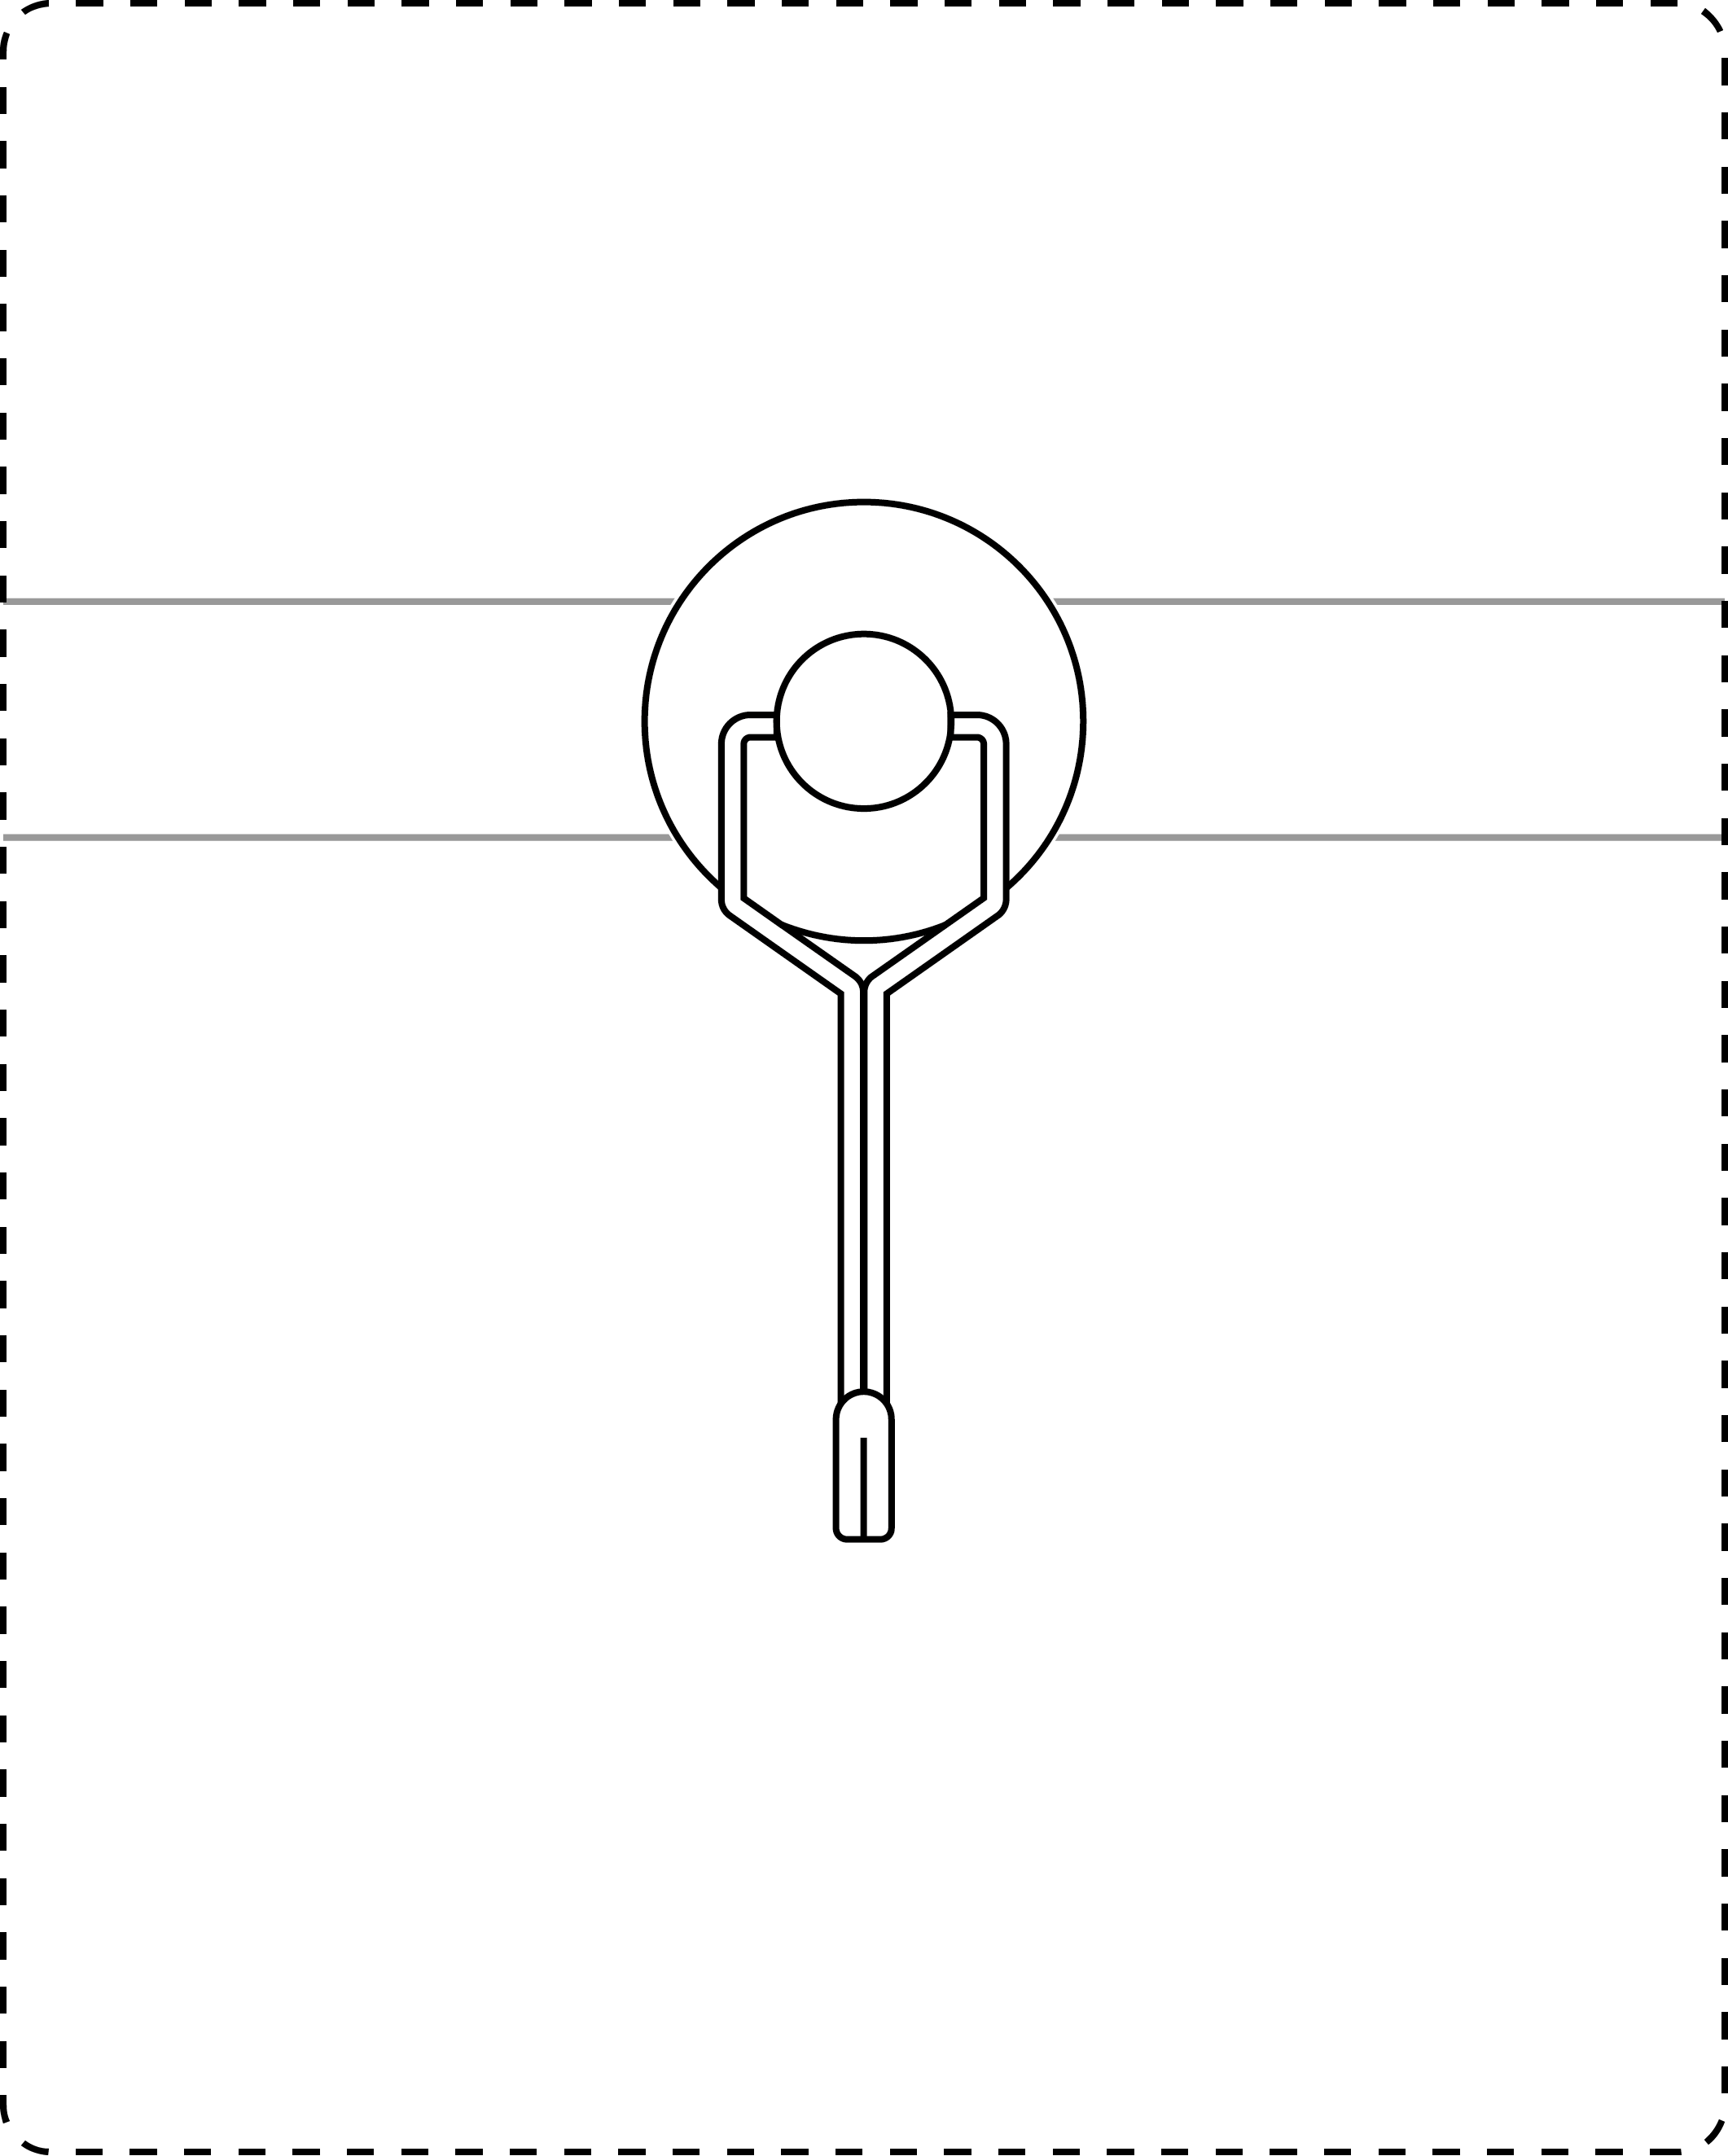
Depending on your setup needs, magnetically attach the mounting hook either directly onto the inner iron plate or onto any of the grow tent’s metal poles. Once the hook is secured, safely hang the Hub on it.
|
|
Step 3:
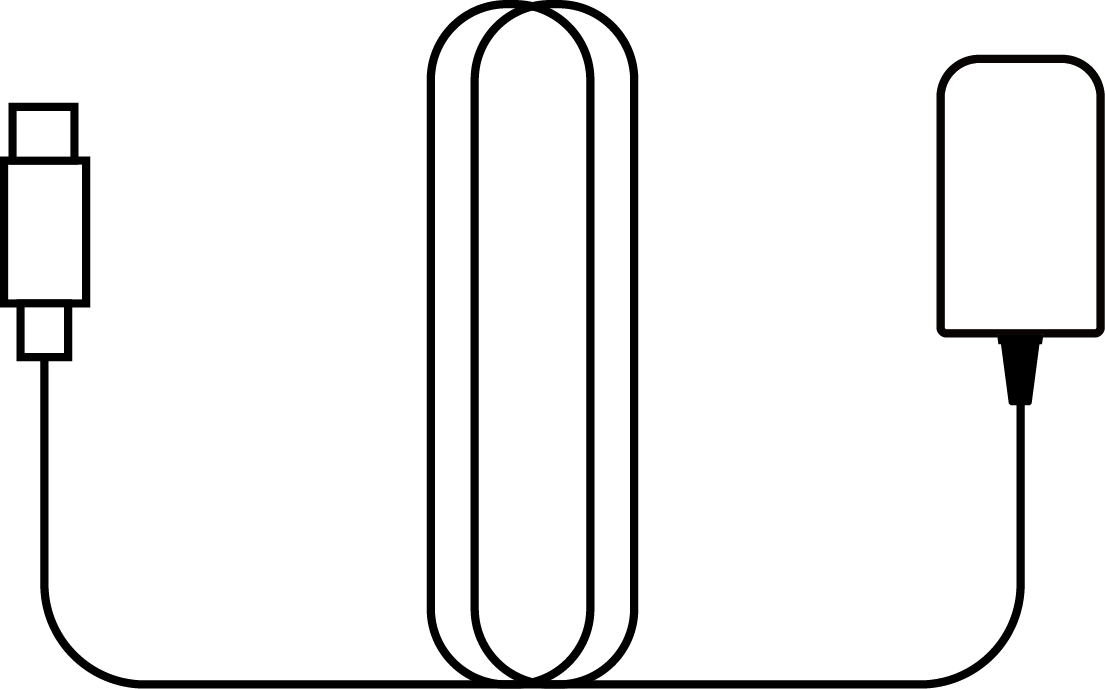
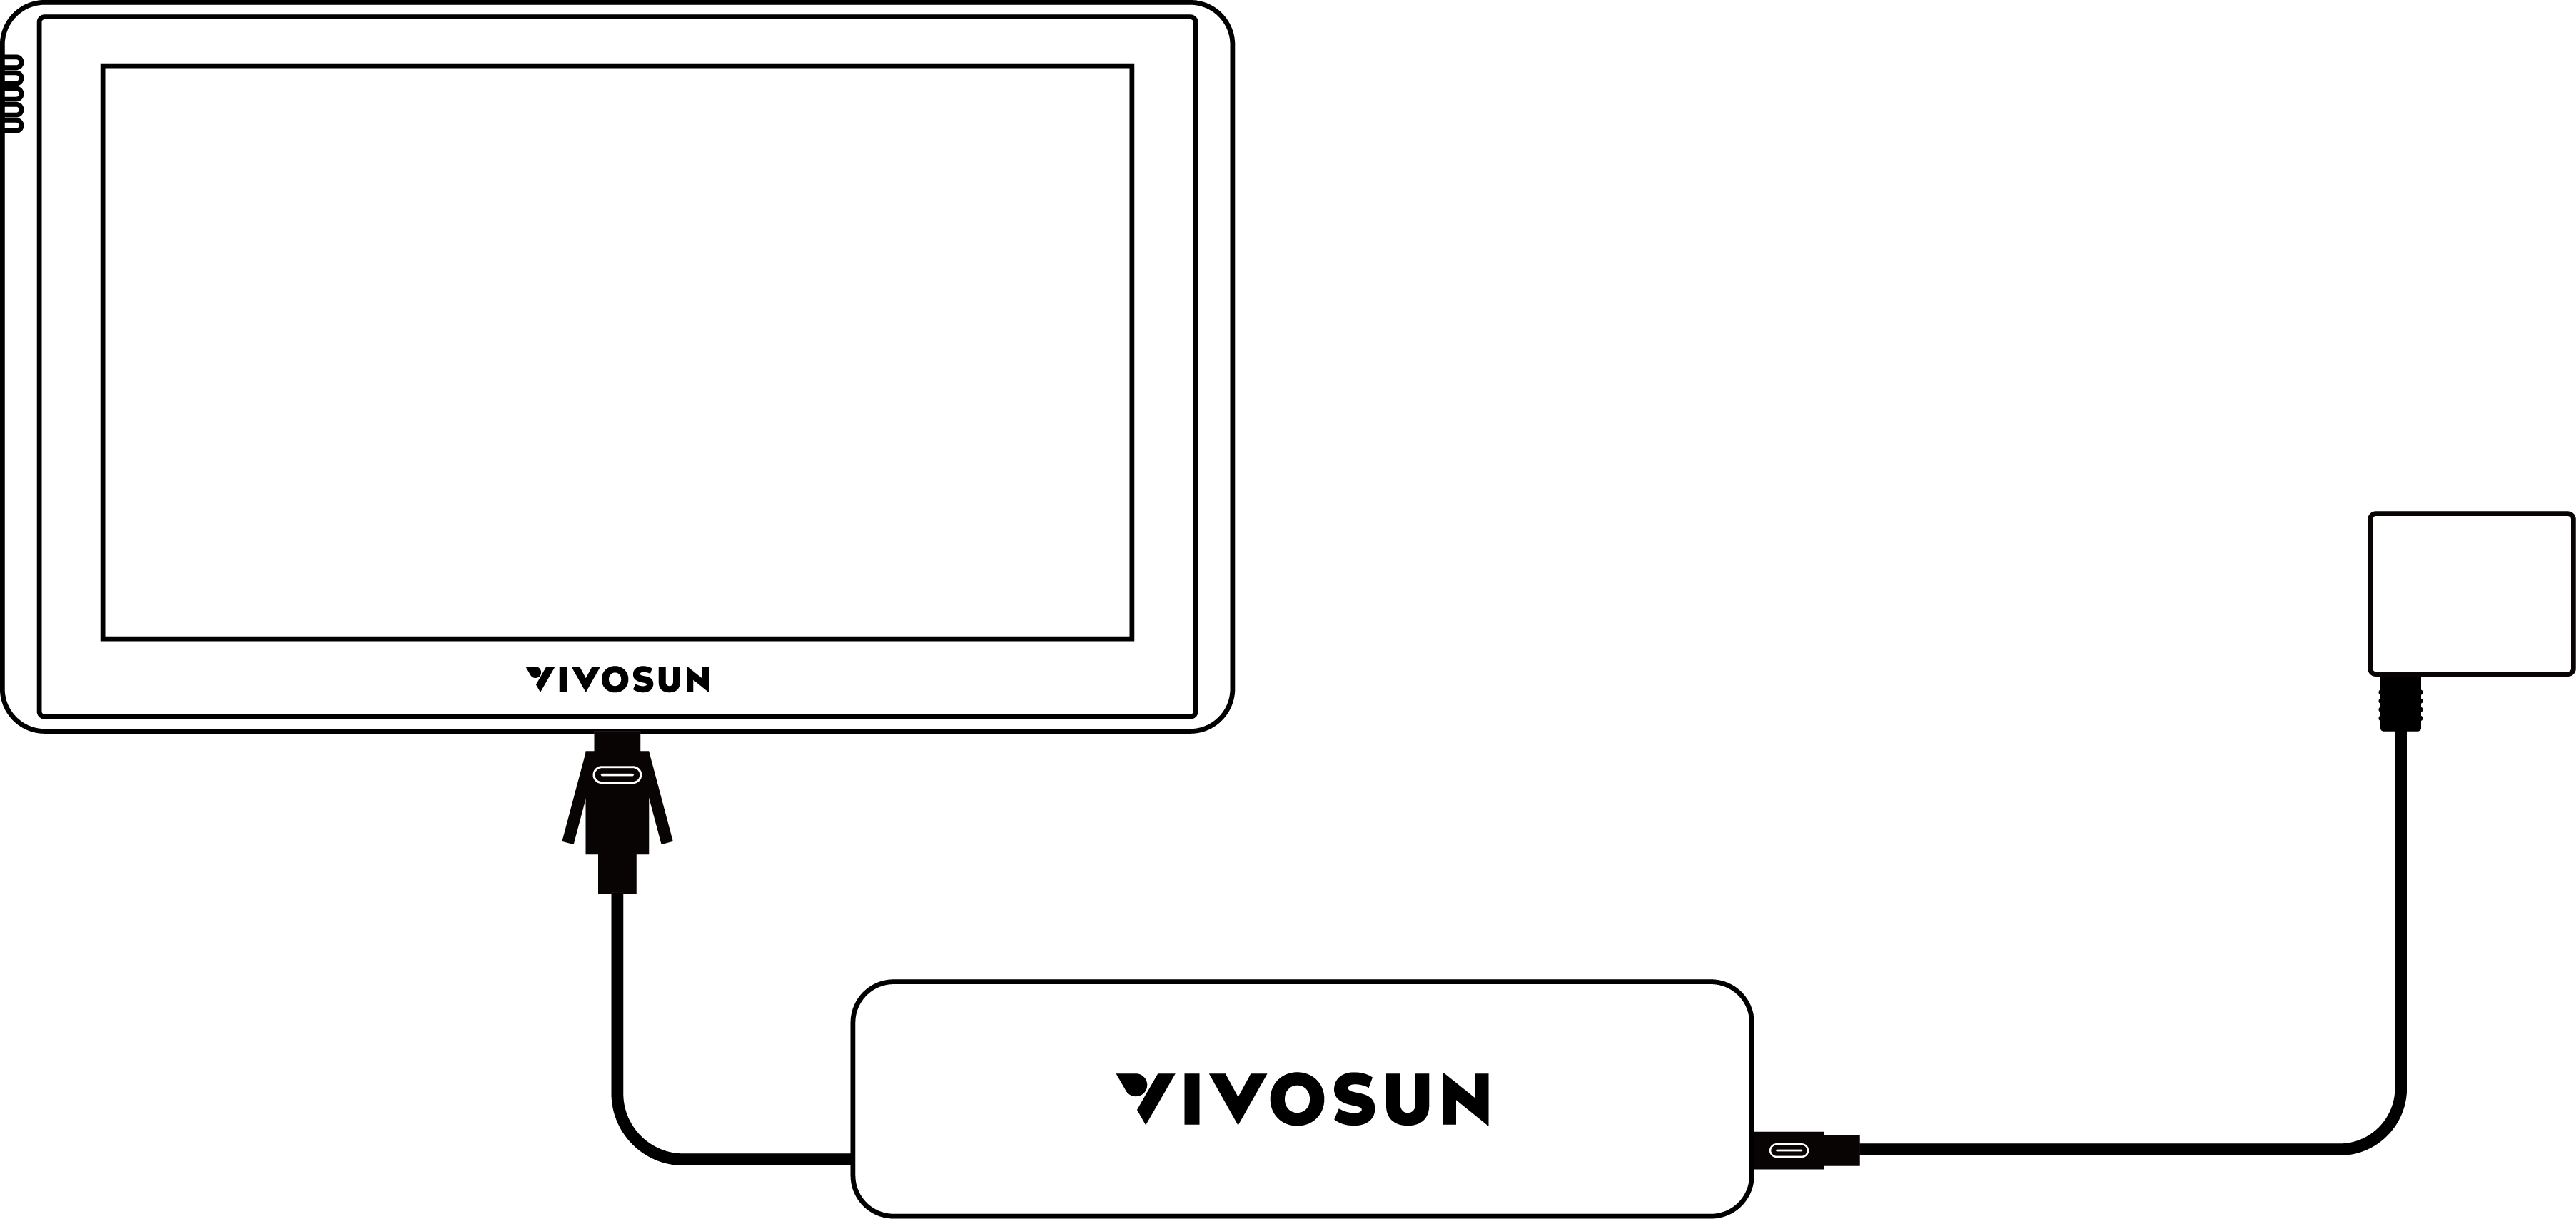
Connect the provided cable from the Hub to the X42 unit, then plug the Hub’s power cord into an outlet to power the system.
Step 4:
Plug your wired devices, such as grow lights, AeroZesh inline duct fans and AeroWave E clip-on fans, directly into the available ports on the Hub. Alternatively, these wired devices can be connected wirelessly to the X42 using the E25 controller. For other wireless climate devices, such as AeroStream humidifier, AeroDrain dehumidifier, AeroLush air-conditioner and AeroLush Heater, pair them directly to the X42 via Bluetooth.
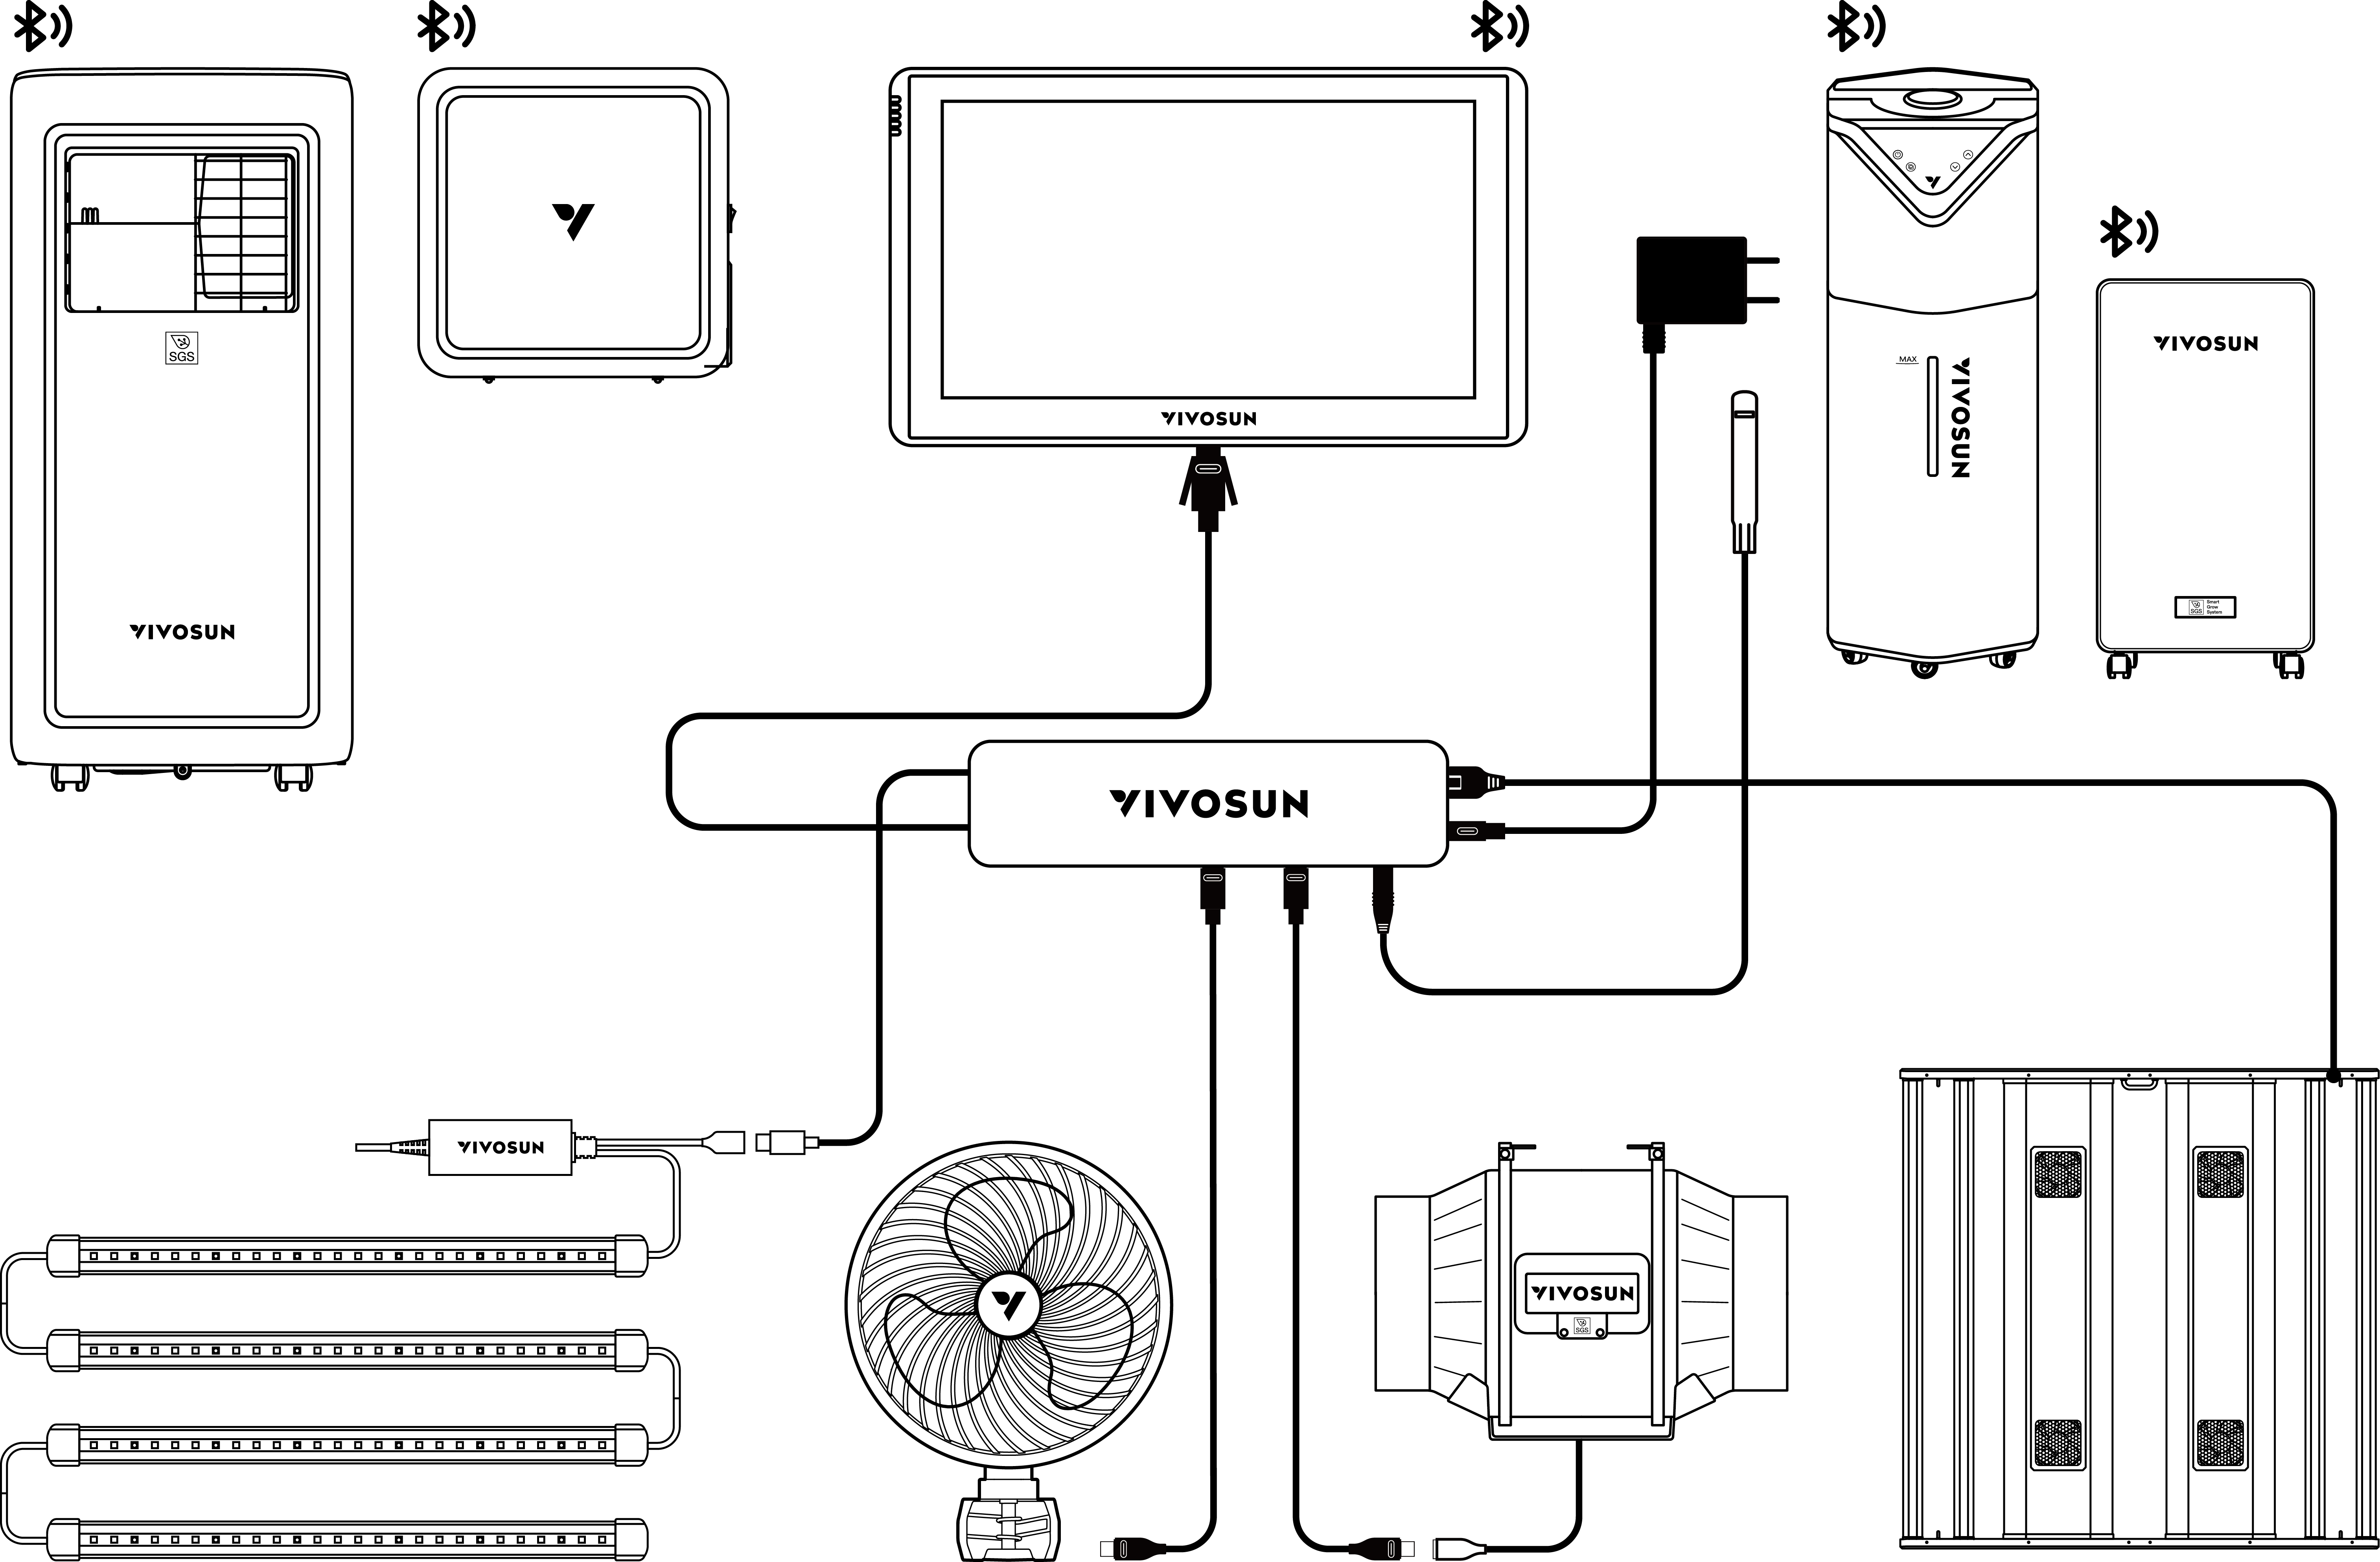
*Wired Connection
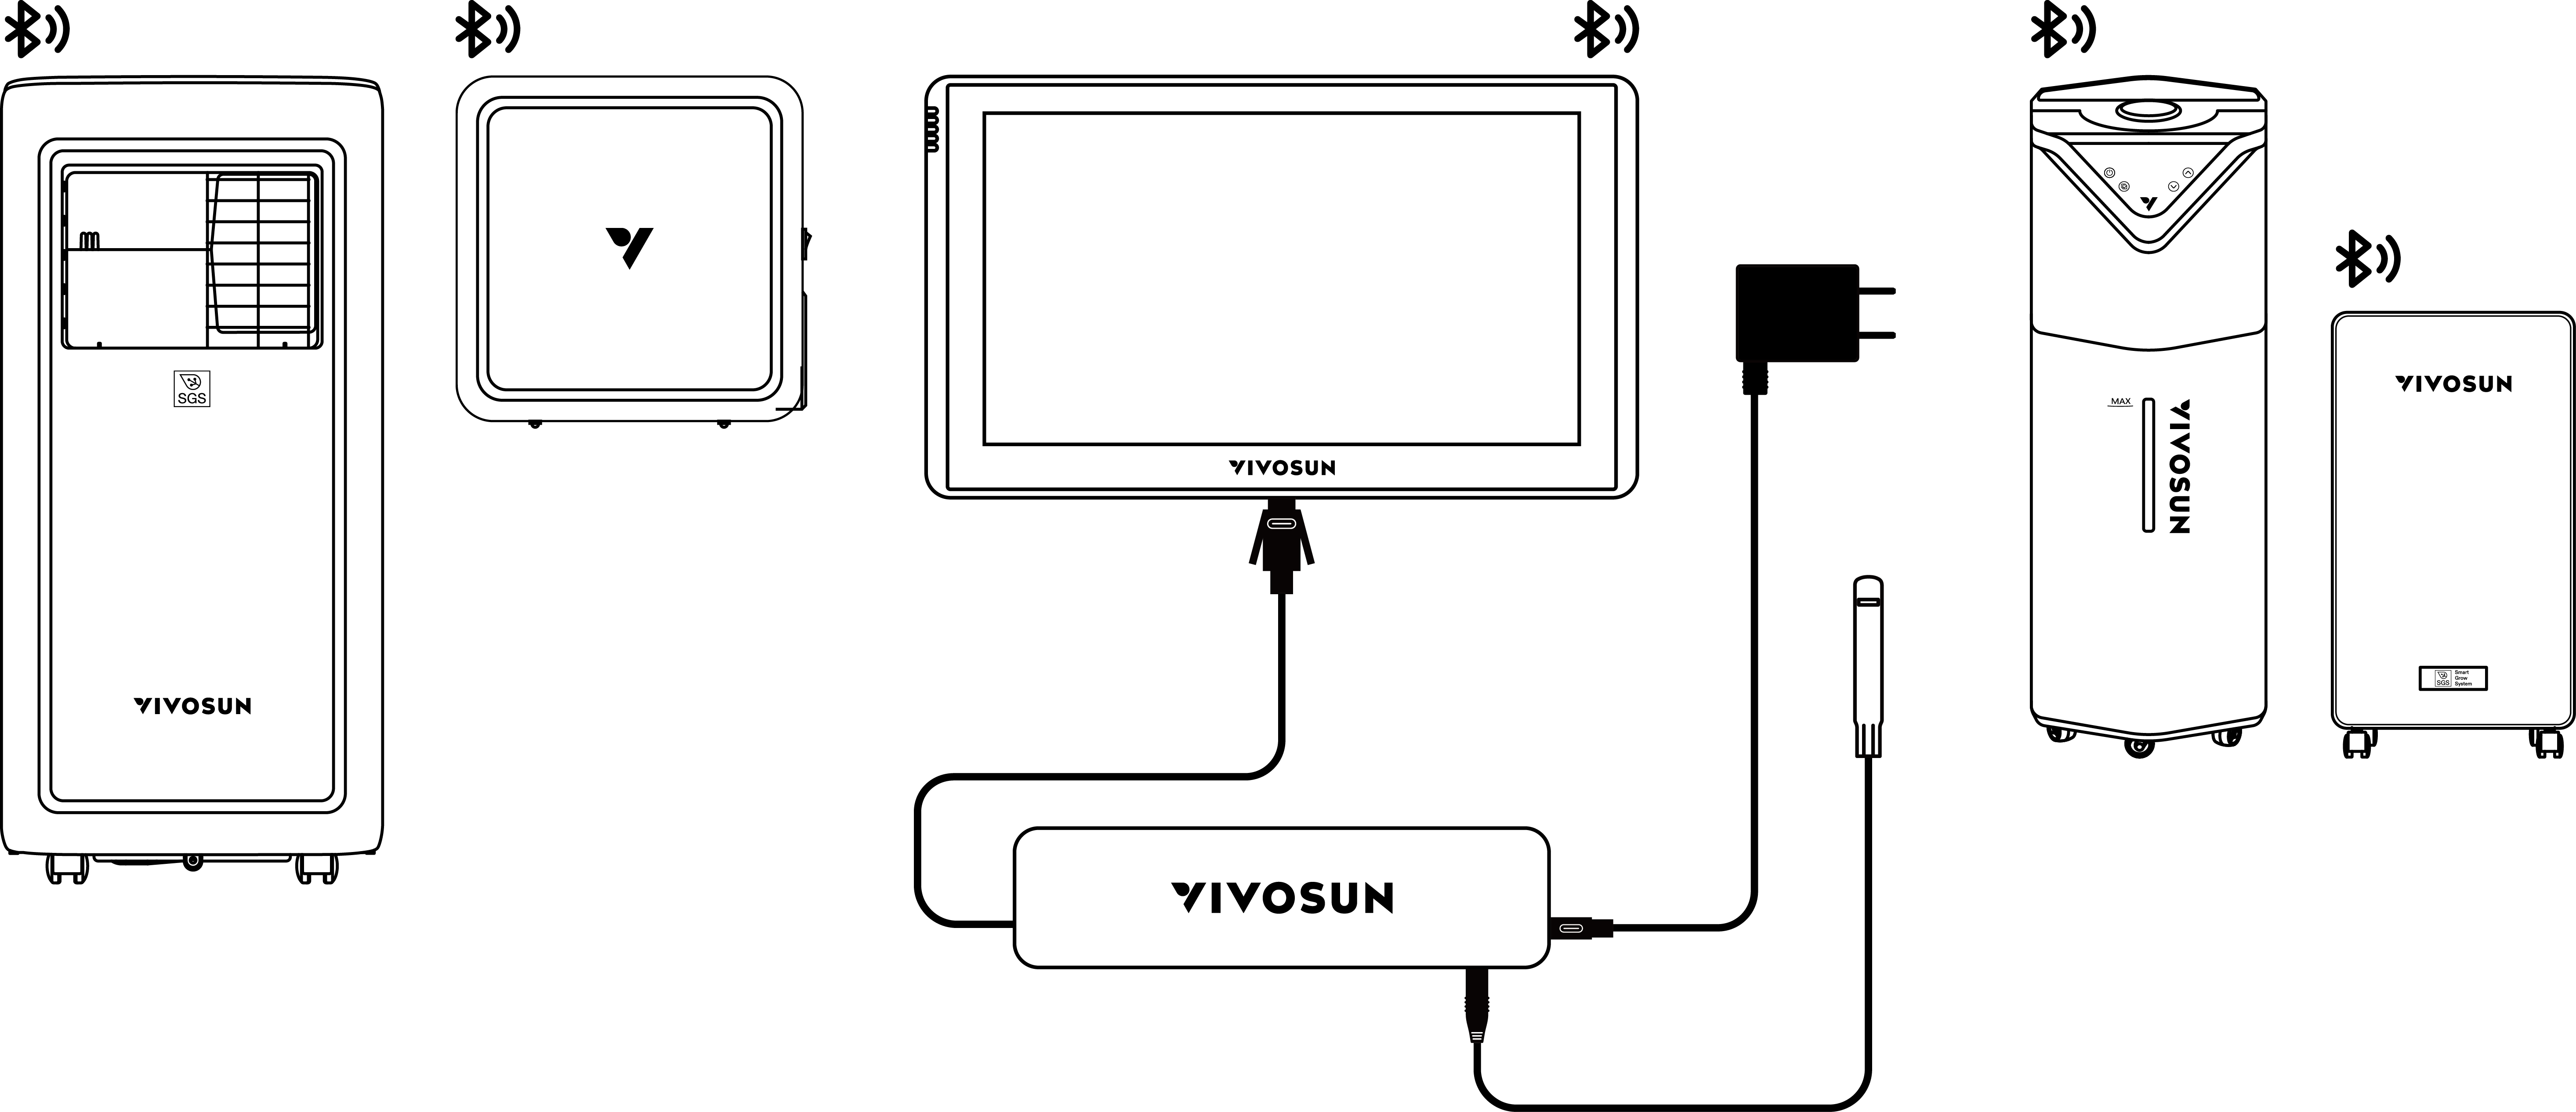
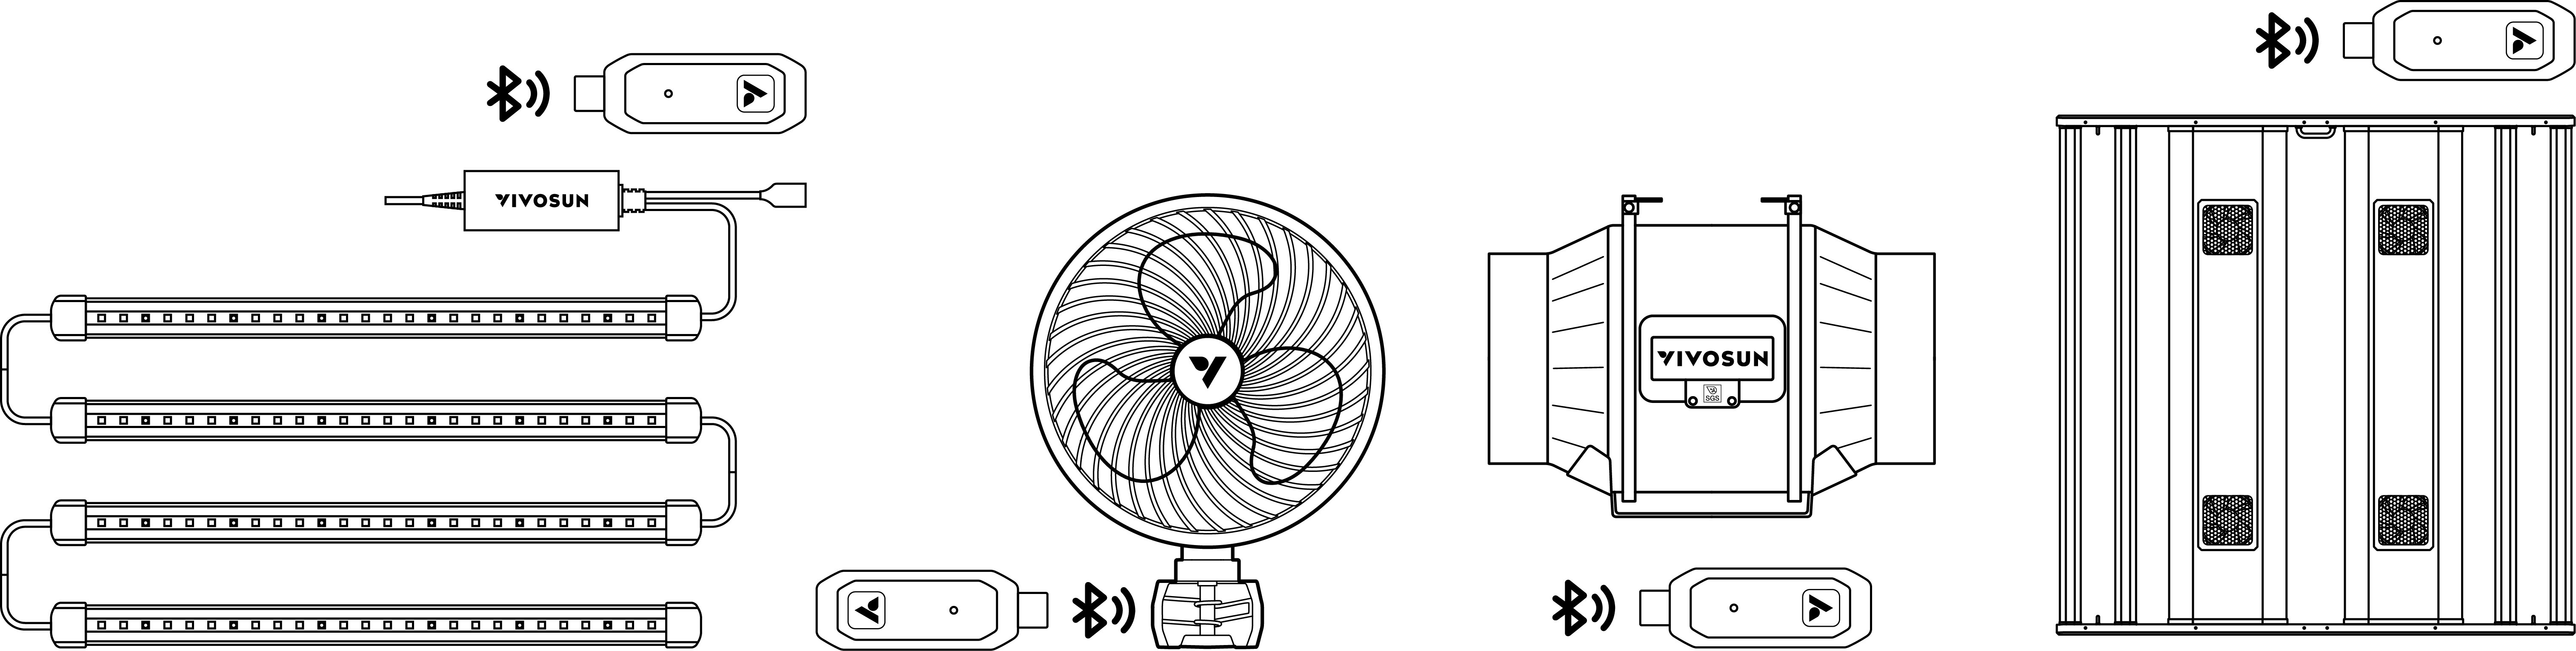
*Wireless Connection
Connection
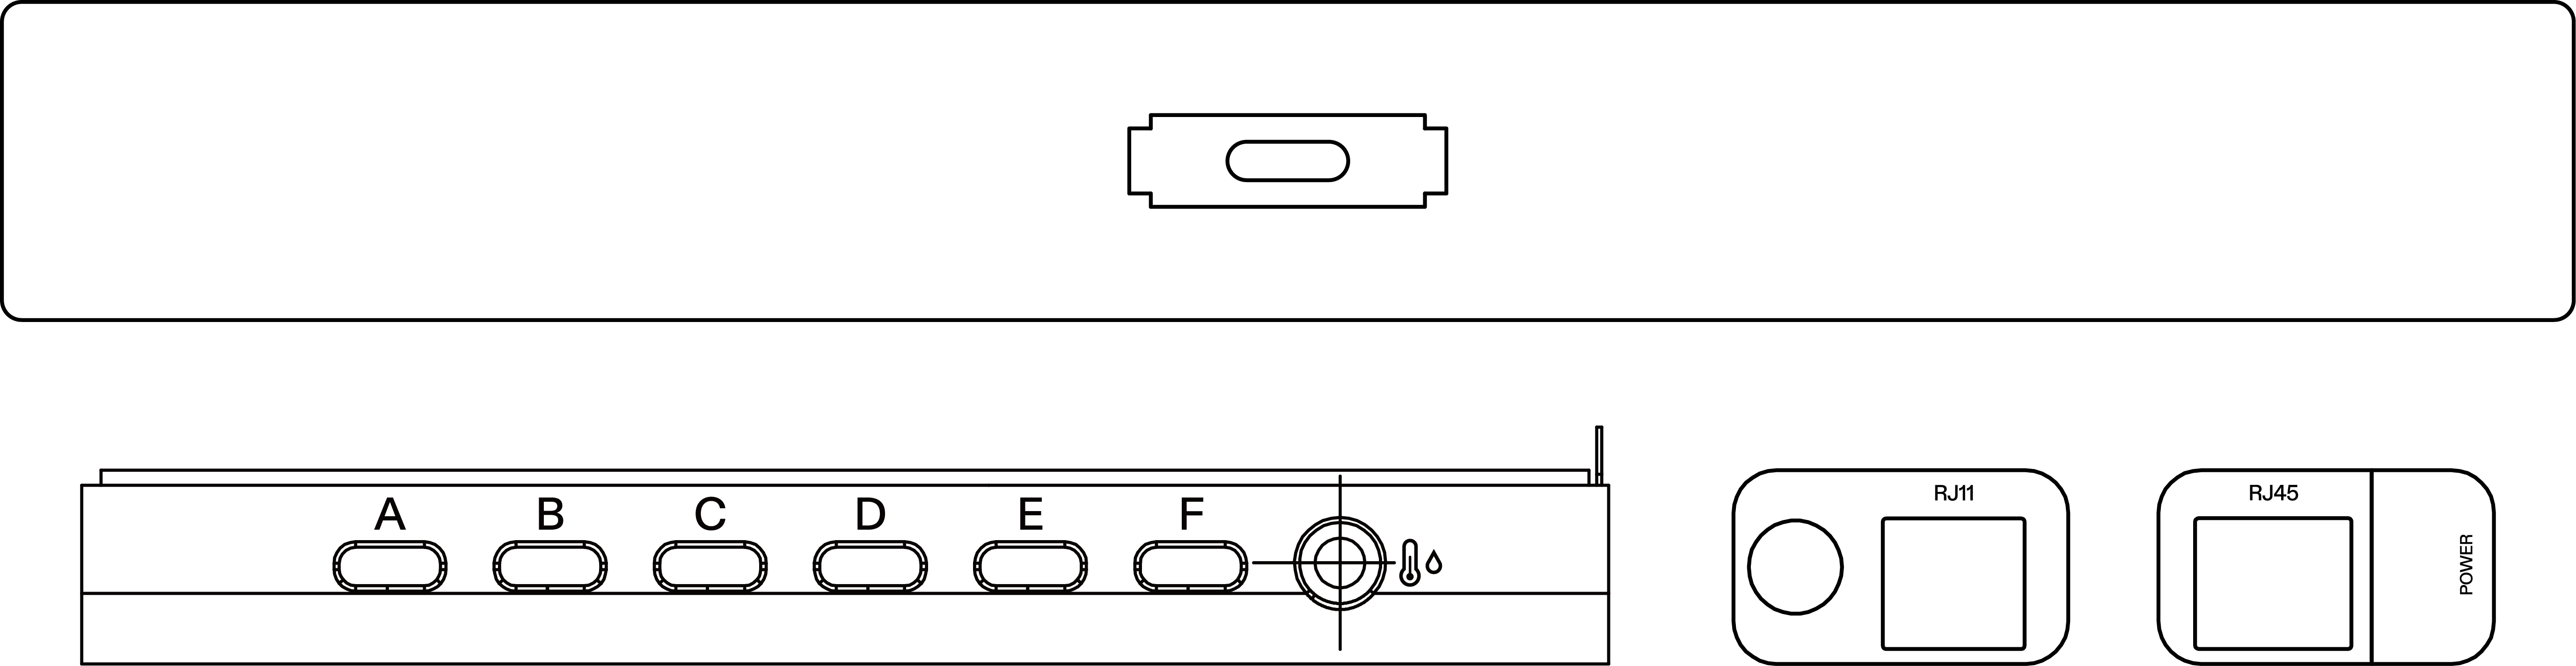
Component |
Port |
Connection |
Main Console |
Type-C Power Port |
Built-in Type-C male cable on the Hub to power the screen |
Hub |
RJ11 Converter |
Grow lights, such as the LumaLight. |
RJ45 Converter |
Grow lights, such as the AeroLight. |
|
Type-C Power Port |
Power Adapter |
|
Universal Type-C Ports A/B/C/D/E/F |
AeroWave E Clip-on Fans, AeroZesh Inline Fans, and other compatible gear. |
|
2.5mm AUX Interface |
Temperature & Humidity Sensor or 4-in-1 Sensor |
Operation
To unlock the full potential of your GrowHub AI controller X42, we highly recommend connecting it to the Vivosun App. Please note that the advanced AI Mode is exclusive to the app—it can only be activated and configured via your smartphone. Additionally, the app unlocks more powerful features like Grow Recipes, and allows you to seamlessly monitor and control your grow environment from anywhere.
Connect GrowHub Controller to the Vivosun App
1. Download the Vivosun App
Search ''VIVOSUN'' in the Apple App Store or in the Google Play Store to download the Vivosun app.

2. Add GrowHub AI Controller X42
Tap ''+'' or  to add GrowHub AI Controller X42. When connecting to the Vivosun app,
  will flash on the screen.
Local Operation
-
Main Page
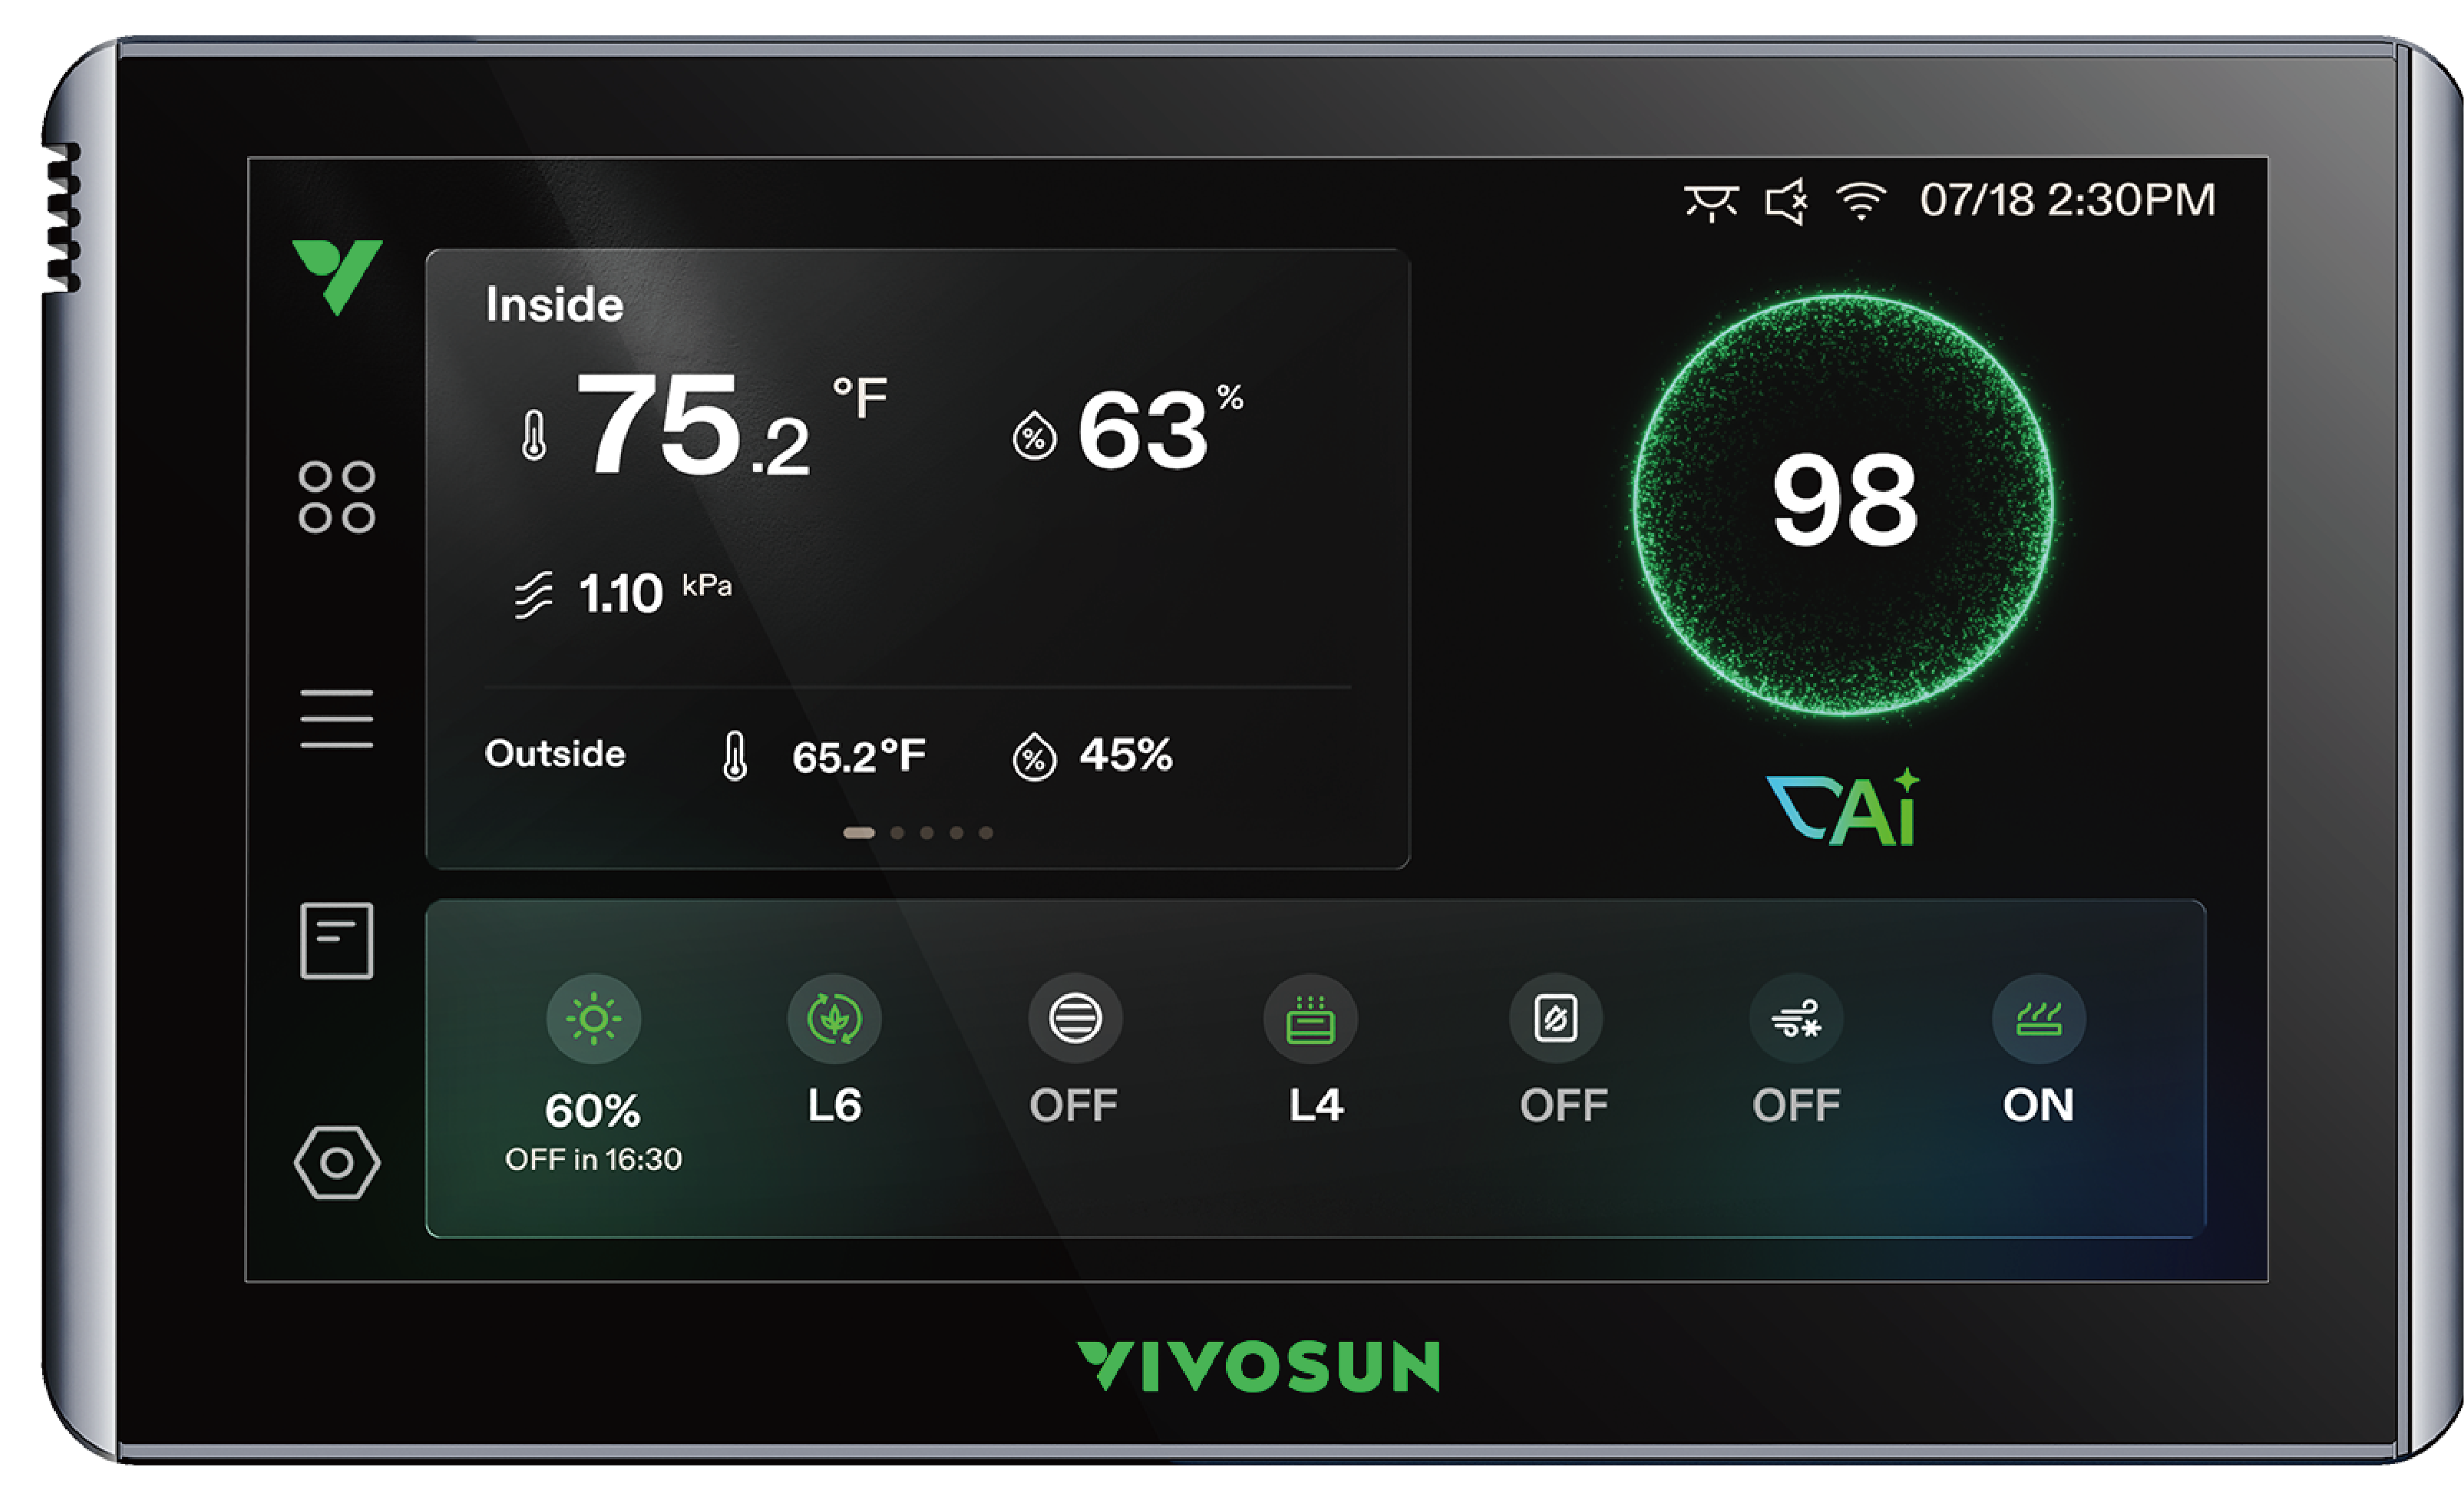
Icon |
Function Description |
|
1. Enter the Control page. |
|
1. Enter the Connection page. |
|
1. Enter the Log page. |
|
Enter the Settings page for system configuration and calibration. |



B. First Time Set Up
1. Powering On: Connect the main console to the Hub, then plug the provided Power Adapter into the Hub’s power port.
Note: Unlike previous models, the X42 Controller must be powered by the included adapter and cannot draw power from other connected devices.
2. Setting the Time: Follow the on-screen prompts to set your system time. Once connected to Wi-Fi, the controller will automatically sync to your local time.
3. Configuring Hub Ports: When you plug devices (such as an AeroZesh or AeroWave) into the Hub, you must use the main console screen to select the exact device type for each corresponding port. This ensures the controller uses the correct operating logic.
You can adjust these port settings at any time by going to Connection > SGS Wired.
Note: All ports assigned the same device type will operate under the same climate logic. For example, if Ports A, B, and C are all configured as AeroWave clip-on fans, they will all follow the same circulation fan logic.
Device Status Bar
The bottom bar displays the real-time status of your connected equipment:
1. Default Devices: Core devices like Grow Lights, Inline Duct Fans, and Circulation Fans are permanently displayed on the home page, regardless of their connection status.
2. Environmental Devices: Devices linked via Bluetooth (such as AeroStream Humidifiers, AeroDrain Dehumidifiers, AeroLush ACs or AeroFlux Heaters) will automatically appear in this status bar once paired.
3. Operating Levels: The text below each icon indicates its current setting (e.g., "L6" or "60%").
Note: Certain climate devices like ACs, Dehumidifiers, and Heaters will simply display "ON" or "OFF" instead of a level.
4. Running Status (Green Icon): An icon lights up green to indicate the device is actively running. For example:
-If a device is in Auto Mode, the icon will turn green whenever the system triggers it to turn on.
-For the AC, the icon lights up green specifically when the compressor is actively running.
5. Quick Access: Tap any device icon in the status bar to quickly navigate directly to that specific device’s settings page.
AI Control Score
Once the AI feature is activated via the Vivosun App, a dynamic score will appear in the top right corner indicating how effectively the AI is controlling your equipment to reach your target Temperature, Humidity, and VPD.
1. Activation: The score is specifically generated after the AI control function is enabled within the Vivosun App.
2. Scoring Logic: The system evaluates the AI’s control performance by continuously comparing your Target Settings (your ideal Temp, Humidity, and VPD) against the Real-Time Readings in your grow space.
Grow Light Settings Page
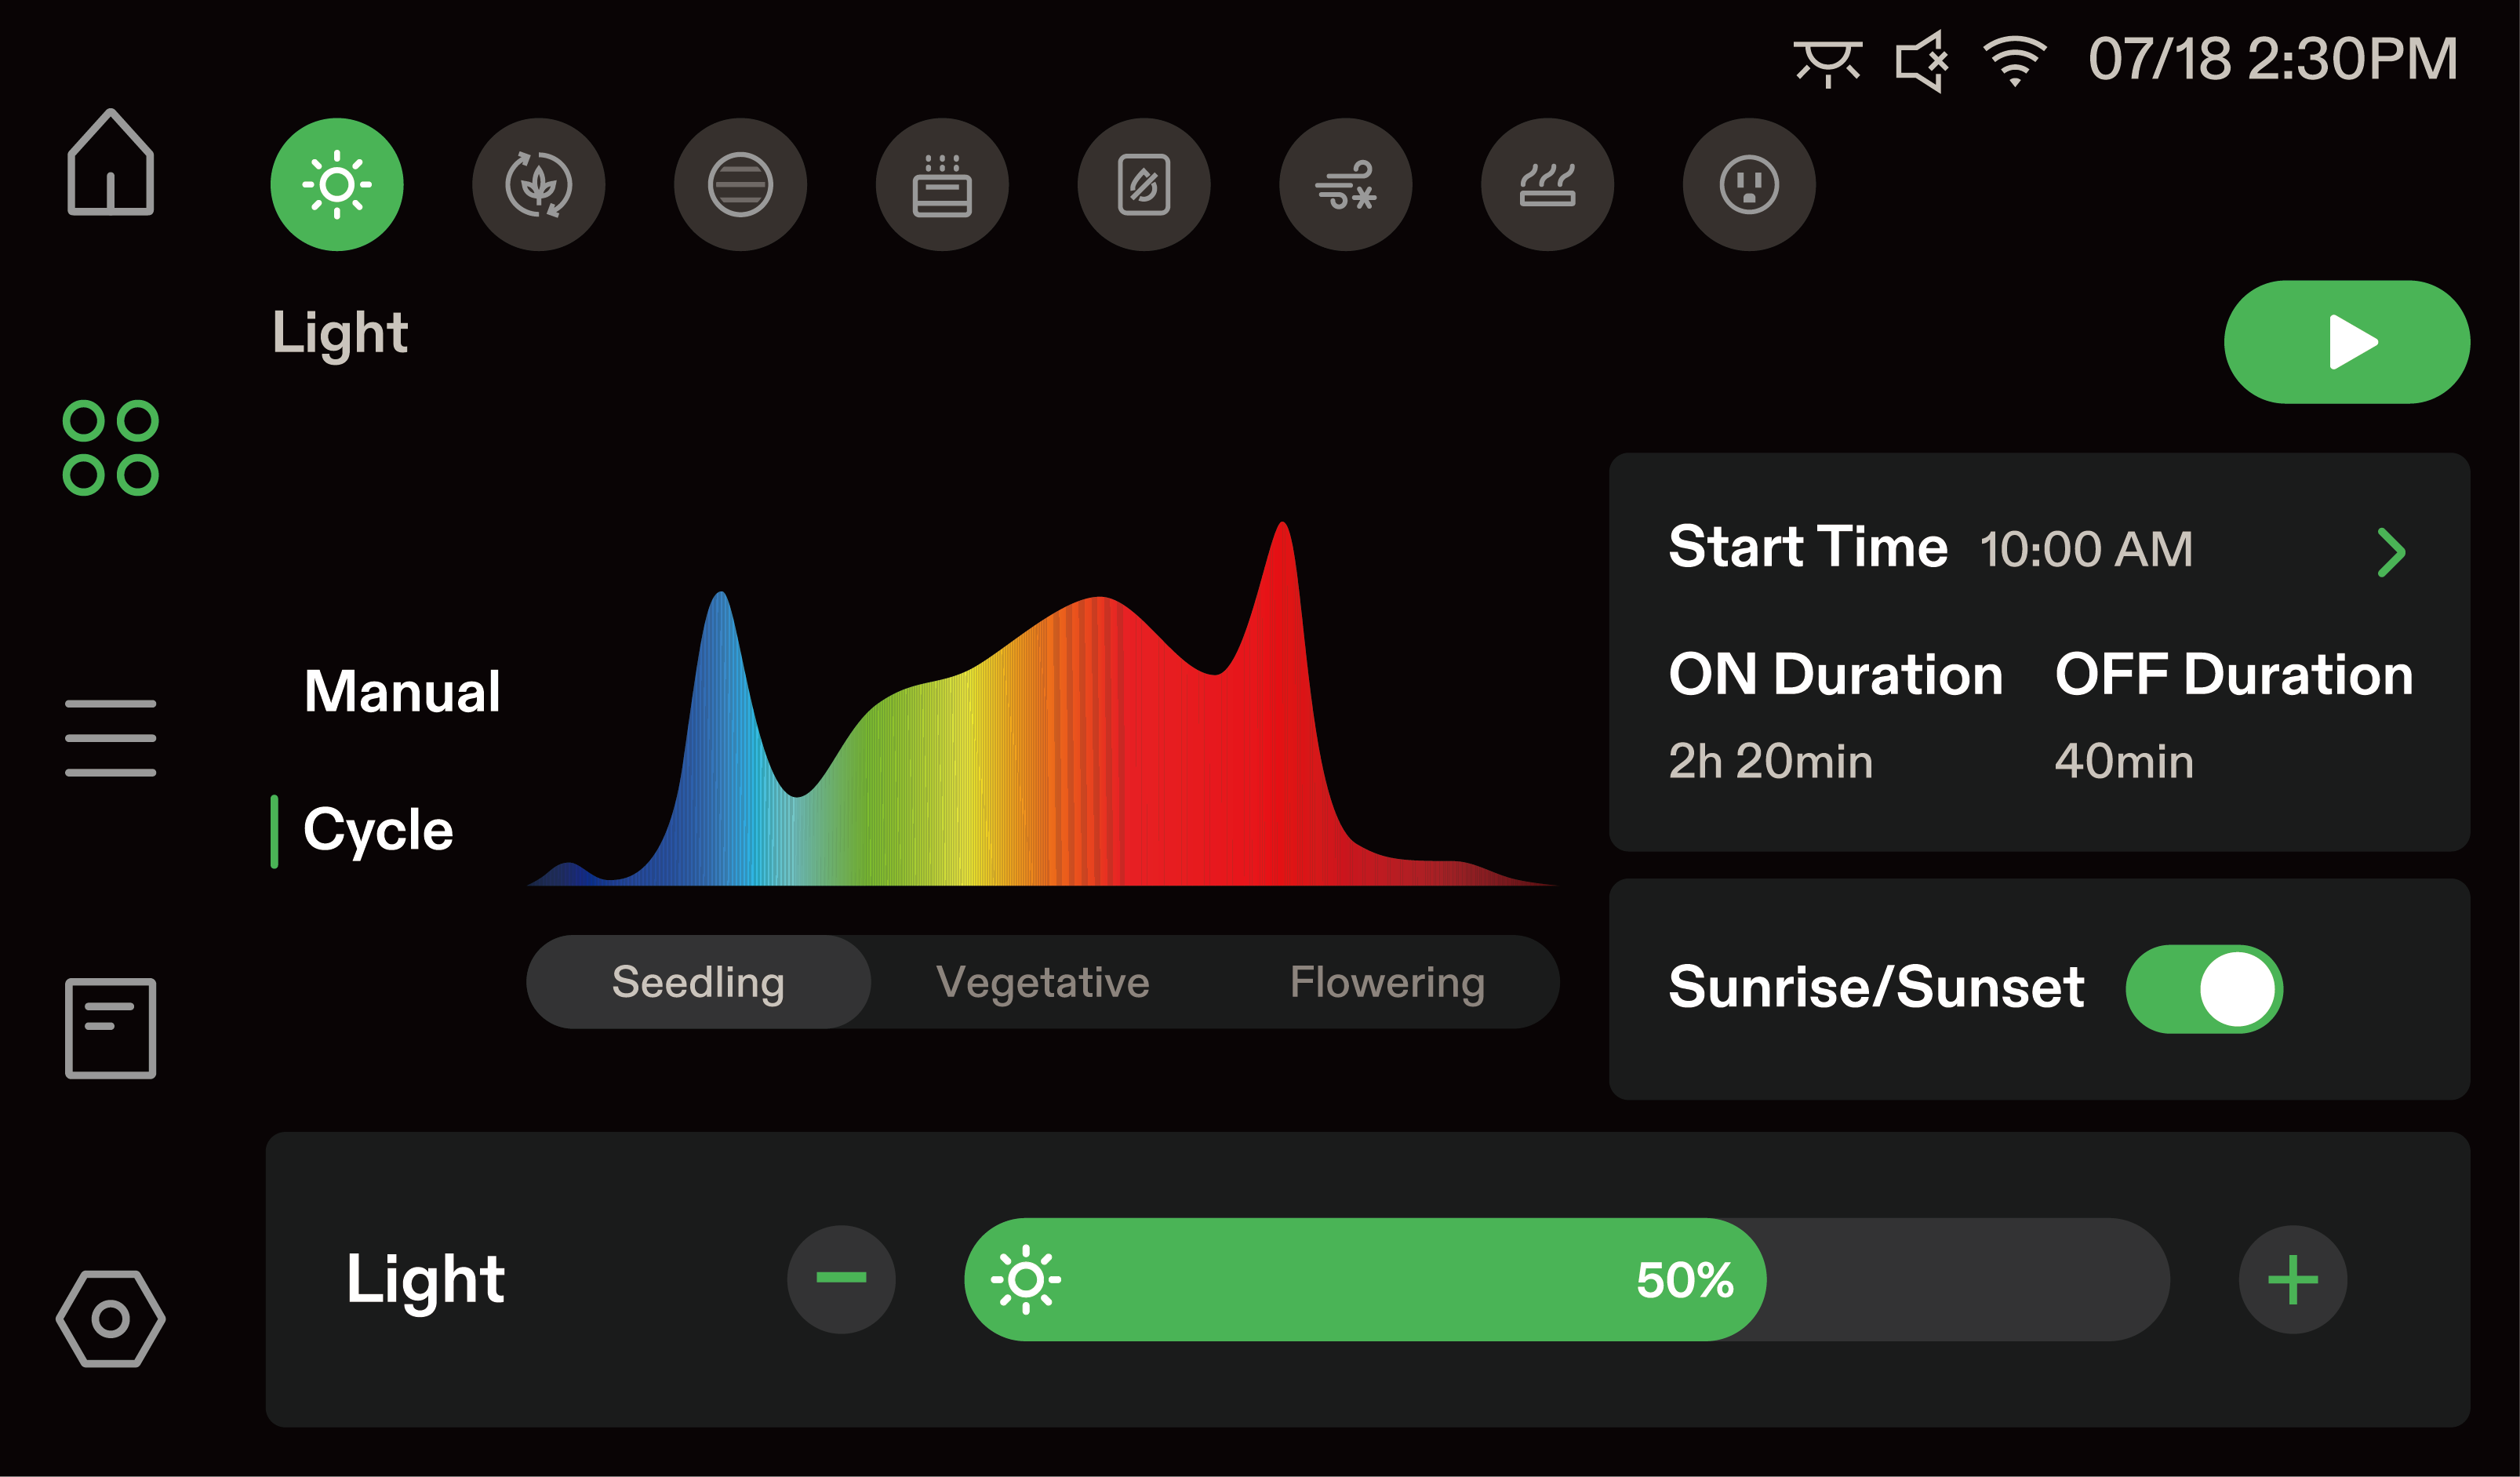
This interface allows you to fully customize your lighting schedules, spectrums, and intensity for optimal plant growth.
1. Operating Modes
-
Manual: The light will run continuously at your set intensity until you manually turn it off or change the mode.
-
Cycle (Selected): Runs an automated daily schedule based on specific "ON" and "OFF" durations.
2. Spectrum
Tap to select between Seedling, Vegetative, or Flowering spectrums.
3. Cycle Settings
-
Start Time: Tap to set the precise time of day your lighting cycle begins.
-
ON / OFF Duration: Displays and allows you to edit how long the light stays on versus off within a 24-hour period (e.g., 18hr ON / 6hr OFF).
4. Sunrise/Sunset
-
Toggle this ON to simulate natural dawn and dusk. The light will gradually dim up when turning on, and dim down when turning
-
off(default duration is 10 minutes). This prevents sudden light shock and reduces plant stress.
5. Intensity Control
Adjust the light intensity of your grow light. Use the "-" and "+" buttons to precisely dial in the percentage, or drag the green slider to reach your desired intensity (0-100%).
6. Start/Pause
Once you have finished configuring your parameters, tap the green "Play" button. This will activate your settings and begin running the Cycle mode.
Circulation Fan Settings Page
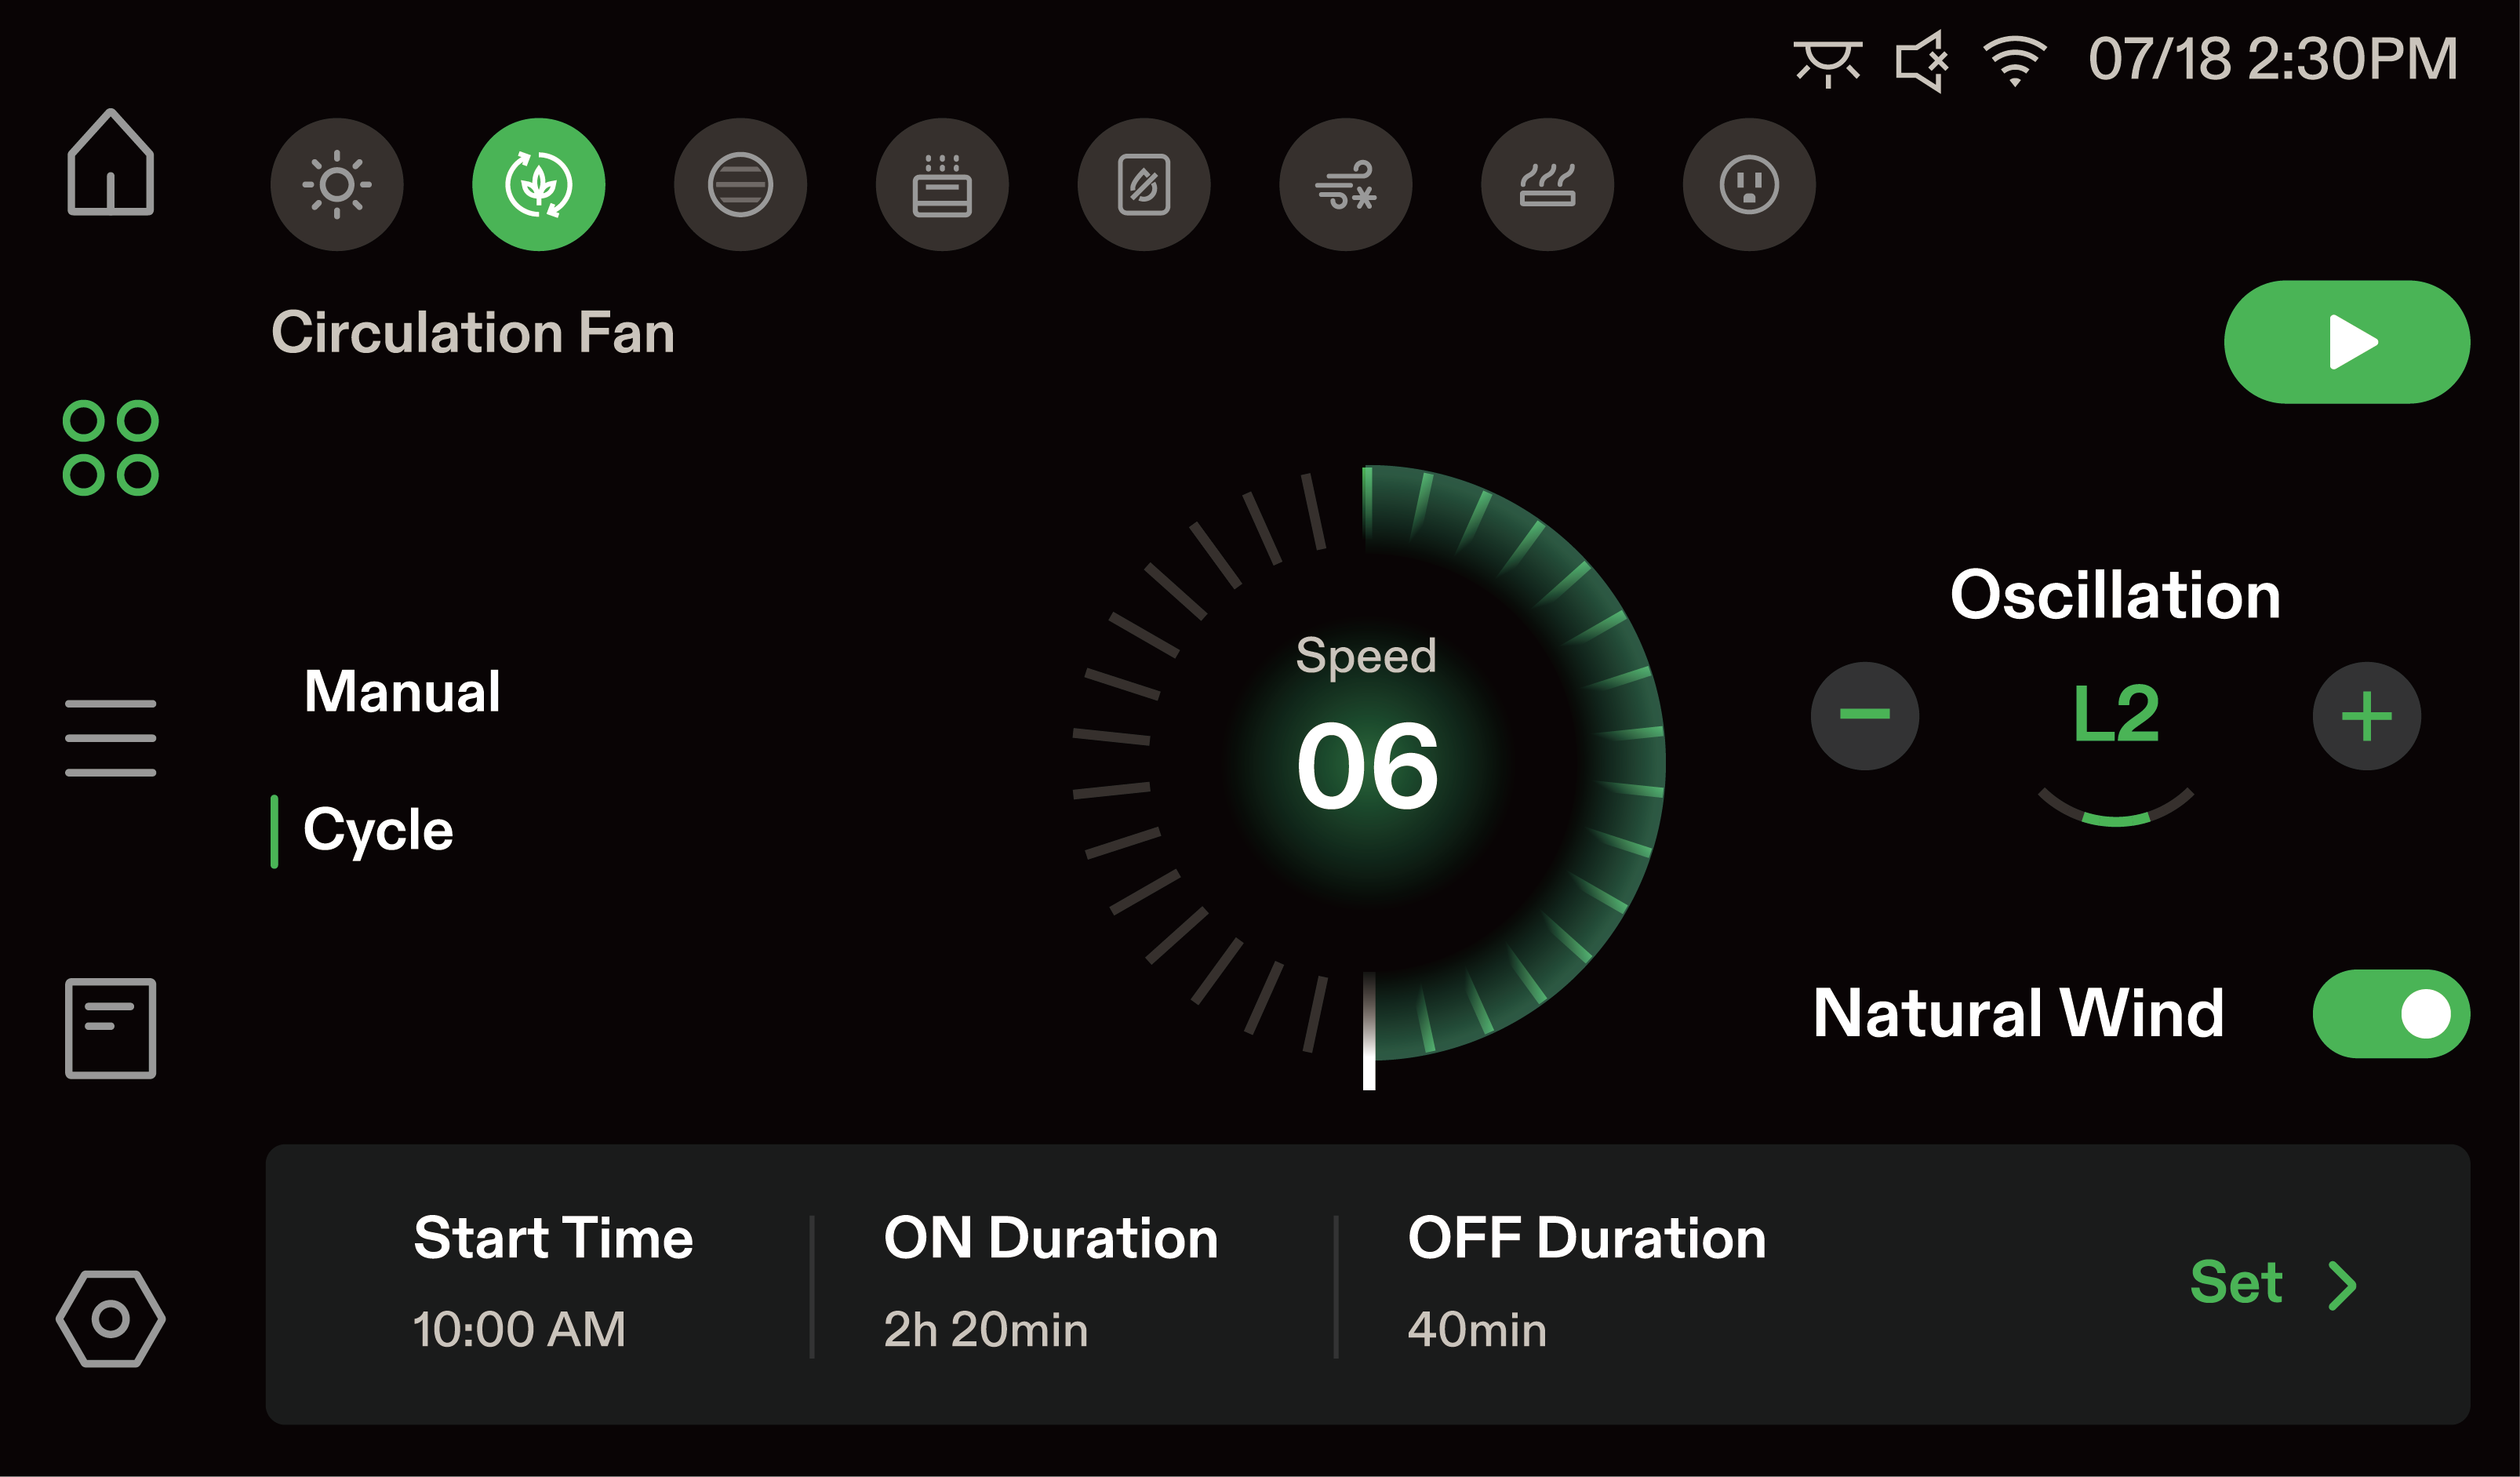
This interface allows you to customize your fan speed, oscillation, and operating schedules to maintain optimal airflow.
1. Operating Modes
-
Manual: The fan will run continuously at your current settings until you manually turn it off or change the mode.
-
Cycle (Selected): Runs an automated schedule based on specific "ON" and "OFF" durations.
2. Speed Control (Range: OFF to 10)
Adjust the fan speed by dragging the green circular dial to select your desired level.
3. Oscillation (Range: L0 to L5)
Use the "-" and "+" buttons to adjust the fan’s oscillation angle.
4. Nature Wind
Toggle this ON to simulate natural outdoor breezes. The fan speed will dynamically fluctuate to promote stronger plant stems and prevent localized wind stress.
5. Cycle Settings: Tap "Set >" to edit your schedule parameters.
-
Start Time: The precise time of day your fan cycle begins.
-
ON / OFF Duration: Displays how long the fan stays on versus off during the cycle period (e.g., 50min ON / 10min OFF).
6. Start/Pause
Once you have finished configuring your parameters, tap the green "Play" button. This will activate your settings and begin running the Cycle mode.
Duct Fan Settings Page
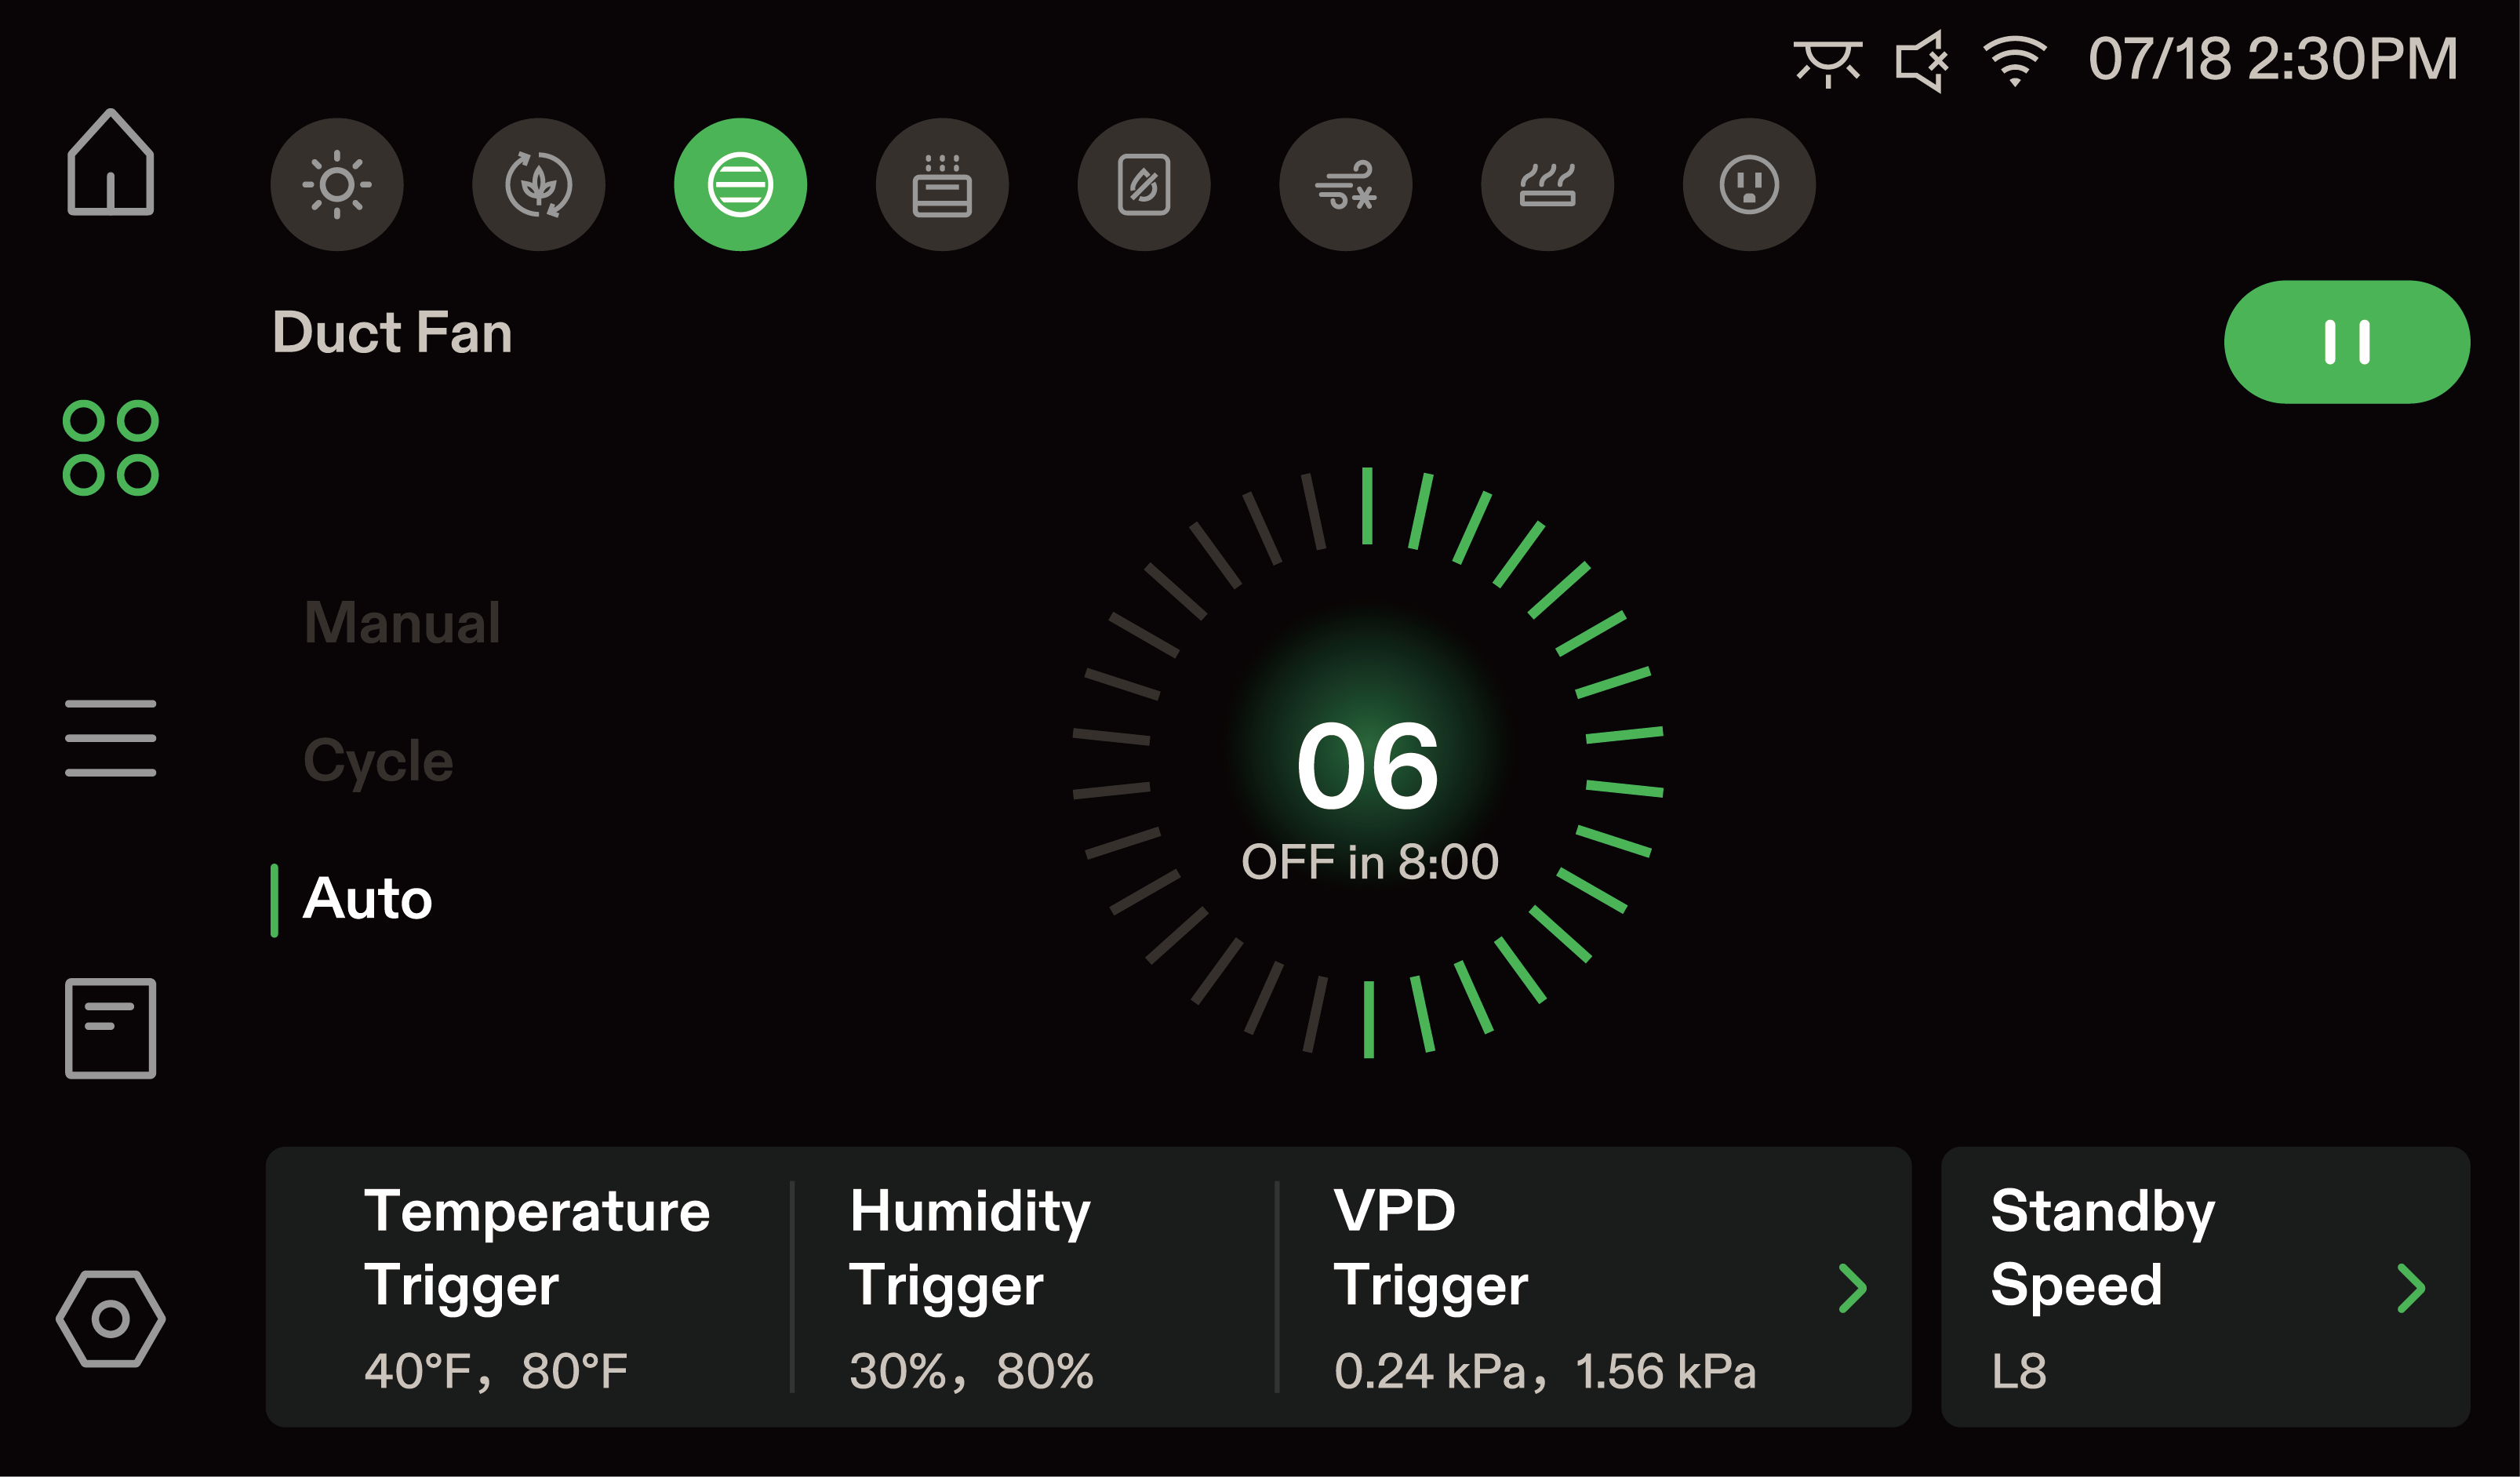
This interface allows you to control duct fan schedules and set smart environmental triggers to manage temperature, humidity, and airflow.
1. Operating Modes
-
Manual: The fan runs continuously at your selected speed until manually changed.
-
Cycle: Runs an automated repeating schedule based on specific "ON" and "OFF" durations.
-
Auto: The fan automatically adjusts its speed based on real-time environmental sensors (Temperature, Humidity, or VPD).
2. Speed Control
-
Manual & Cycle Modes: Drag the green dial to set your primary running speed (Range: OFF to 10).
-
Auto Mode (Max Speed): The dial sets the maximum speed the fan is allowed to reach when an environmental trigger is activated(Range: 1 to 10).
3. Cycle Settings (Cycle Mode Only)
Tap "To Set >" at the bottom to configure:
-
Start Time: The specific time of day the cycle begins.
-
ON / OFF Duration: Determines how long the fan runs versus how long it stops during the cycle (e.g., 45min ON / 15min OFF).
4. Environmental Triggers (Auto Mode Only)
Tap the bottom panels to set parameters for smart automation:
-
Temperature / Humidity / VPD Triggers: Set threshold limits. If the environment exceeds these limits, the fan will automatically ramp up to your Max Speed. The High trigger value must be greater than or equal to the Low trigger value (High ≥ Low).
-
Standby Speed: Set a continuous baseline speed for the fan to run when environmental conditions are within your ideal target range. The standby speed ranges from OFF up to your Max Speed, but cannot exceed the Max Speed.
5. Start/Pause When compiling settings in Cycle or Auto mode, tap the green "Play" button in the top right corner to activate your configuration.
Humidifier Settings Page
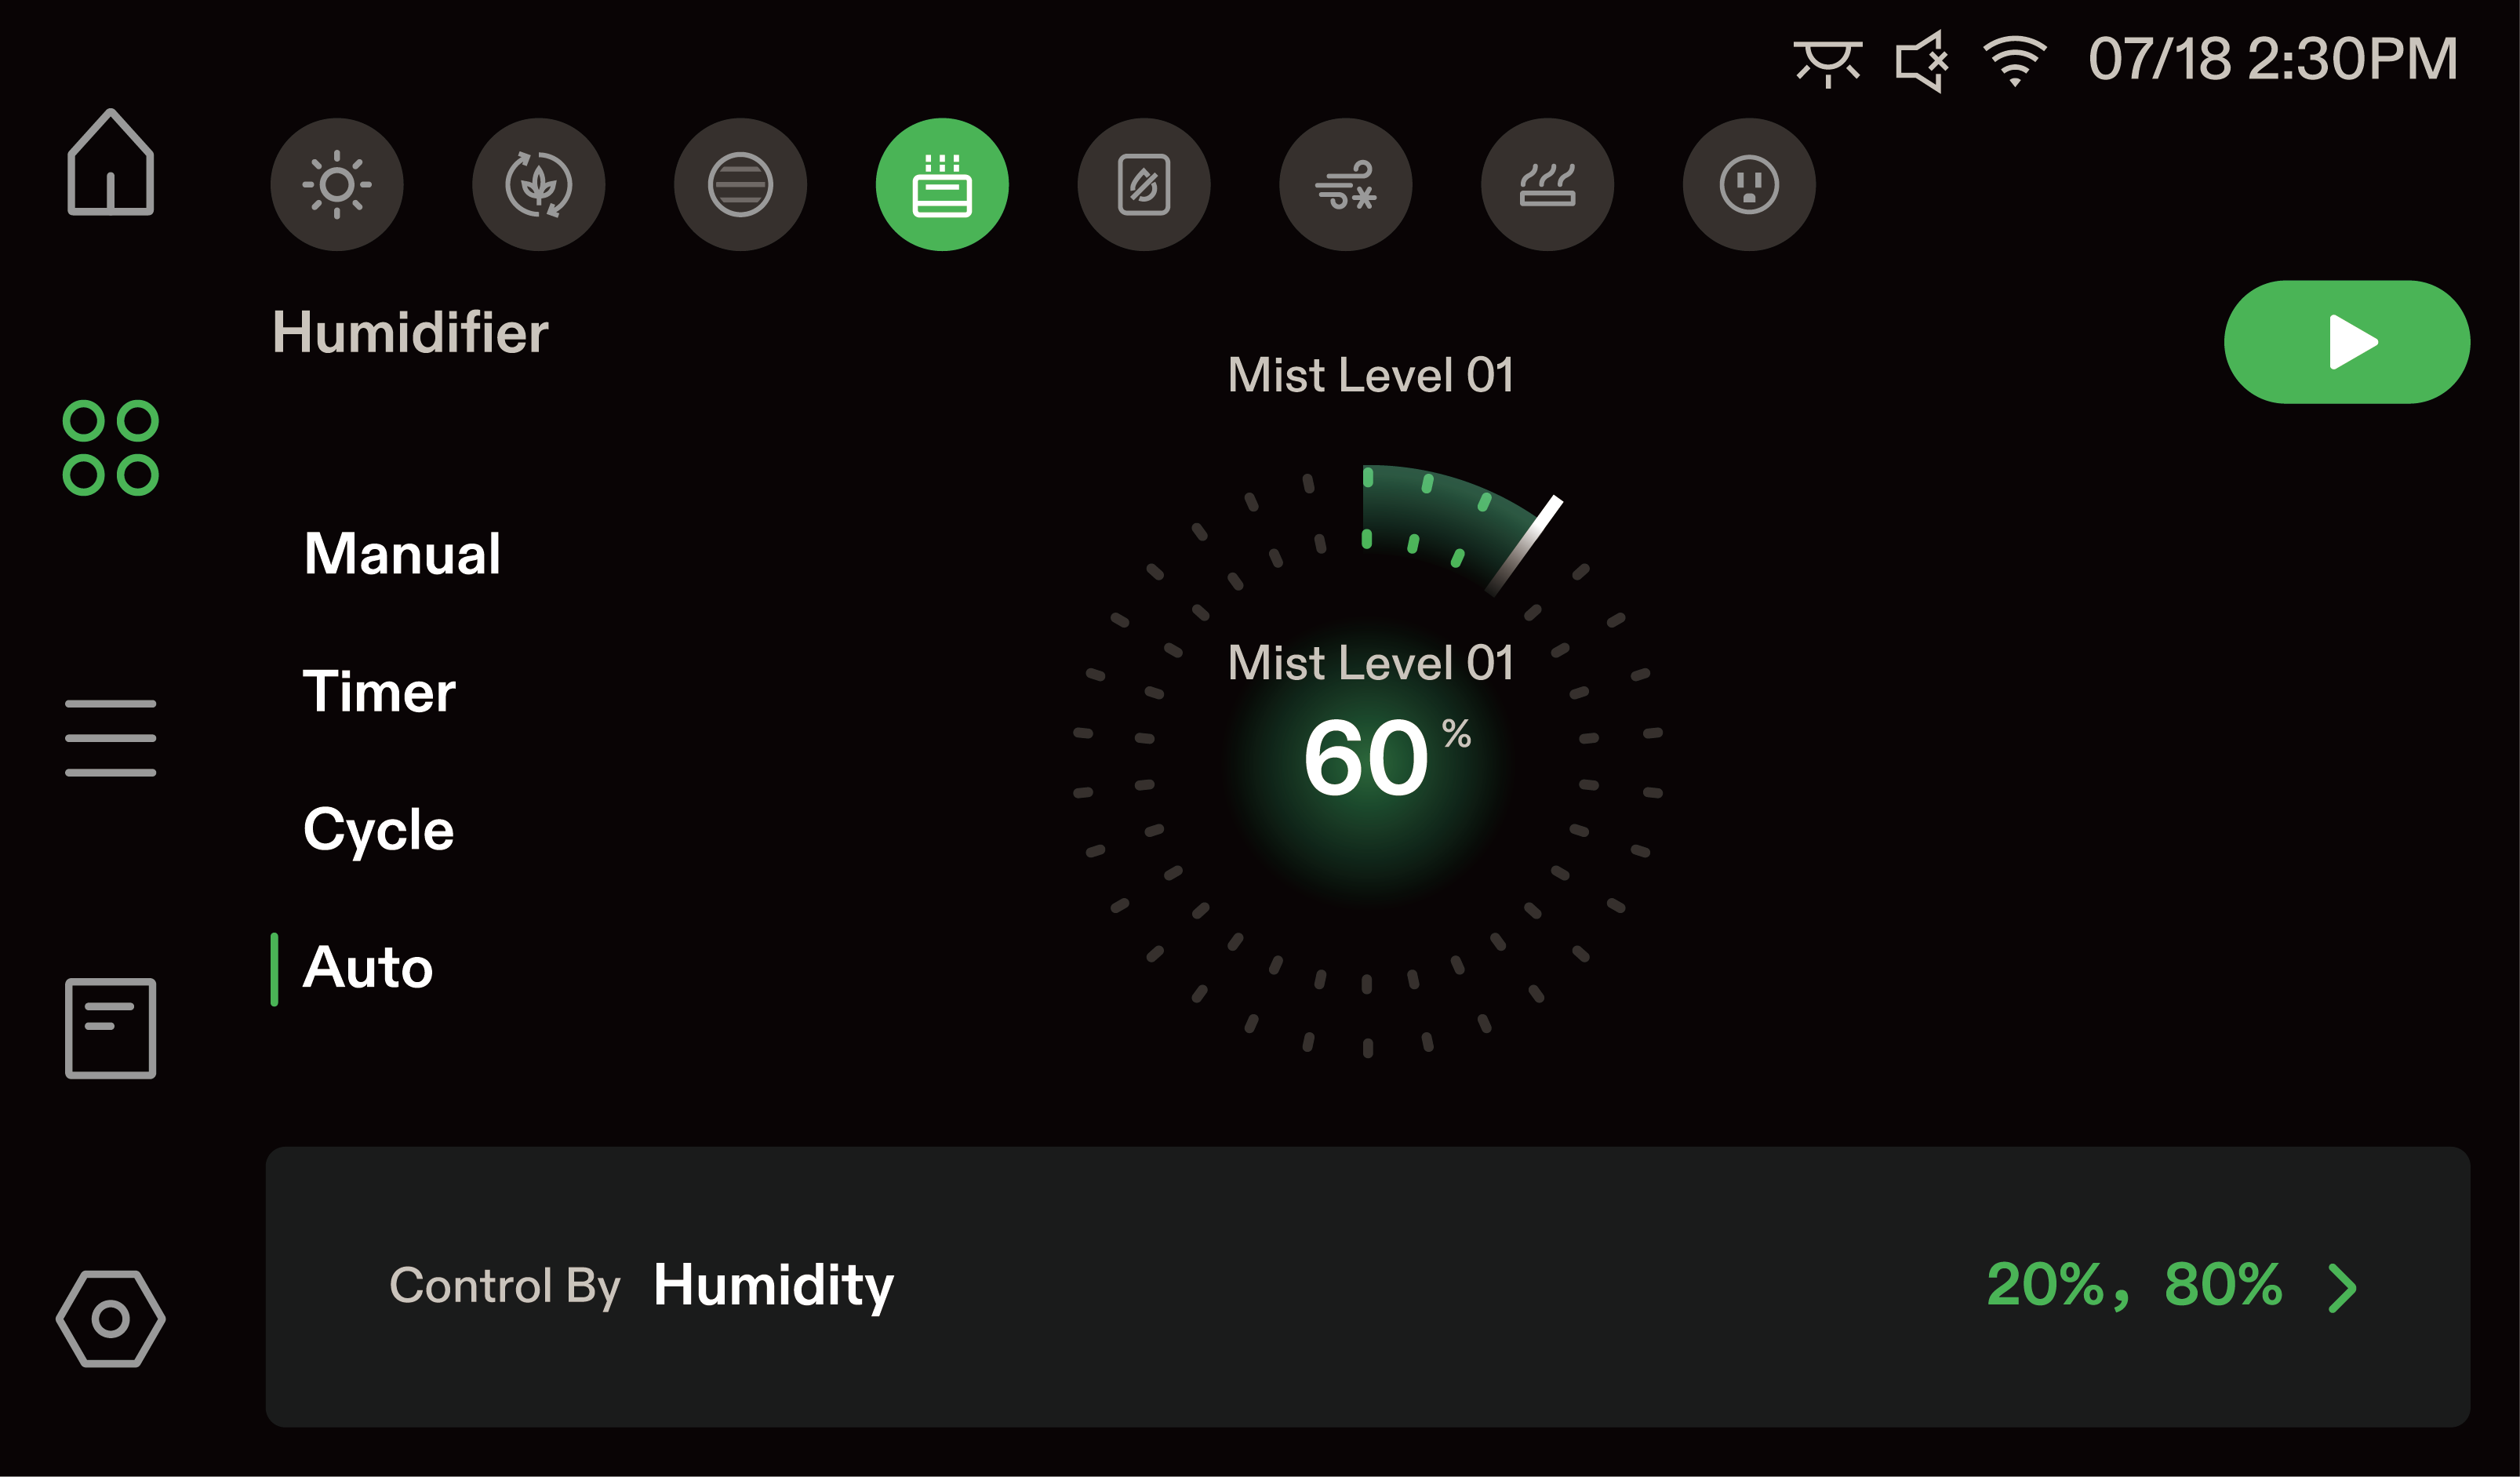
This interface allows you to control your environment’s moisture levels through continuous operation, specific timers, looping schedules, or smart environmental targeting.
1. Operating Modes
-
Manual: The humidifier runs continuously at your selected mist level until you change it or turn it off.
-
Timer: The device runs for a predefined countdown period and then automatically turns off.
-
Cycle: Runs on a continuous, repeating schedule based on precise "ON" and "OFF" durations.
-
Auto: The device automatically turns on and off to maintain a specific environmental target (e.g., target Humidity or VPD).
2. Mist Level & Current Status
-
Manual, Timer & Cycle Modes: Drag the green dial to set your desired misting intensity(Range: OFF to 5).
-
Auto Mode (Max Mist Level): The dial sets the maximum mist output the humidifier is allowed to use when actively trying to reach your target(Range: 1 to 5), preventing sudden humidity spikes.
-
Current Reading: The large central number (e.g., 68%) always displays the real-time humidity level of your environment.
3. Timer Settings (Timer Mode Only)
Tap the bottom panel to set a countdown duration (e.g., 3hr 0min). The humidifier will run at your set Mist Level until the timer reaches zero.
4. Cycle Settings (Cycle Mode Only)
Tap "Set >" at the bottom to configure your looping schedule:
-
Start Time: The specific time of day the cycle begins.
-
ON / OFF Duration: Determines how long the humidifier actively produces mist versus how long it pauses during the cycle loop (e.g., 4hr ON / 2hr OFF).
5. Auto Settings (Auto Mode Only)
Tap the bottom panel ("Control By…") to set your ideal environmental target.Choose Target VPD or Target Humidity and set the desired value (e.g., 1.2kPa). The humidifier will automatically activate when the environment is too dry and stop misting once the target is reached.
6. Start/Pause
When configuring settings in Timer, Cycle, or Auto modes, tap the green "Play" button in the top right corner to activate your selected operation. (The button turns into a Pause icon when running).
Dehumidifier Settings Page
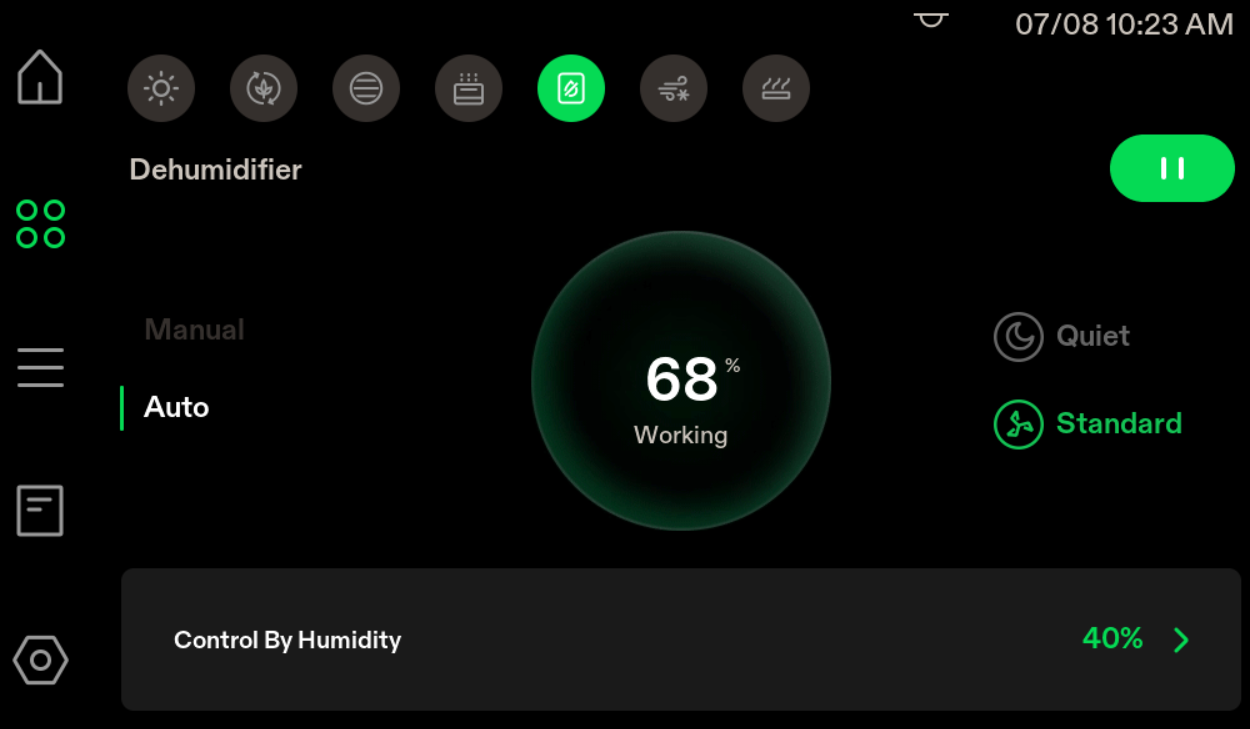
This interface allows you to remove excess moisture from your environment either continuously or through smart automated targeting.
1. Operating Modes
-
Manual: The dehumidifier runs continuously based on your power state and selected fan speed.
-
Auto: The device automatically turns on and off to maintain a specific environmental target.
2. Current Status & Fan Speed Settings
-
Current Reading: The large central number (e.g., 68%) constantly displays the real-time humidity level of your environment. The text below it indicates the current working status (ON or OFF).
-
Fan Speed Selection: Tap the options on the right side of the screen to set the operating intensity:
a) Quiet: Lower fan speed for reduced noise operation.
b) Standard: Higher fan speed for maximum moisture removal efficiency.
3. Auto Settings (Auto Mode Only)
Tap the bottom panel ("Control By…") to set your ideal environmental target. Choose Target Humidity or Target VPD and set the desired value (e.g., 40%). The dehumidifier will automatically activate when the environment is too humid and stop running once the target is reached.
4. Power & Activation
-
Manual Mode: In Manual mode, tap the green Power button in the top right corner to instantly turn the device ON or OFF.
-
Auto Mode: When compiling your target in Auto mode, tap the green "Play" button in the top right corner to activate the smart automation.
Air Conditioner Settings Page
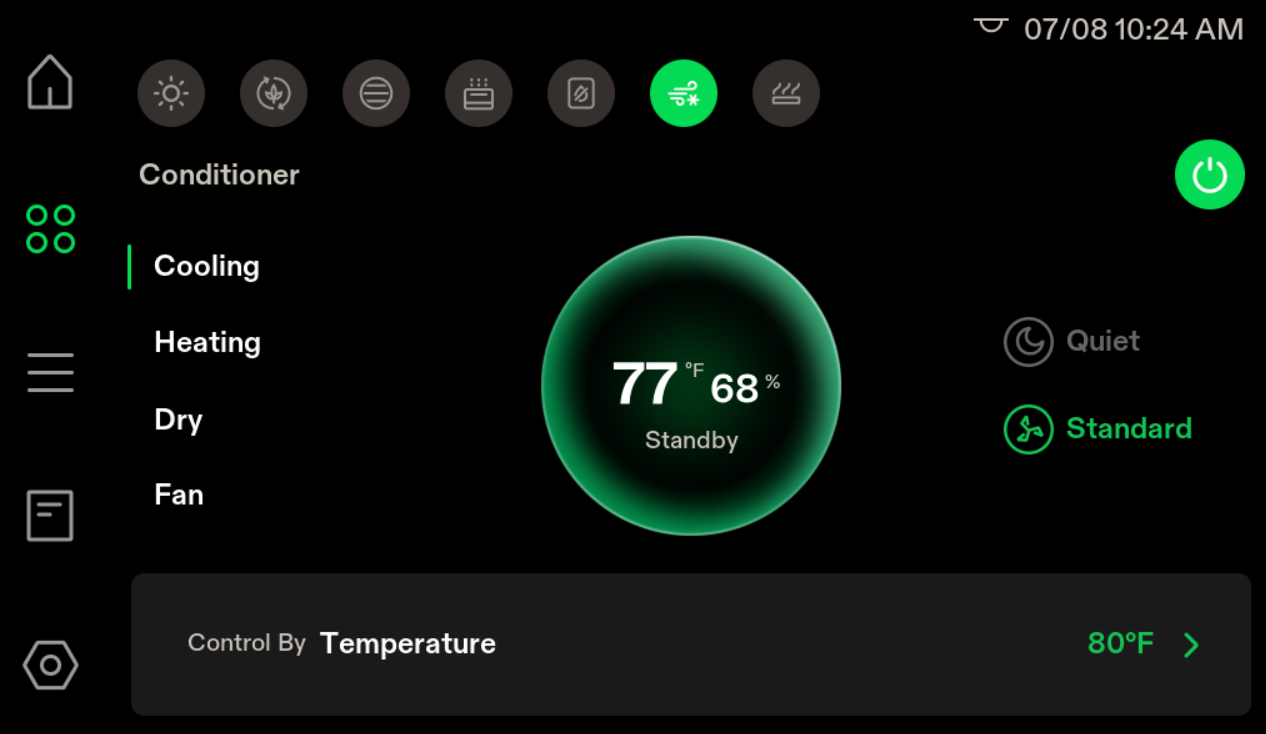
This interface allows you to comprehensively manage the climate of your environment through temperature and humidity control.
1. Operating Modes
Select your desired operation from the left menu:
-
Cooling: Lowers the room temperature to your specific target.
-
Heating: Raises the room temperature to your specific target.
-
Dry: Removes excess moisture to reach your target humidity.
-
Fan: Circulates air continuously without targeting temperature or humidity.
2. Current Status & Fan Speed Settings
-
Current Reading: The large central numbers display both the real-time temperature (e.g., 77°F) and humidity (e.g., 68%). The text below indicates if the unit is actively Working or in Standby (target achieved).
-
Fan Speed Selection: Tap the options on the right side to set the operating intensity:
-Quiet: Lower fan speed for reduced noise operation.
-Standard: Higher fan speed for maximum efficiency.
3. Target Settings (Cooling, Heating & Dry Modes)
Tap the bottom panel ("Control By…") to set your ideal environmental target. Drag the slider to set your desired value (e.g., Target Temperature at 80°F or Target Humidity at 50%). The air conditioner will automatically activate when the environment deviates from your setting and enter Standby mode once the target is reached.
4. Power Controls
Tap the green Power button in the top right corner to instantly turn the device ON or OFF across all operating modes.
Heater Settings Page
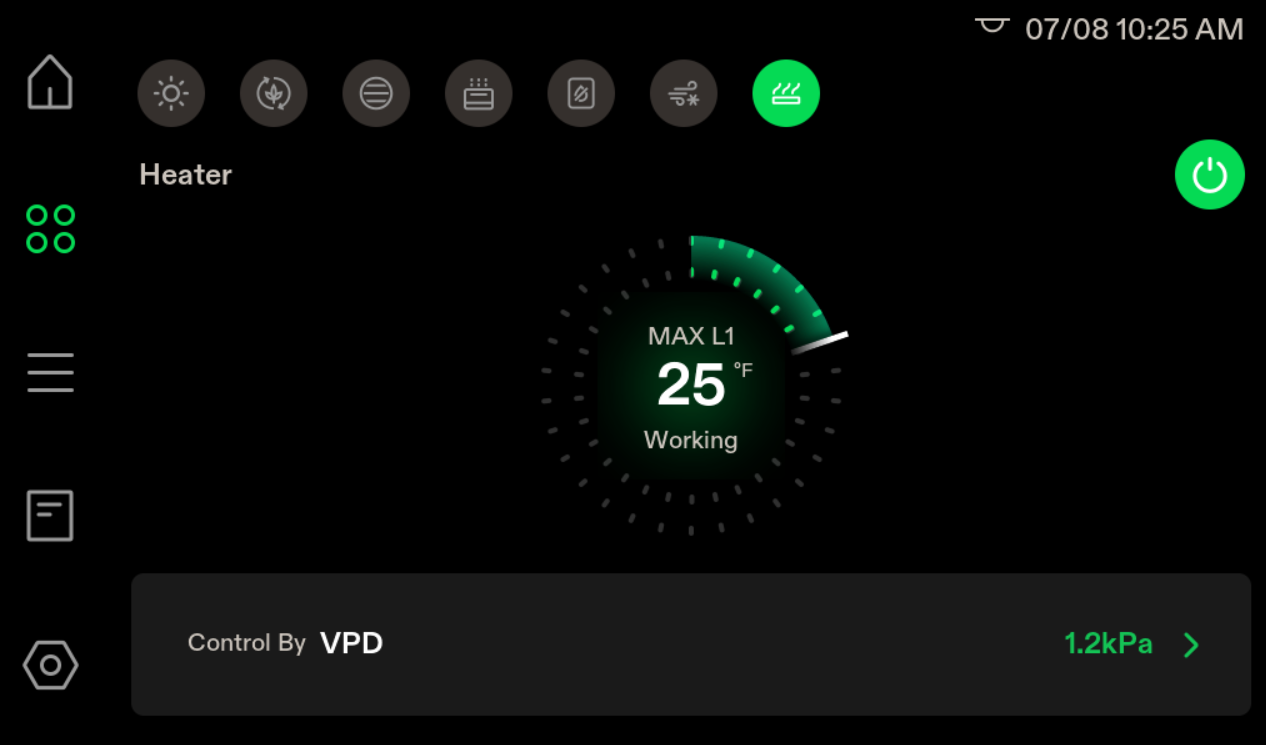
This interface allows you to add warmth to your environment to maintain ideal temperature or VPD conditions.
1. Current Status & Heat Level
-
Current Reading: The large central number displays the real-time temperature of your environment. The text below it indicates if the unit is actively Working (heating) or in standby.
-
Power Level Limit: The dashed green ring around the central dial displays your active heating limit. By dragging the marker along the ring, you can set the maximum heat output intensity from MAX L1 to MAX L5. This determines how much power the device is allowed to use to reach your target.
2. Target Settings: Tap the bottom panel("Control By…") to open the detailed target setup menu. Use the top tabs to choose your preferred control metric:
-
Target Temperature: Drag the slider to set a straightforward heat target (e.g., 77°F). The heater will automatically activate when the environment is colder than this value and stop once the target is reached.
-
Target VPD: Drag the top slider to set your desired VPD value (e.g., 1.2kPa). In this mode, you must also define a safety Temperature Range(e.g., Min 66°F to Max 85°F). The heater operates based on these three zones:
-Below Min Temp: The heater runs continuously to quickly raise the temperature into the active range.
-Within Range (Min to Max): True VPD control zone. The heater intelligently modulates to reach and accurately maintain your Target VPD.
-Above Max Temp: The heater automatically stops working entirely, regardless of the current VPD level, to prevent accidental overheating.
3. Power Controls
Tap the green Power button in the top right corner to instantly turn the device ON or OFF.
Auto Mode
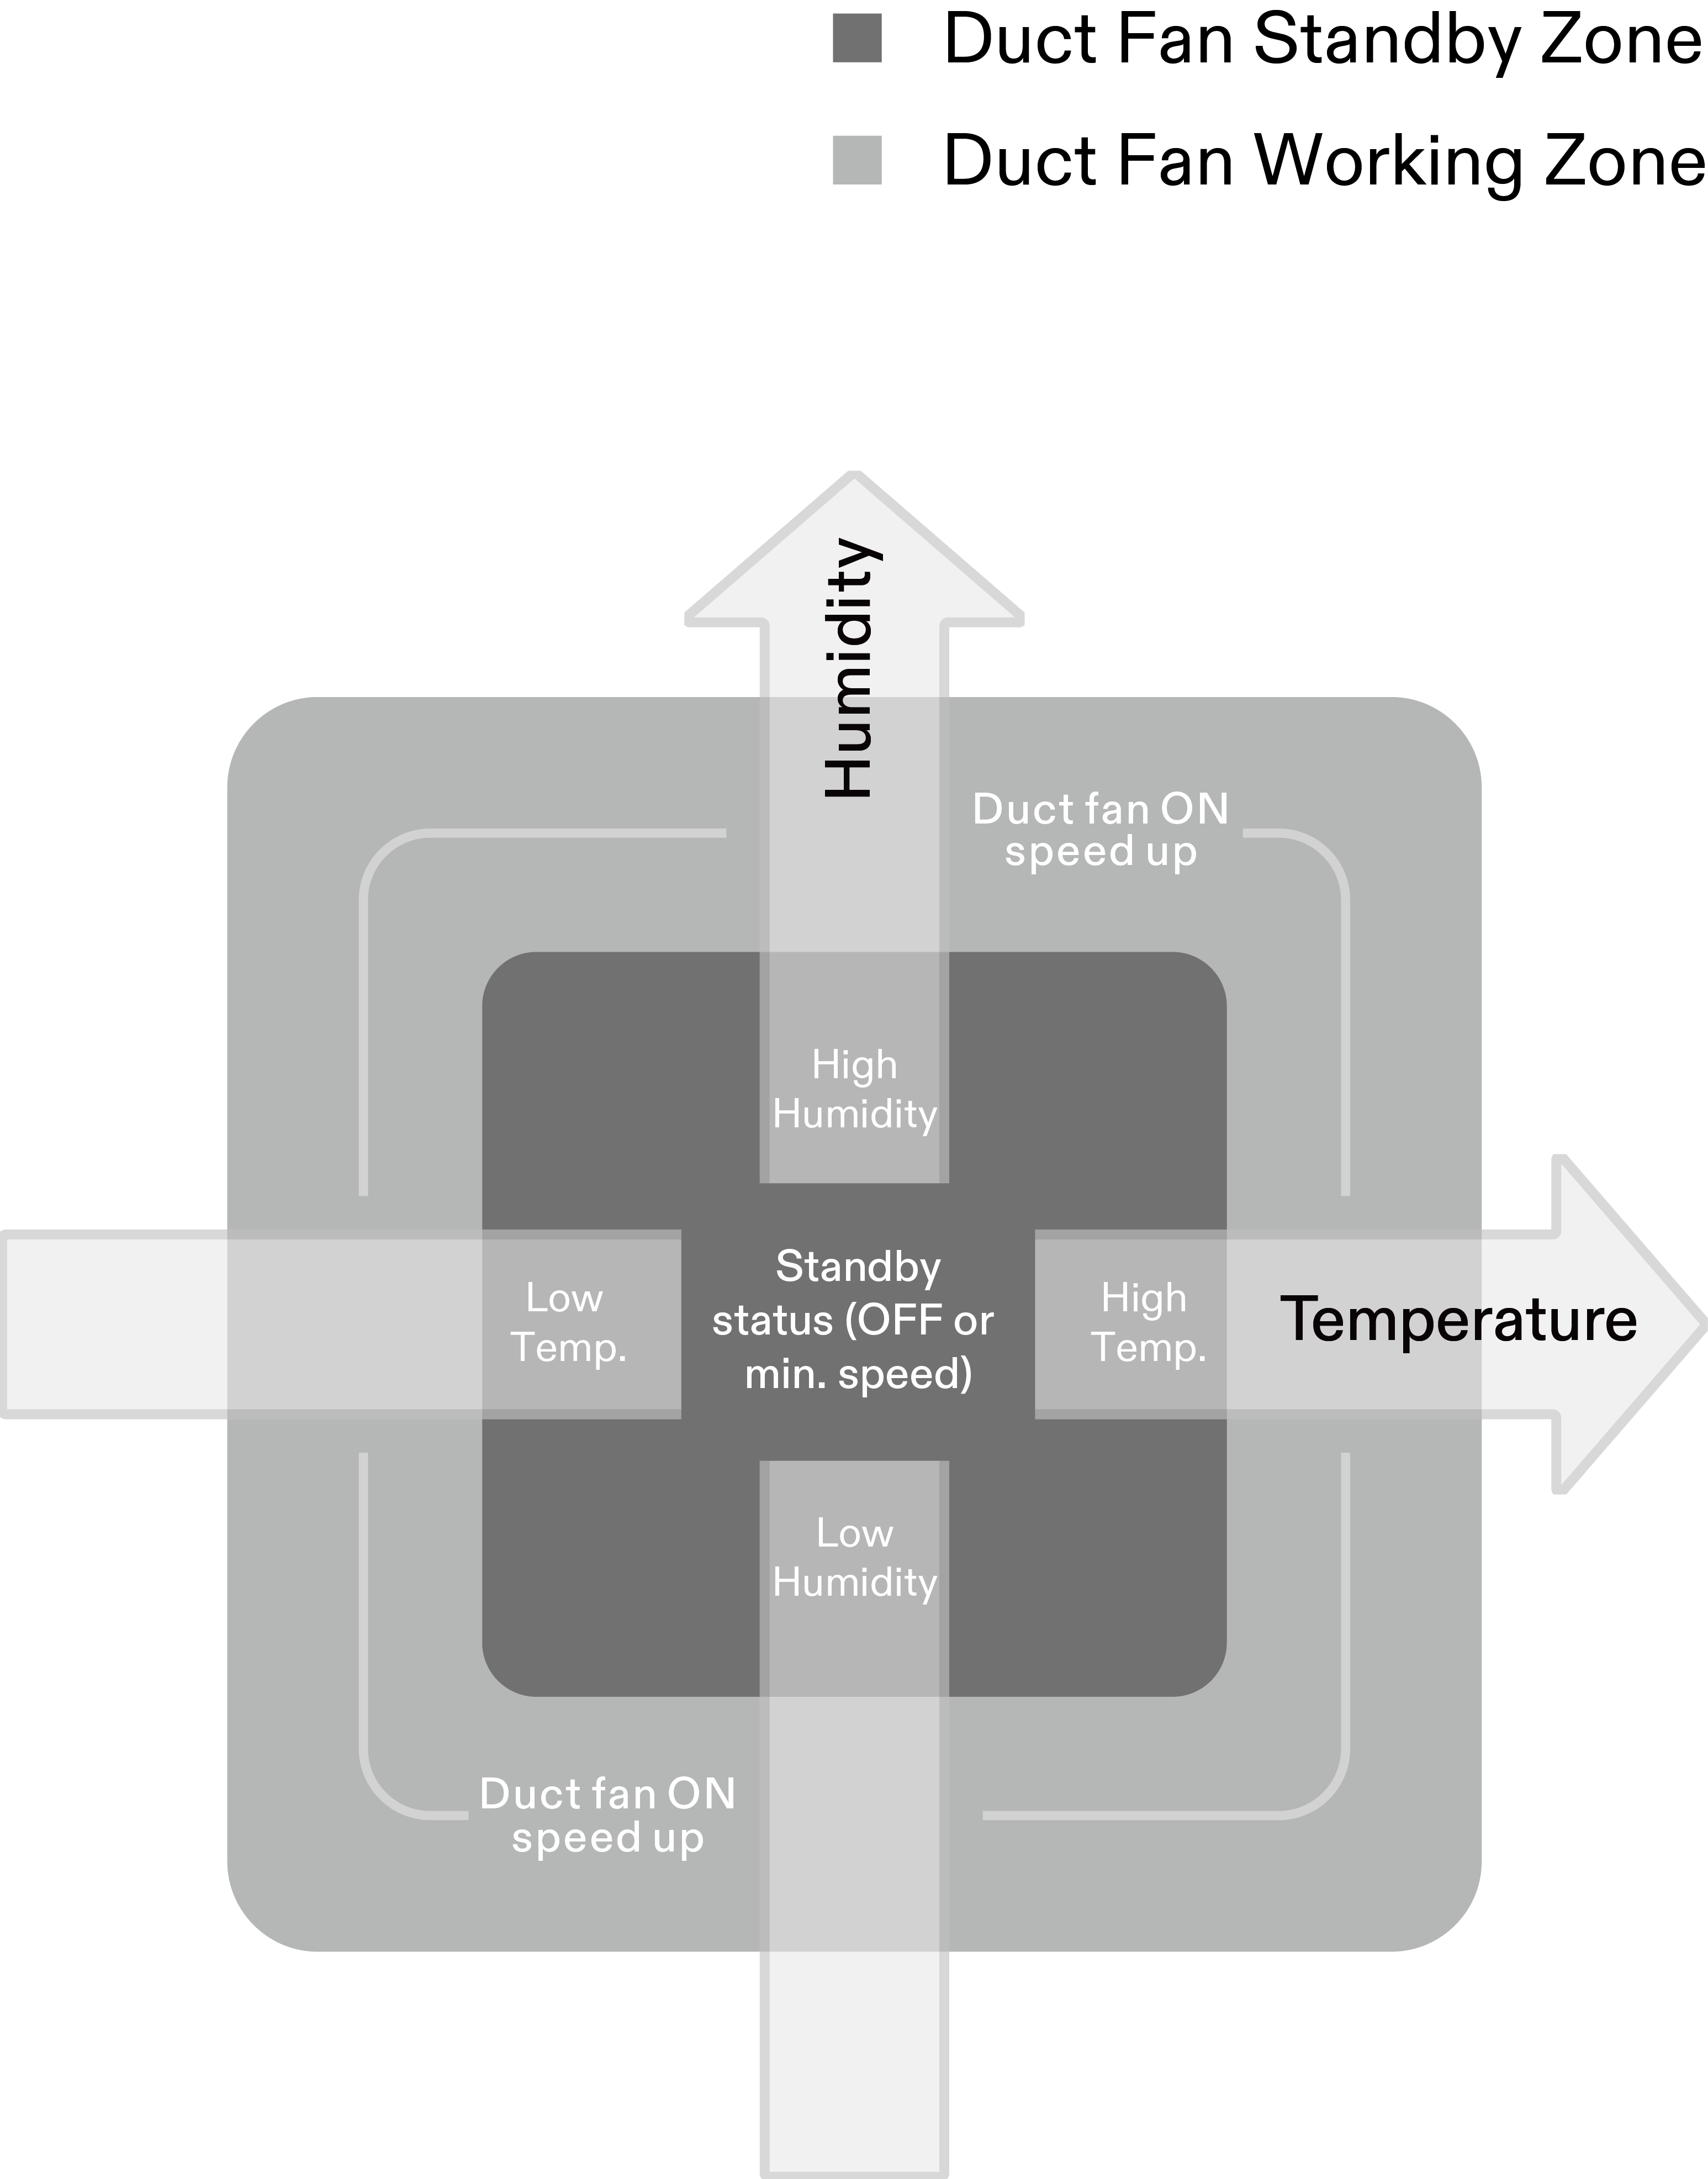
Settings for the thresholds between the duct fan’s standby and active zones can be adjusted using the GrowHub Controller or the Vivosun App. In the Vivosun App, you can also set the duct fan’s behavior during standby mode, choosing either to keep it OFF or run it at a minimum speed. When temperature or humidity reaches a specified threshold, the duct fan will turn ON or increase its speed. The further the environment deviates from the threshold, the higher the fan speed will become.
The inside temperature or humidity reading will flash if the values rise above or drop below the set levels.
The alarm icon will flash if the inside temperature or humidity exceeds the set range or if the duct fan remains in working mode for more than 1 hour.
Auto Mode —Temperature example

Duct Fan Standby Zone Standby status (OFF or min. speed)

Duct Fan Working Zone (Duct fan ON / speed up)
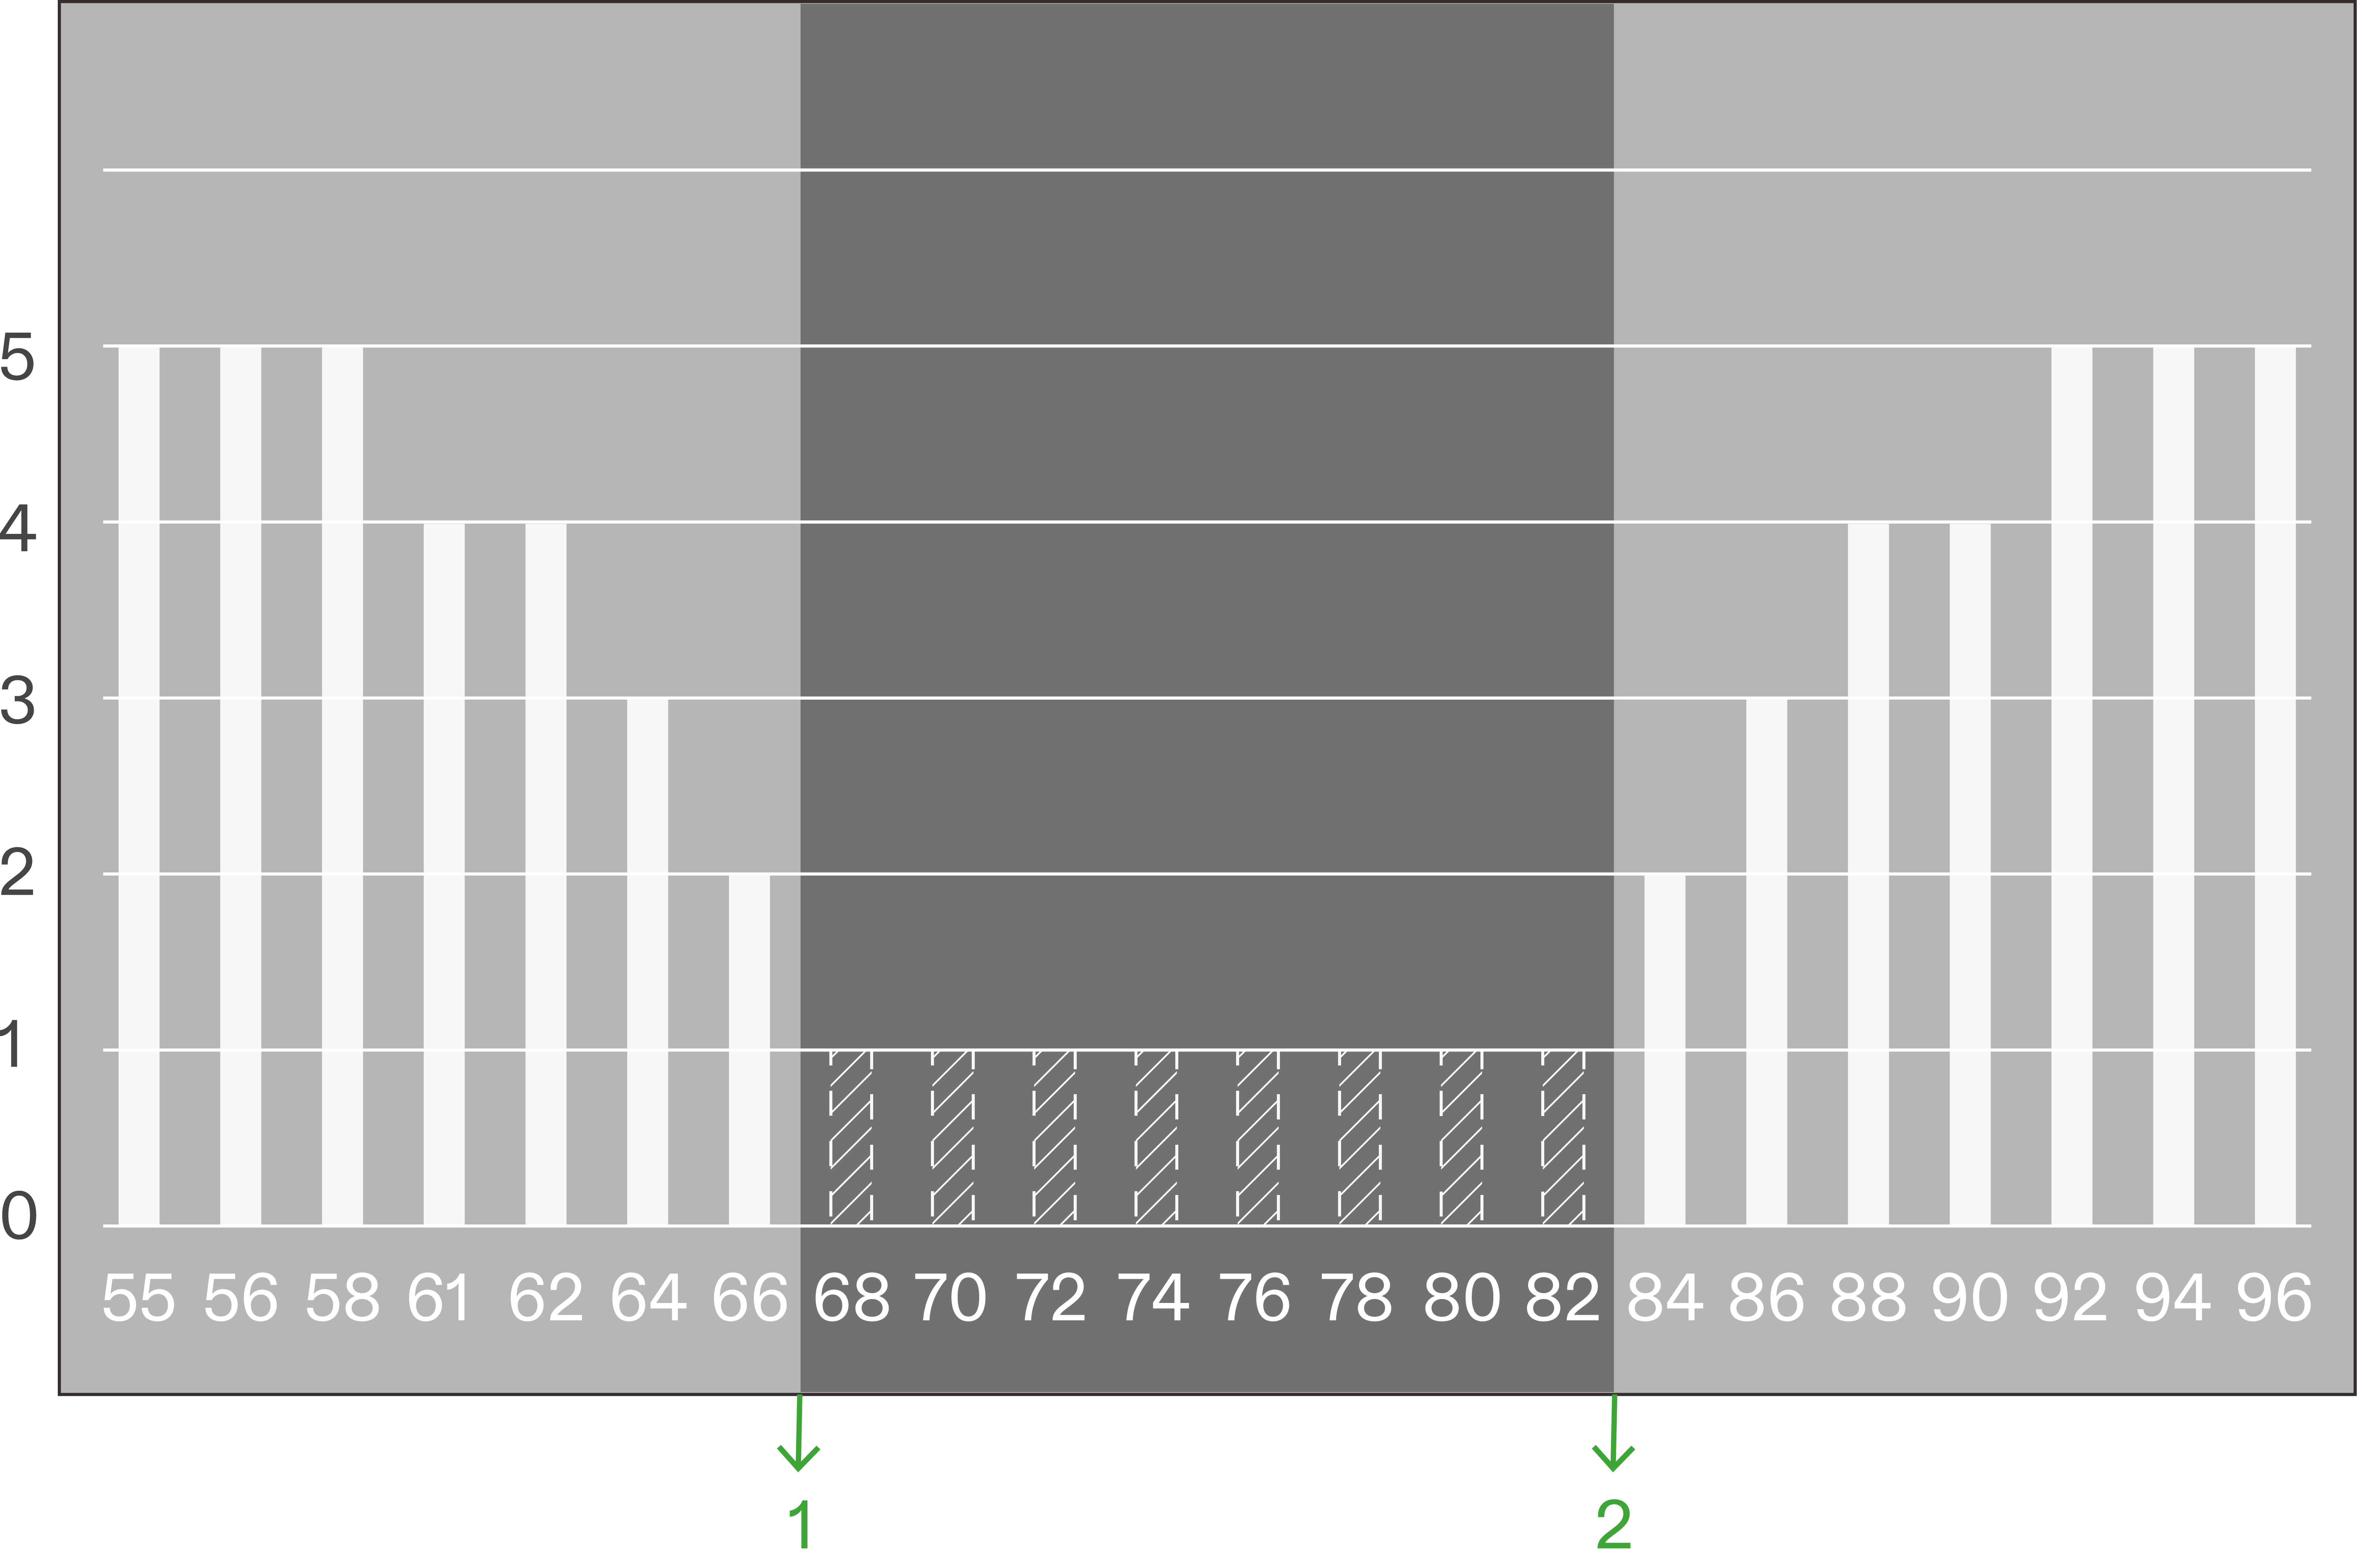
*The horizontal axis represents Temperature (°F)
① Low Temp. Trigger
② High Temp. Trigger
The example above shows the duct fan operating in Auto Mode (Max Speed = 5, Standby Speed = 1) in response to changes in inside temperature. When the temperature reaches a set threshold, the duct fan will turn on or increase its speed. The further the temperature exceeds the threshold, the higher the fan speed will become.
Auto Mode—Humidity example
Duct Fan Standby Zone Standby status (OFF or min. speed)
Duct Fan Working Zone (Duct fan ON / speed up)
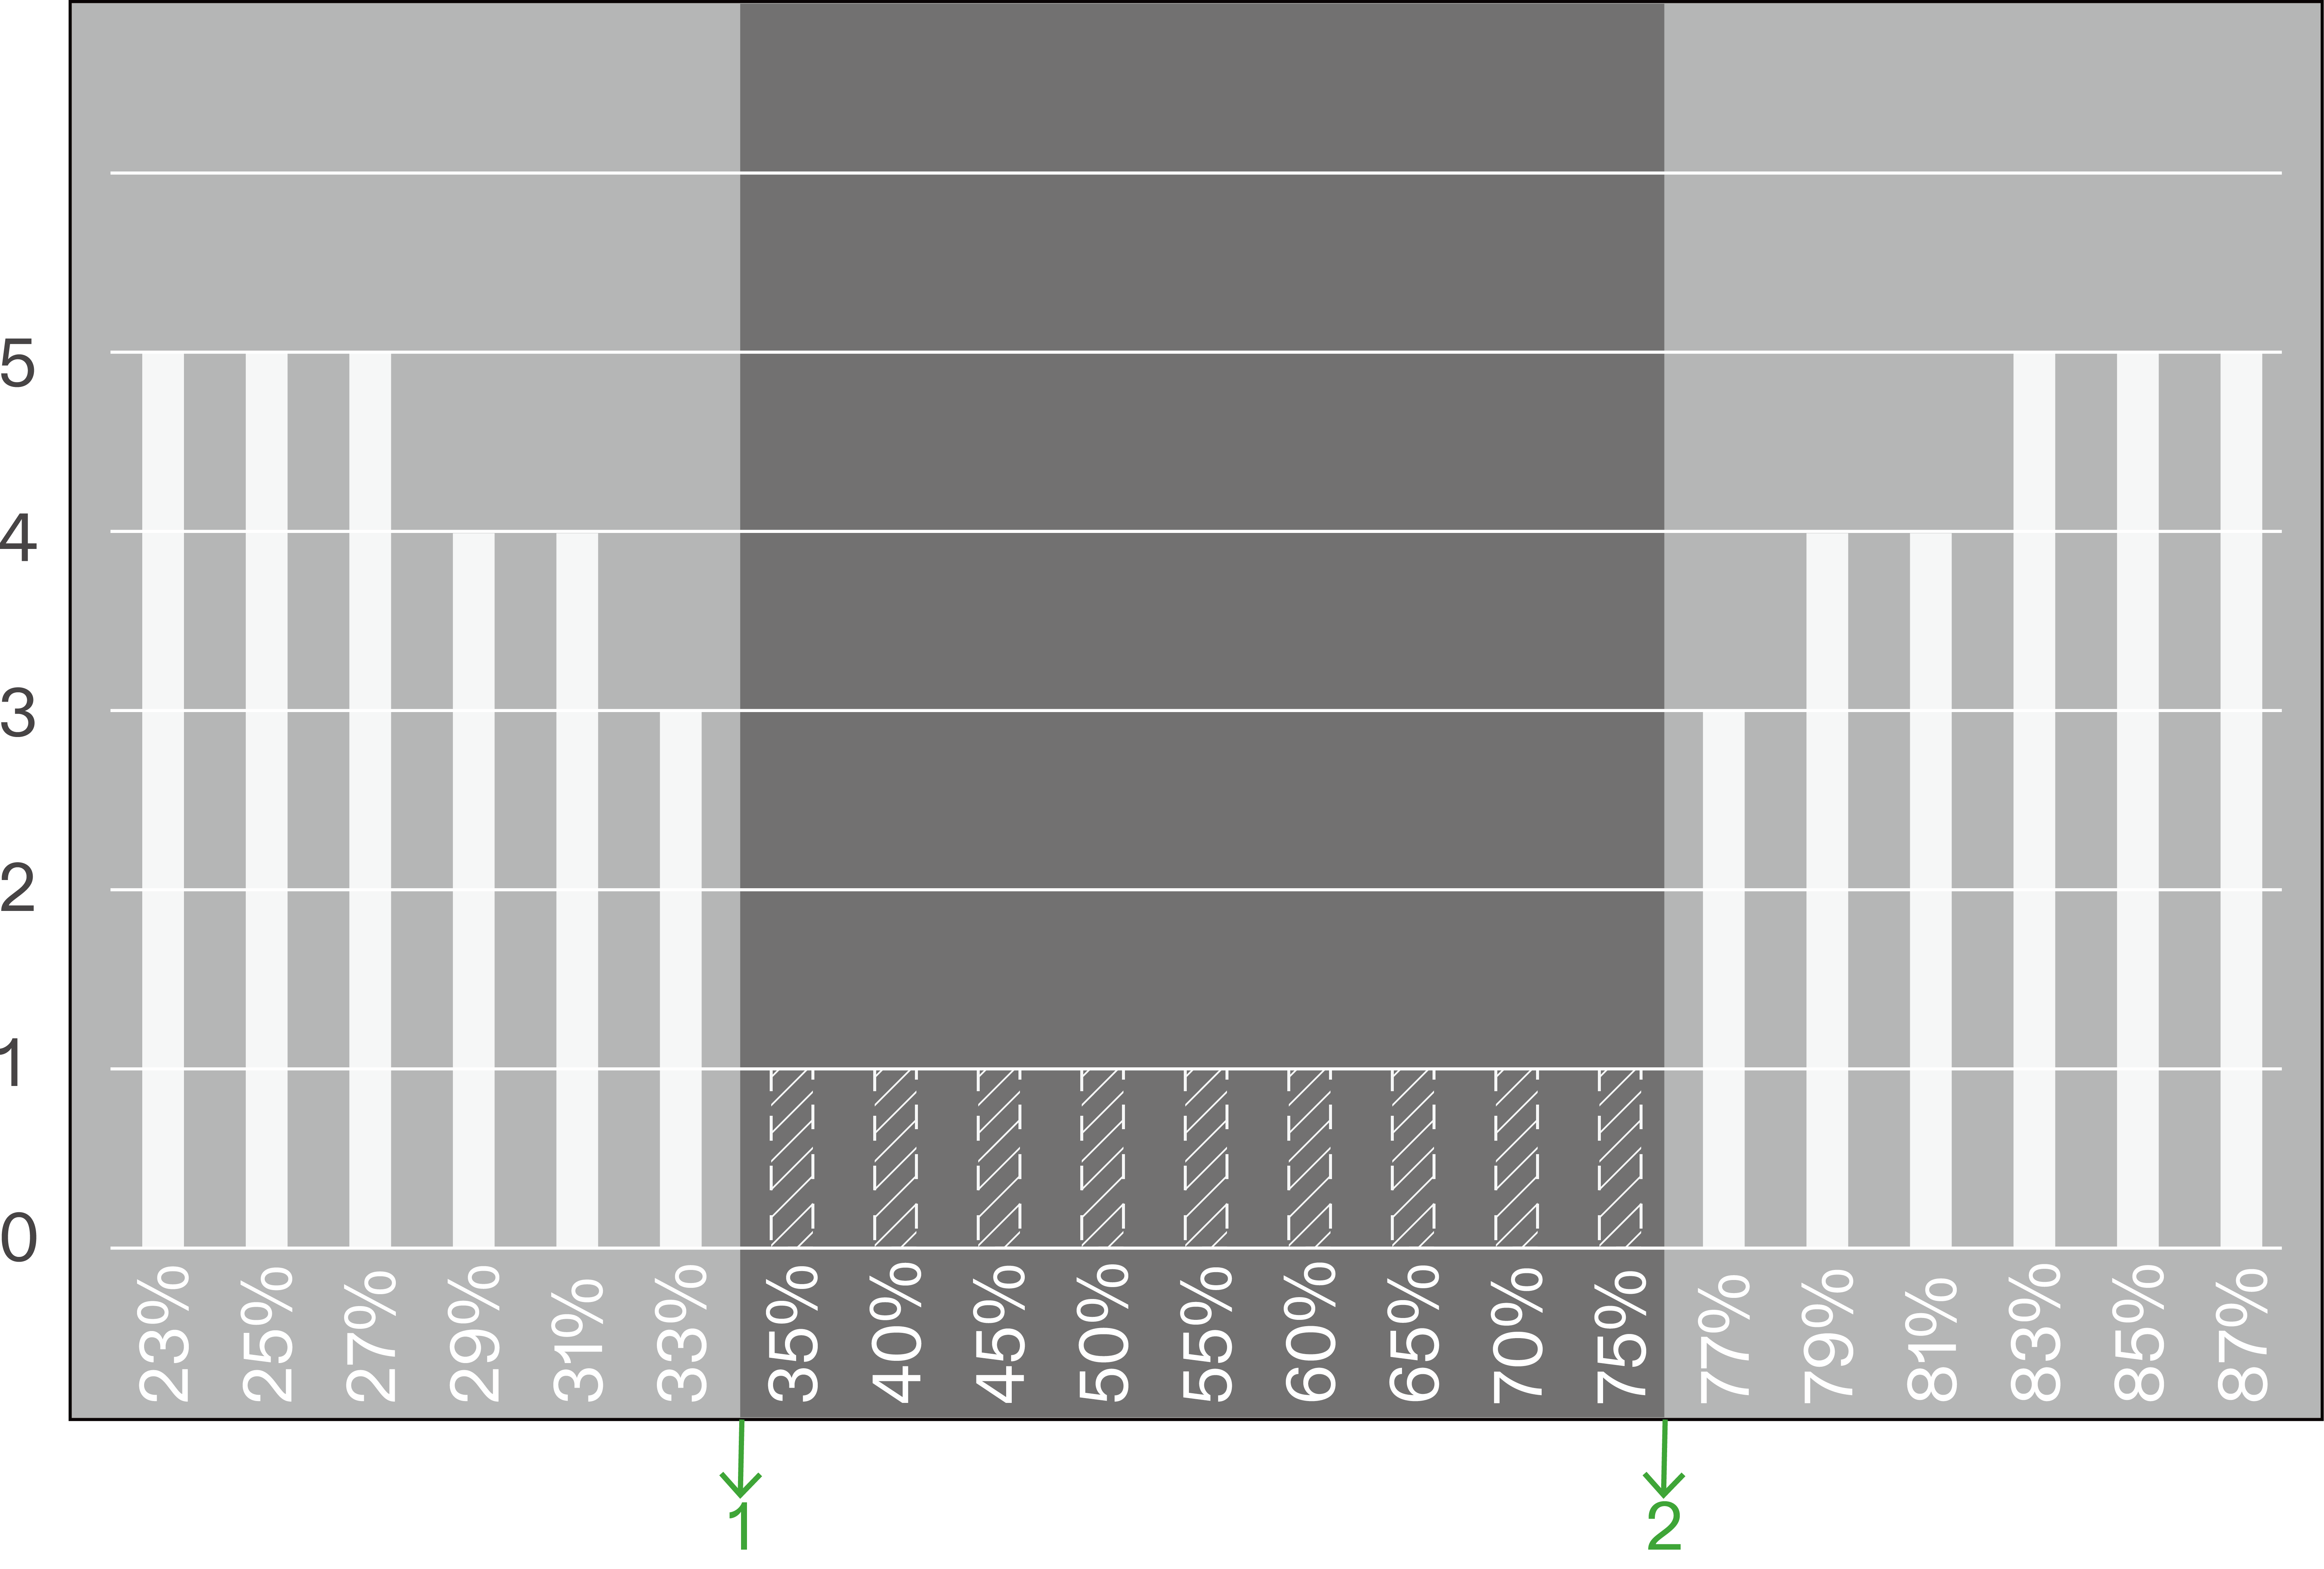
*The horizontal axis represents Humidity (RH)
① Low RH Trigger
② High RH Trigger
The example above shows the duct fan operating in Auto Mode (Max Speed = 5, Standby Speed = 1) in response to changes in inside humidity. When the humidity reaches a set threshold, the duct fan will turn on or increase its speed. The further the humidity exceeds the threshold, the higher the fan speed will become.
Auto Mode—VPD example
Duct Fan Standby Zone Standby status (OFF or min. speed)
Duct Fan Working Zone (Duct fan ON / speed up)
*The horizontal axis represents VPD(kPa)
① Low VPD Trigger
② High VPD Trigger
The example above shows the duct fan operating in Auto Mode (High VPD = 1.0, Low VPD = 0.5, Max Speed = 5, Standby Speed = 1) in response to changes in inside temperature. When the temperature reaches a set threshold, the duct fan will turn on or increase its speed. The further the temperature exceeds the threshold, the higher the fan speed will become.
Note: For precise VPD control, use HVAC devices (AeroLush Air Conditioner, AeroStream Humidifier, AeroDrain Dehumidifier, AeroFlux Heater) together with the system. The duct fan alone can only help regulate VPD by exchanging air between the grow tent and the external environment to adjust temperature and humidity.
Advanced Auto Mode
Use the Vivosun app to switch the duct fan to Advanced Auto Mode, where the system also considers the temperature and humidity outside your grow space when controlling the fan. In this mode, you can set minimum and maximum temperature and humidity thresholds. If the outside conditions are worse than inside, the duct fan will not increase speed—even if the internal temperature or humidity exceeds your set range. The alarm icon will flash to notify you that the external environment is unsuitable.
To enable Advanced Auto Mode, go to the Vivosun app: Settings > Additional Settings > Duct Fan Auto Trigger Mode.
WARRANTY
VIVOSUN offers a 2-year limited warranty on this product purchased directly from us or our authorized dealers, beginning on the original date of purchase.
This warranty is provided in addition to, and does not affect, your statutory rights under applicable consumer protection laws in the country where the product was purchased.
For the full Warranty Policy, please visit: https://www.vivosun.com/help/warranty-policy
Alternatively, you may contact customer service at support@vivosun.com /+1 888-505-8486.
FCC ID STATEMENT
This device complies with part 15 of the FCC Rules. Operation is subject to the following two conditions:
(1) This device may not cause harmful interference, and (2) this device must accept any interference received, including interference that may cause undesired operation.
NOTE: This equipment has been tested and found to comply with the limits for a Class B digital device, pursuant to part 15 of the FCC Rules. These limits are designed to provide reasonable protection against harmful interference in a residential installation. This equipment generates, uses and can radiate radio frequency energy and, if not installed and used in accordance with the instructions, may cause harmful interference to radio communications. However, there is no guarantee that interference will not occur in a particular installation. If this equipment does cause harmful interference to radio or television reception, which can be determined by turning the equipment off and on, the user is encouraged to try to correct the interference by one or more of the following measures:
-
Reorient or relocate the receiving antenna.
-
Increase the separation between the equipment and receiver.
-
Connect the equipment into an outlet on a circuit different from that to which the receiver is connected.
-
Consult the dealer or an experienced radio/TV technician for help.
Warning: Changes or modifications not expressly approved by the party responsible for compliance could void the user’s authority to operate the equipment.
IC STATEMENT
This device contains licence-exempt transmitter(s)/receiver(s) that comply with Innovation, Science and Economic Development Canada’s licence-exempt RSS(s). Operation is subject to the following two conditions:
-
This device may not cause interference.
-
This device must accept any interference, including interference that may cause undesired operation of the device.
The distance between user and device should be no less than 20cm.
CE STATEMENT
We declare that this device is in compliance with the essential repuirements and other relevant provisions of Directive 2014/53/EU.

Product |
Model |
SKU |
GrowHub AI Controller X42 |
GrowHub AI X42 |
VSE-GHX42 |
Wi-Fi: Operation Frequency: 2412 MHz~2484 MHz
Maximum Power: 20.5 dBm(E.I.R.P.)
Operating temperature: 0 °C to +50 °C
Address of Manufacturer: VIVOSUN INC, 2050 S LYNX AVE ONTARIO, CA 91761-8010
Contents

We help you grow your best green.

We provide the highest quality.

We relentlessly pursue the future.

We make growing more enjoyable.

We support every grower.
Sign up and get 8% off your first order
©2026 Vivosun All Rights Reserved